

Mobile App
WorkHarmony Mobile App
The employee app from first launch to daily use: connecting to the company, creating an account, Complete Mode and Simple Mode, settings and troubleshooting. Use it to support employees.
1. Introduction
The WorkHarmony mobile app is your own self-service workplace on your phone. With it you can:
- clock in and out, and see your attendance for every day of the pay period
- see your leave balances and apply for leave
- request overtime, report a missed clocking, ask for a late exemption, request a duty change, an HR letter or a benefit
- follow every request until it is decided
- read your payslips, documents, company announcements and notifications
- approve requests, if you are a manager
This guide walks you through the app from the very first time you open it: connecting to your company, creating your account and signing in. It then explains every part of the app in both of its layouts.
1.1 Two ways to use the app
The app has two layouts. Both use the same account, show the same information and follow the same company rules. They only differ in how much they show on each screen.
| Complete Mode | Simple Mode | |
|---|---|---|
| Who it suits | Everyone who wants every summary, list and tool | Anyone who mainly clocks in and out and makes the odd request |
| Bottom tabs | Home, Attendance, Leave, Tasks (or Directory), More | Home, Attendance, Requests, More |
| Clocking in and out | Home and the Attendance tab | Home and the Attendance tab, with larger buttons |
| Attendance | Whole pay period with tallies and filters | Today, the last few days and a week-by-week history |
| Requests | A request hub plus a list for each type | One Requests tab with every type and one "My requests" list |
You choose the layout the first time you sign in, and you can change it at any time in Settings (see section 6.1). Chapter 4 explains Complete Mode and chapter 5 explains Simple Mode.
1.2 What you need
- A smartphone with iPhone (iOS) or Android, connected to the internet.
- Your company's QR code, company code or the link from the welcome email. Your HR team gives you these.
- Your employee code. It is on your badge or payslip, or ask HR.
- The mobile number that HR has on your employee record. The app sends a verification code to it when you create your account.
Note: The screenshots in this guide were taken in the company "Test Company" with the employee code ML001. Your screens show your own company, name and data.
2. Getting started
2.1 Install the app
Search for WorkHarmony in the App Store (iPhone) or Google Play (Android) and install it. When you open it for the first time you see a short welcome tour.
2.2 The welcome screens
The welcome tour has five screens that introduce what the app can do. Swipe left to move to the next one. The dots near the bottom show where you are.
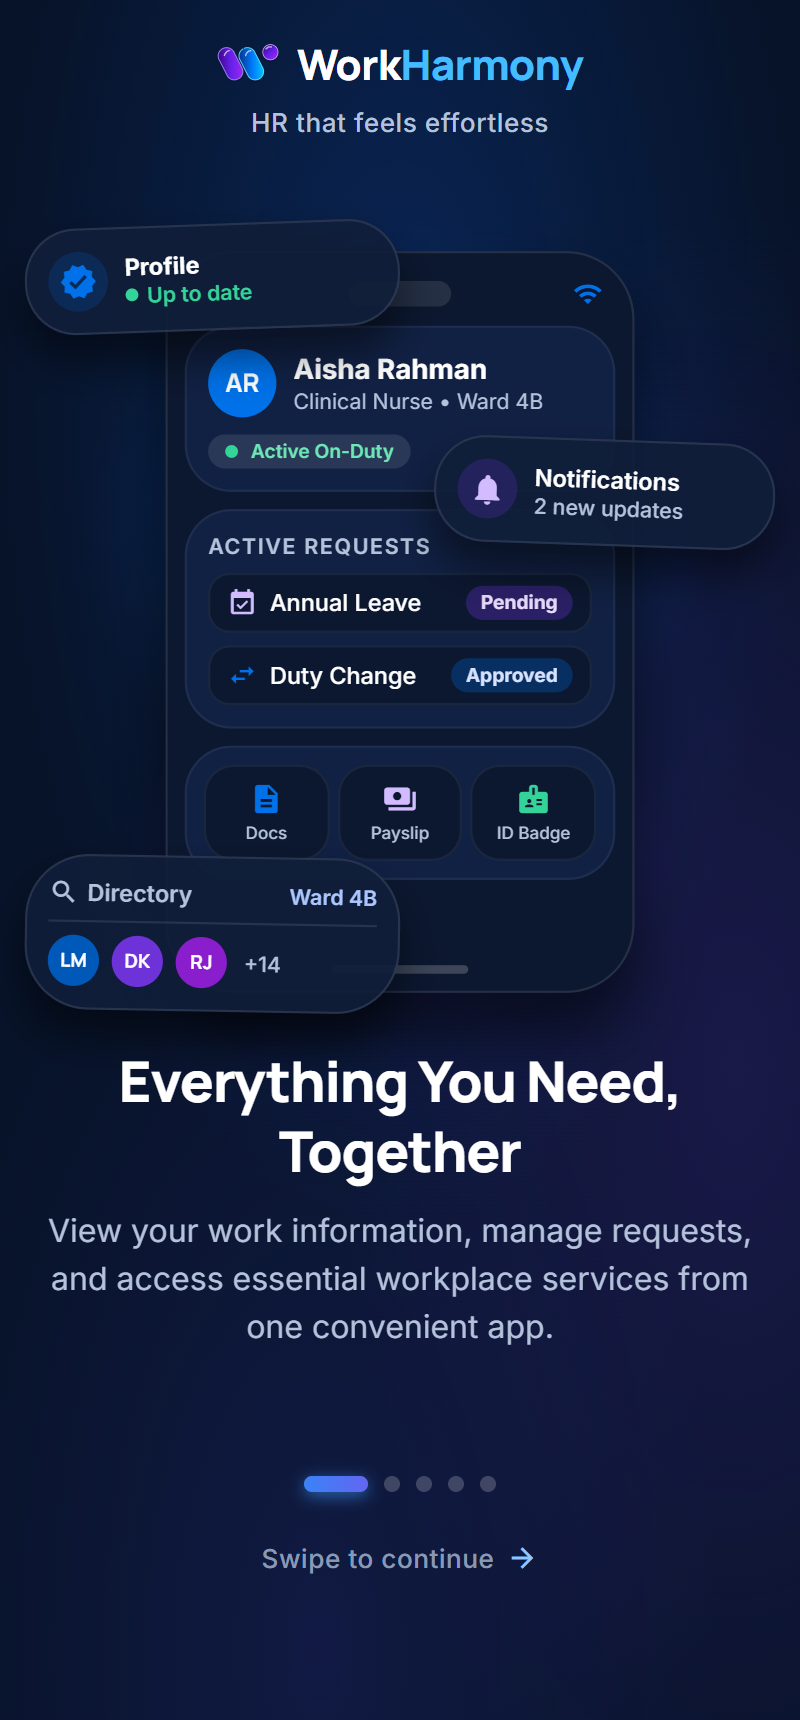
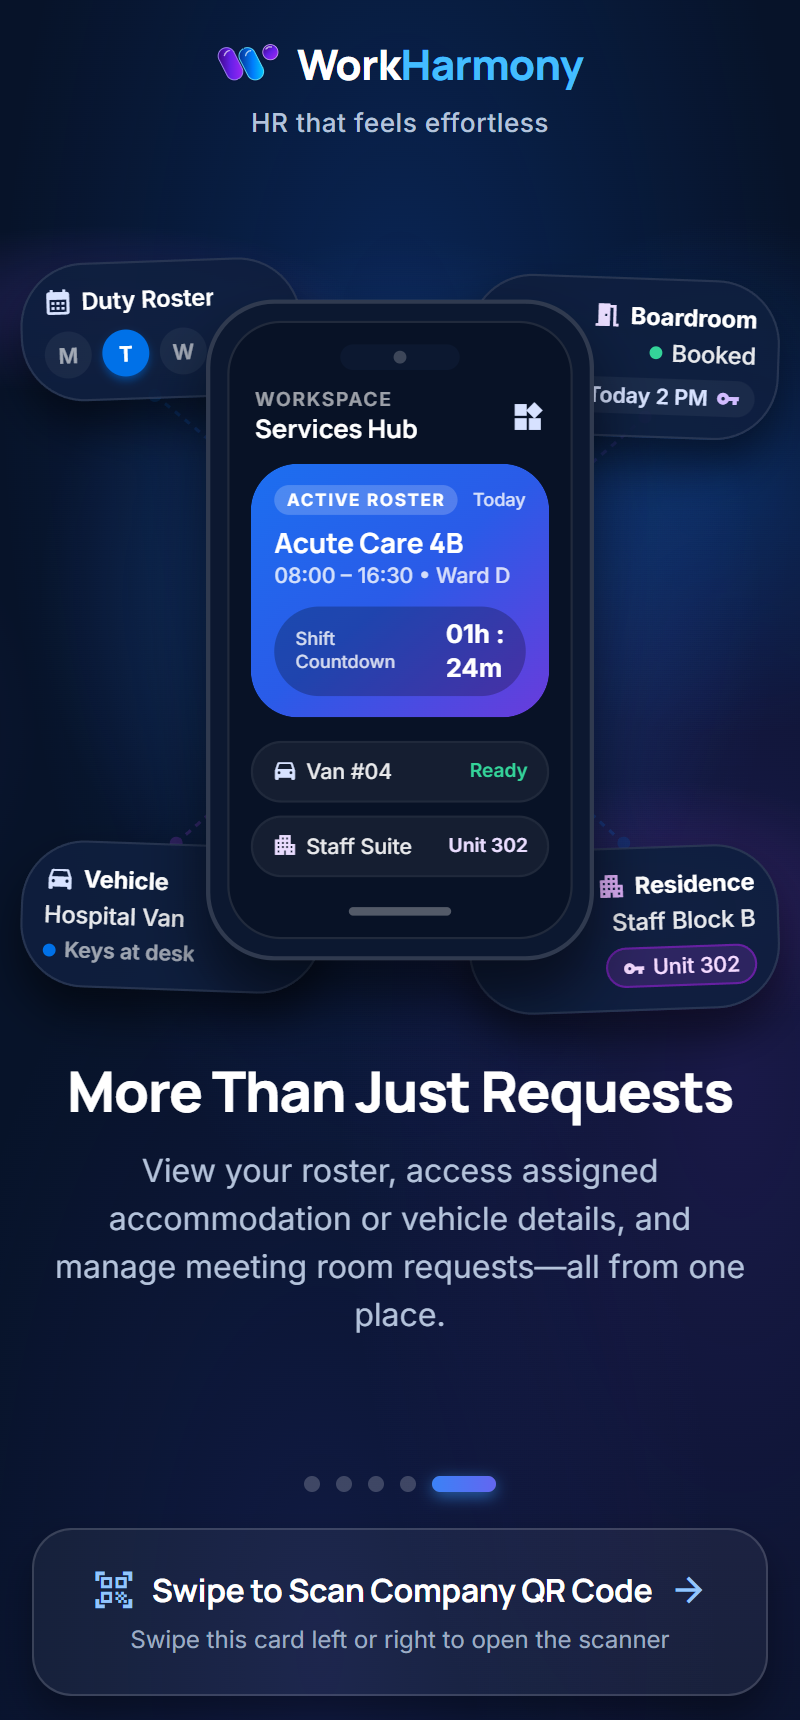
On the last screen, swipe the Swipe to Scan Company QR Code card to the side (or tap it) to connect the app to your company.
2.3 Connect the app to your company
Before you can create an account, the app must know which company you work for. There are four ways to do this. You only need one of them.
Option 1: Scan the company QR code
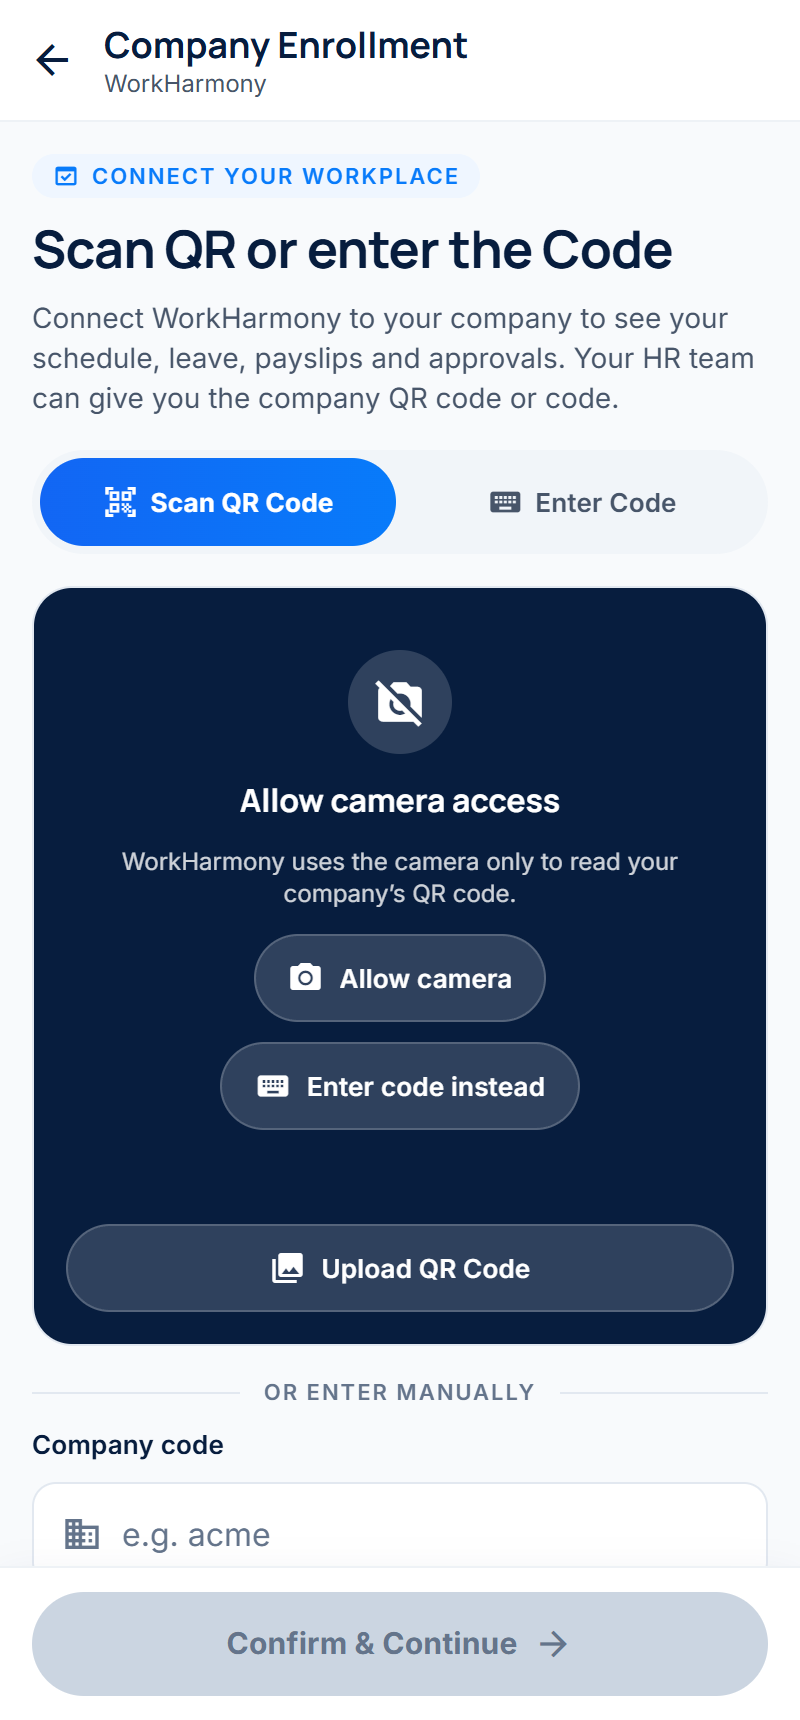
- On the Company Enrollment screen, make sure Scan QR Code is selected.
- Tap Allow camera the first time, so the app can use the camera.
- Point the camera at the company QR code that HR gave you (on paper, a poster or another screen).
The app reads the code and checks it at once.
Option 2: Upload a photo of the QR code
If you have the QR code as a picture on your phone (for example a screenshot from an email or a chat), you do not need the camera:
- Tap Upload QR Code. Your phone's photo gallery opens.
- Choose the photo that shows the QR code.
The app finds the QR code in the photo and starts checking it straight away. If the photo has no QR code, or the code is not a WorkHarmony company code, the app tells you and you can choose another photo.
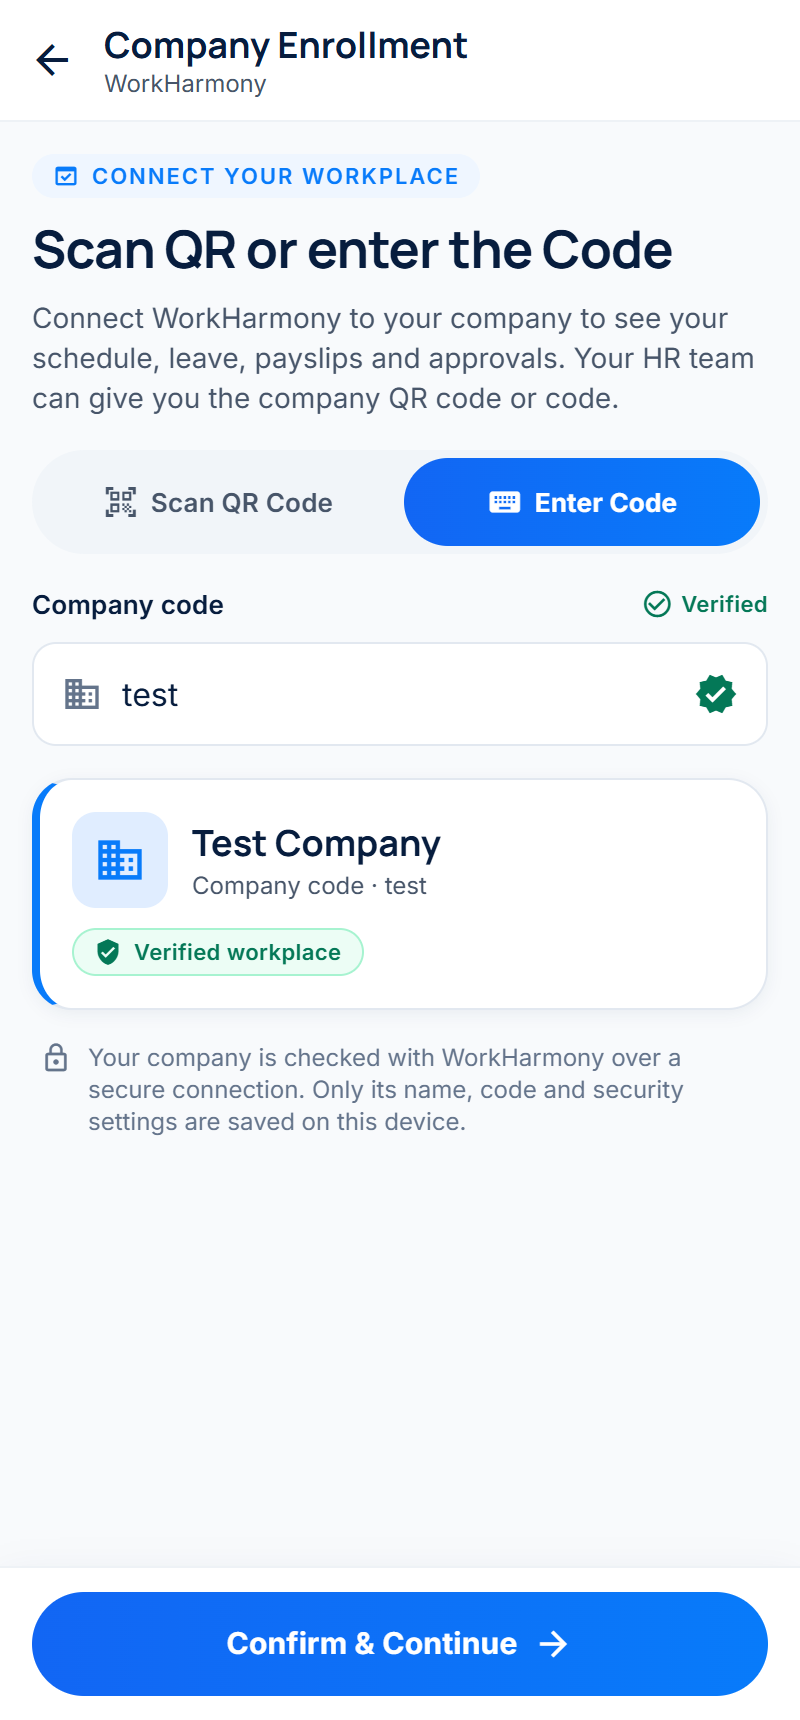
Option 3: Enter the company code
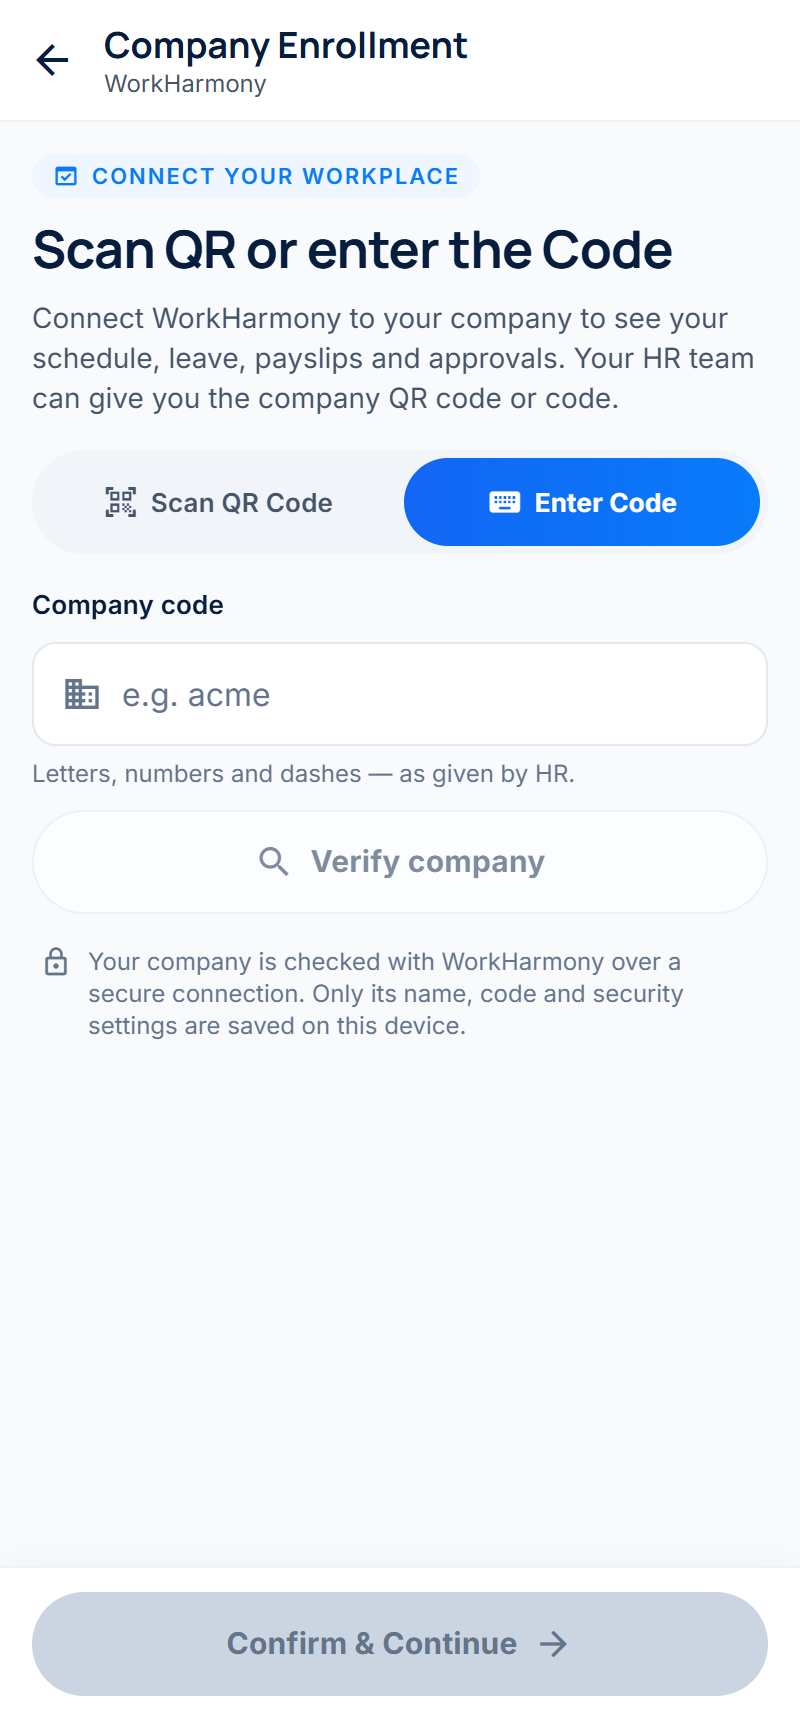
- Tap Enter Code.
- Type the company code from HR in Company code (letters, numbers and dashes).
- Tap Verify company.
Option 4: Tap the link in the welcome email
Your company's welcome email has an Open in the WorkHarmony app button. Open the email on your phone and tap it. The app opens with your company code already filled in and checks it for you. If the app is not installed yet, the page that opens has links to the App Store and Google Play. Install the app, then tap the button again.
Confirm your company
When the company is verified, its name appears with a green Verified workplace badge. Check that it is the right company and tap Confirm & Continue.
Tip: If the wrong company appears, do not confirm it. Go back, check the code with HR and try again.
2.4 Create your account
The first time you use the app you create your own account. The app takes you to Create account automatically after you confirm your company. Creating an account has three steps.
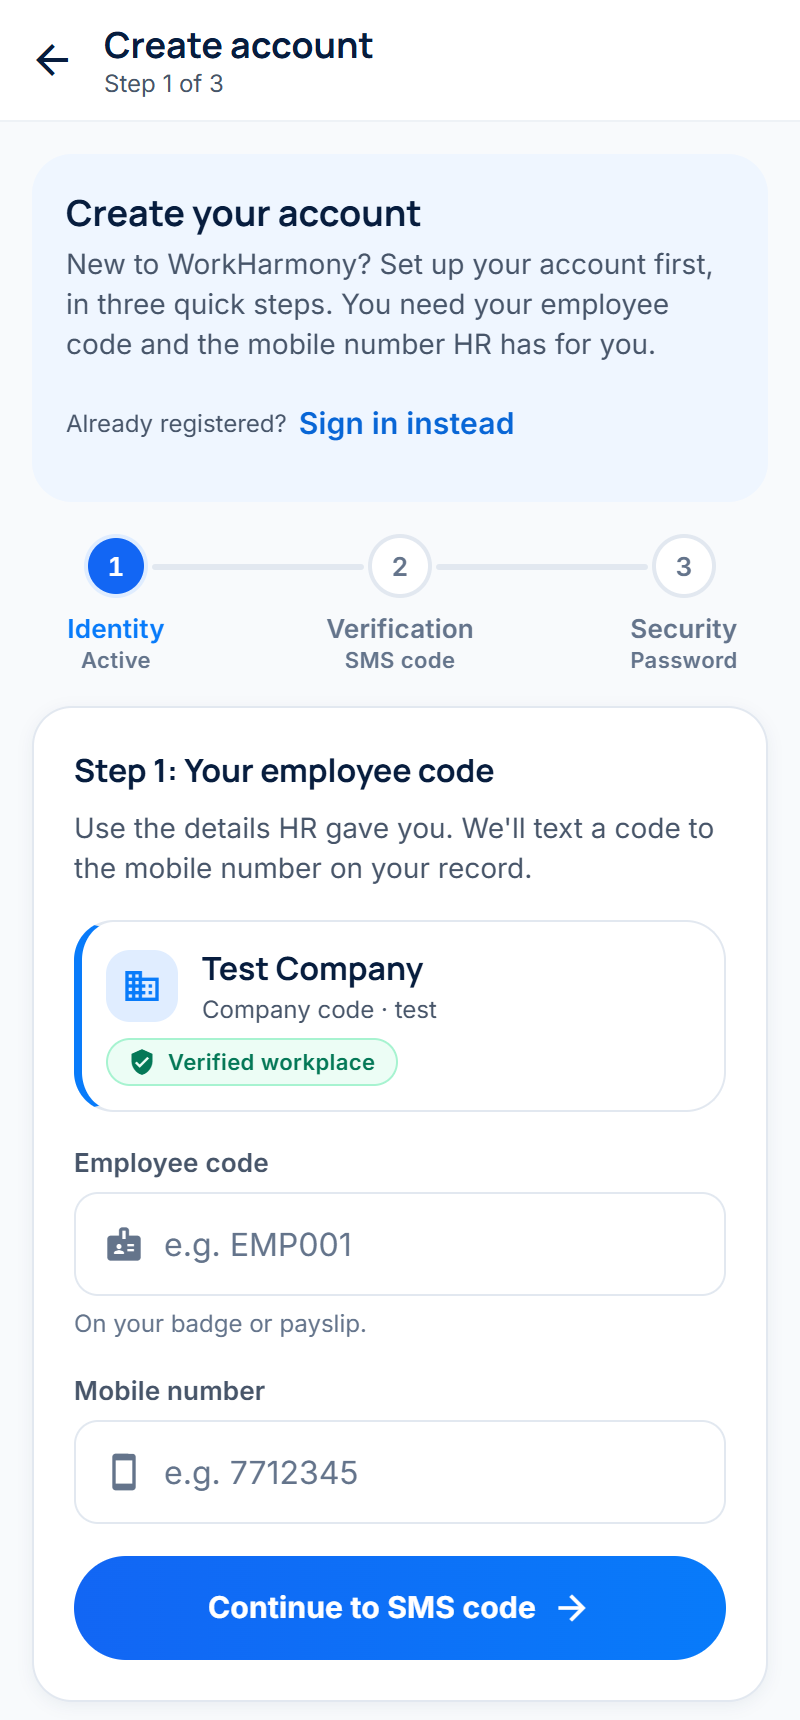
Step 1: Your employee code and mobile number
- In Employee code, type your employee code, for example ML001.
- In Mobile number, type the mobile number HR has on your record.
- Tap Continue to SMS code.
The app checks that the employee code exists and that the mobile number matches your record, then sends a 6-digit code to that number by SMS.
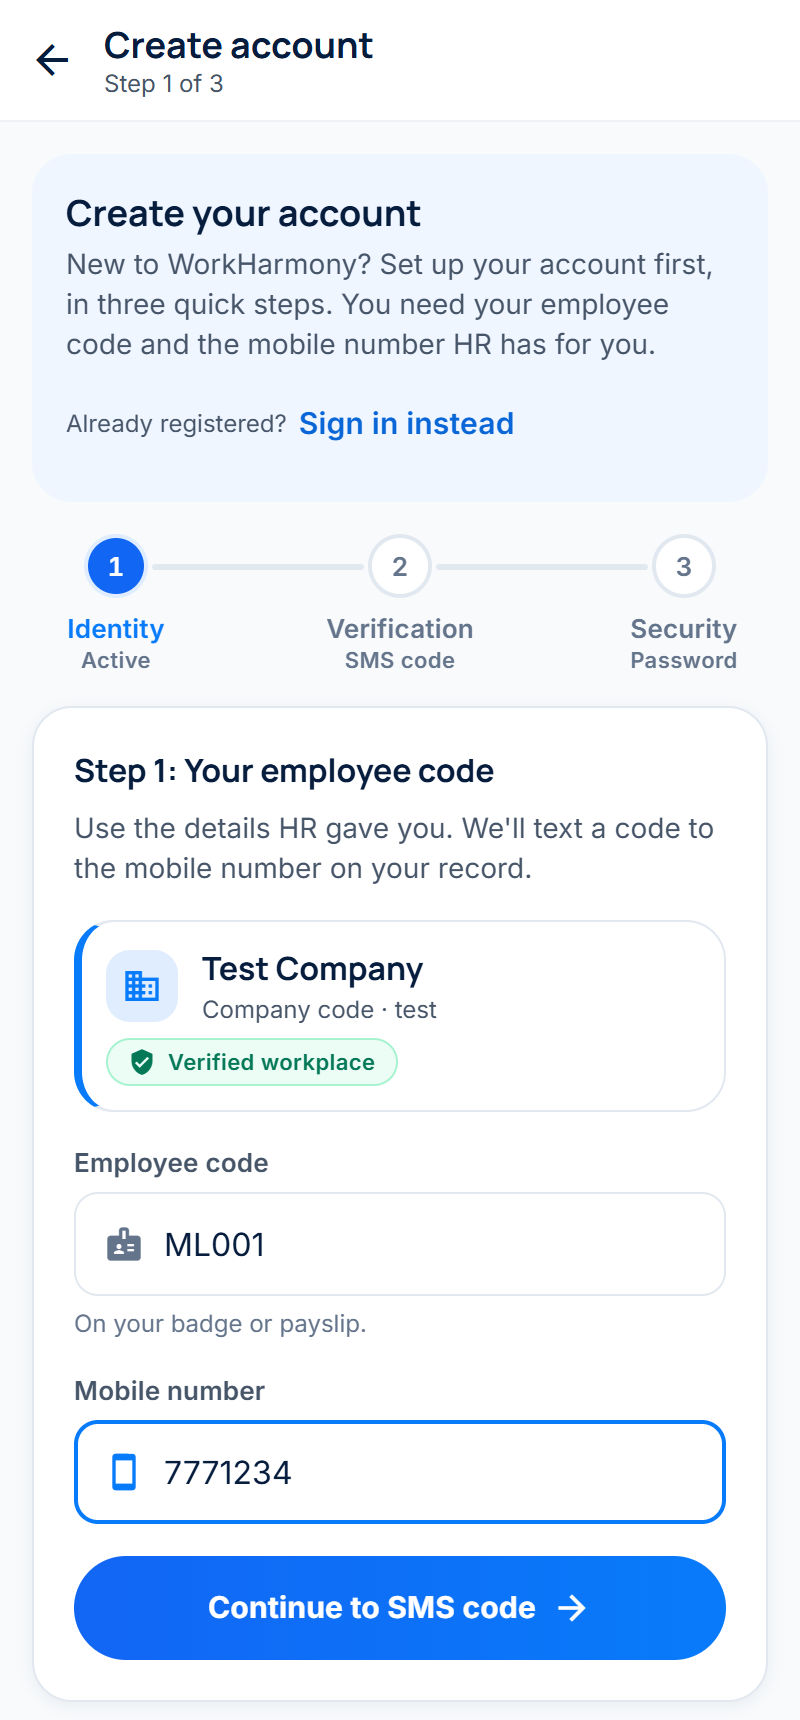
Step 2: Enter the SMS code
- Open the text message and find the 6-digit code.
- Type it into the six boxes. The app checks it as soon as all six digits are in, or tap Verify code.
If the message does not arrive, wait for the countdown to finish and tap Resend. To correct your employee code or mobile number, tap Change.
Step 3: Set your password
- In Password, type a new password. The checklist below the field shows your company's password rules, and each rule turns green when it is met.
- Type the same password again in Confirm password.
- Tap Create account.
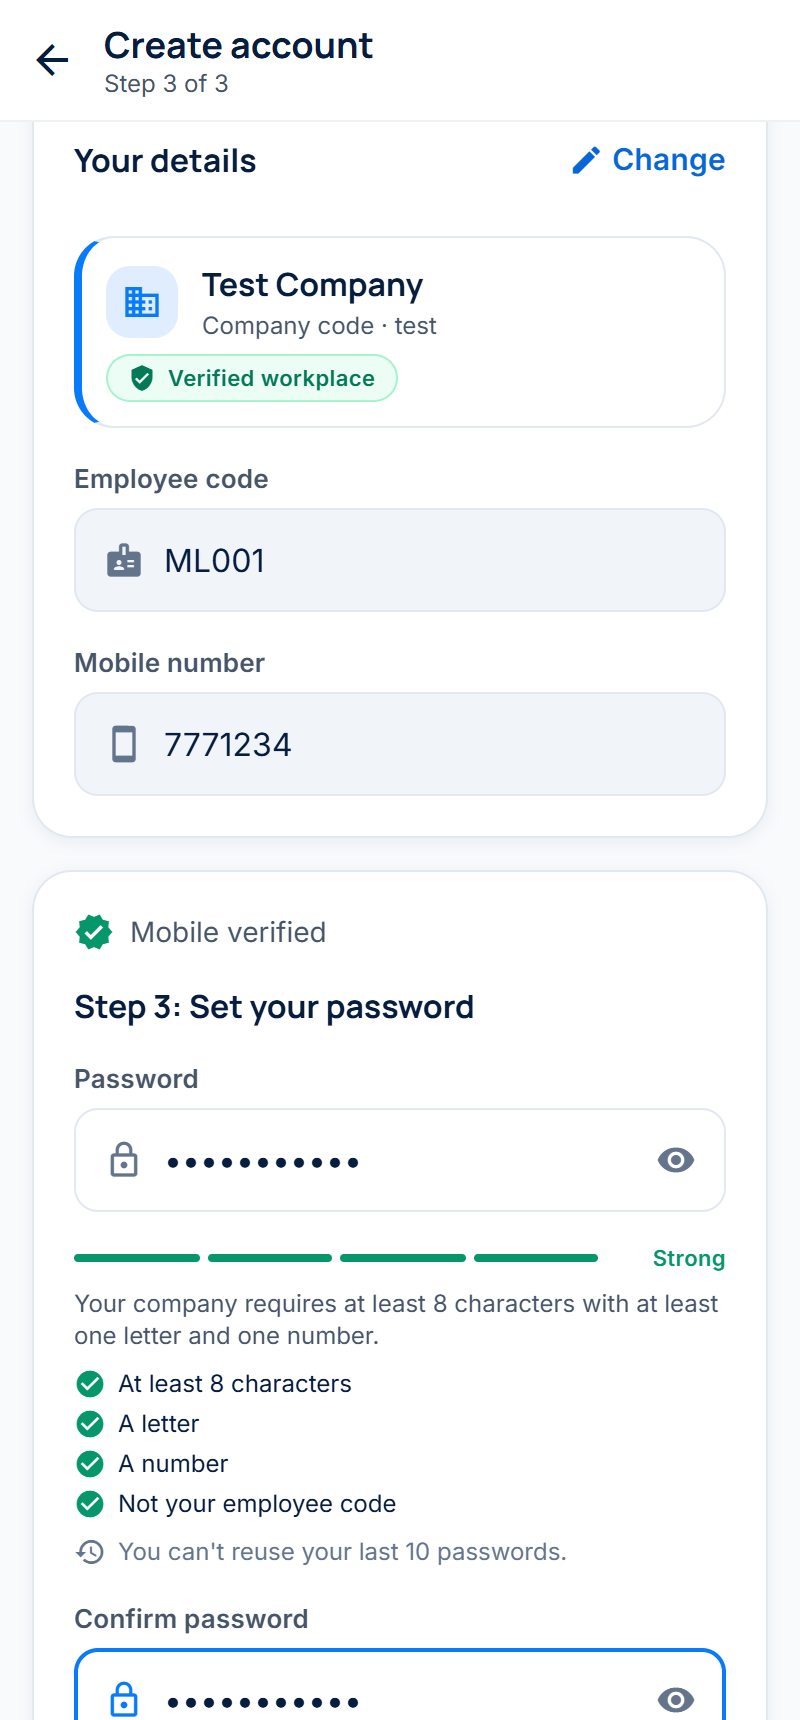
Your account is created and you are signed in straight away.
Note: If you see Text messages aren't set up yet, your company has not switched on SMS for the app. Contact HR; they can set it up or help you another way.
2.5 Sign in
Next time you open the app it goes straight to Sign in with your company already shown.
- Type your Employee code and Password.
- Tap Sign in.
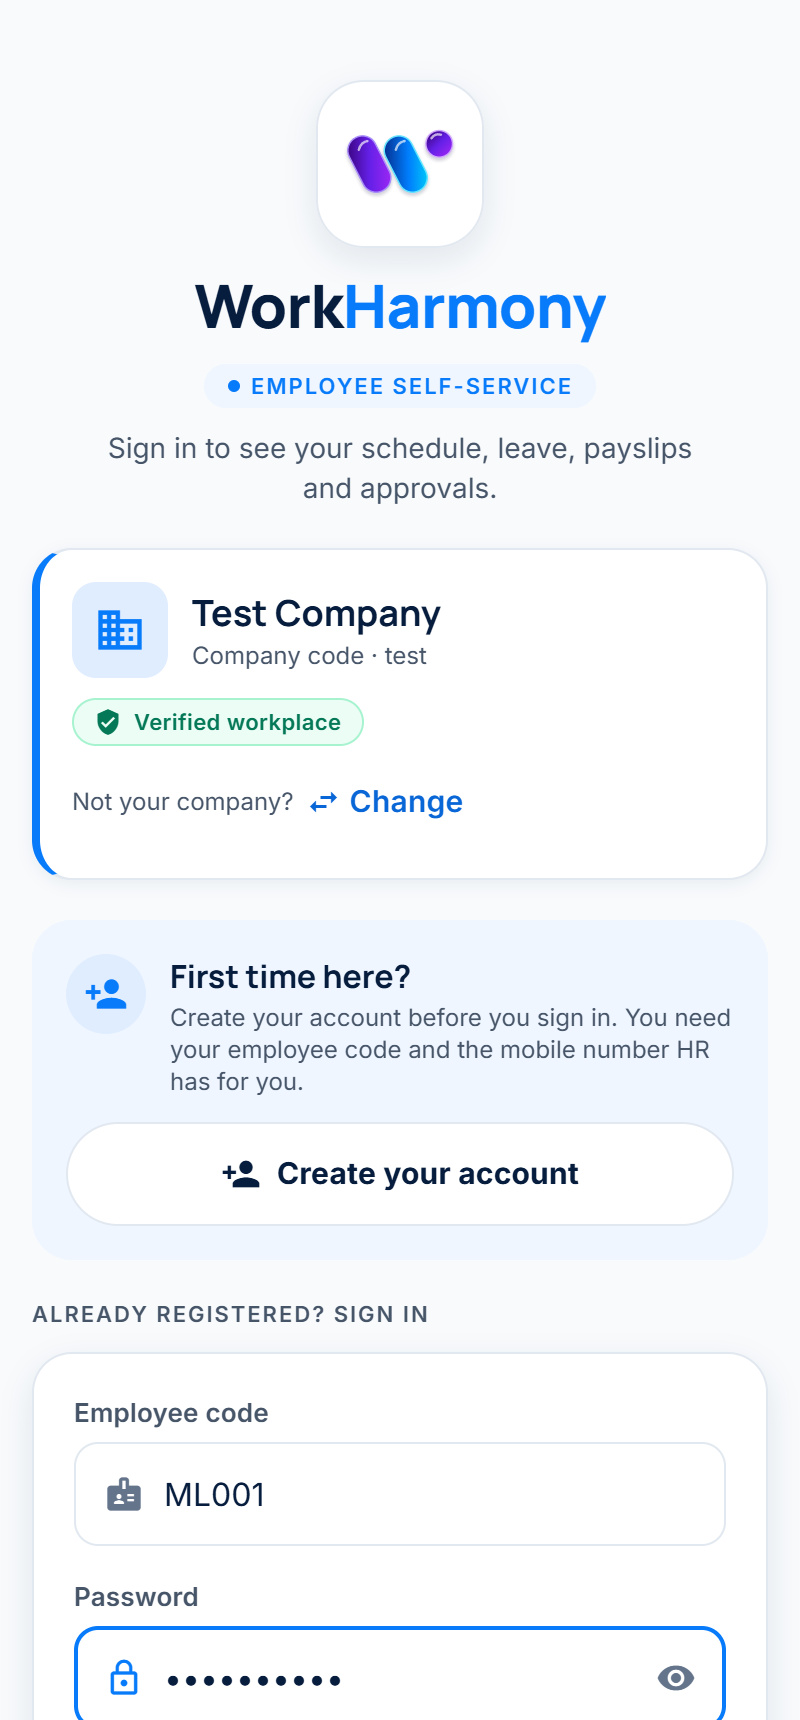
- First time here? The Create your account button at the top of the sign-in screen takes you to account creation (section 2.4).
- Forgot password? Tap it below the password field. The app texts a temporary password to the mobile number on your record. Sign in with it and the app asks you to choose a new password.
- Not your company? Tap Change on the company card to connect to a different company. This removes everything the app saved on the phone and starts again from the company step.
2.6 Your first sign-in
Depending on your company's security settings, the app may ask you a few questions the first time you sign in:
- Change your password, if you signed in with a temporary password.
- Set up two-factor authentication, if your company uses it (section 6.4).
- Use Face ID or fingerprint to unlock the app, if your phone supports it (section 6.3).
Finally, the app asks how you would like to use it.
2.7 Choose Complete Mode or Simple Mode
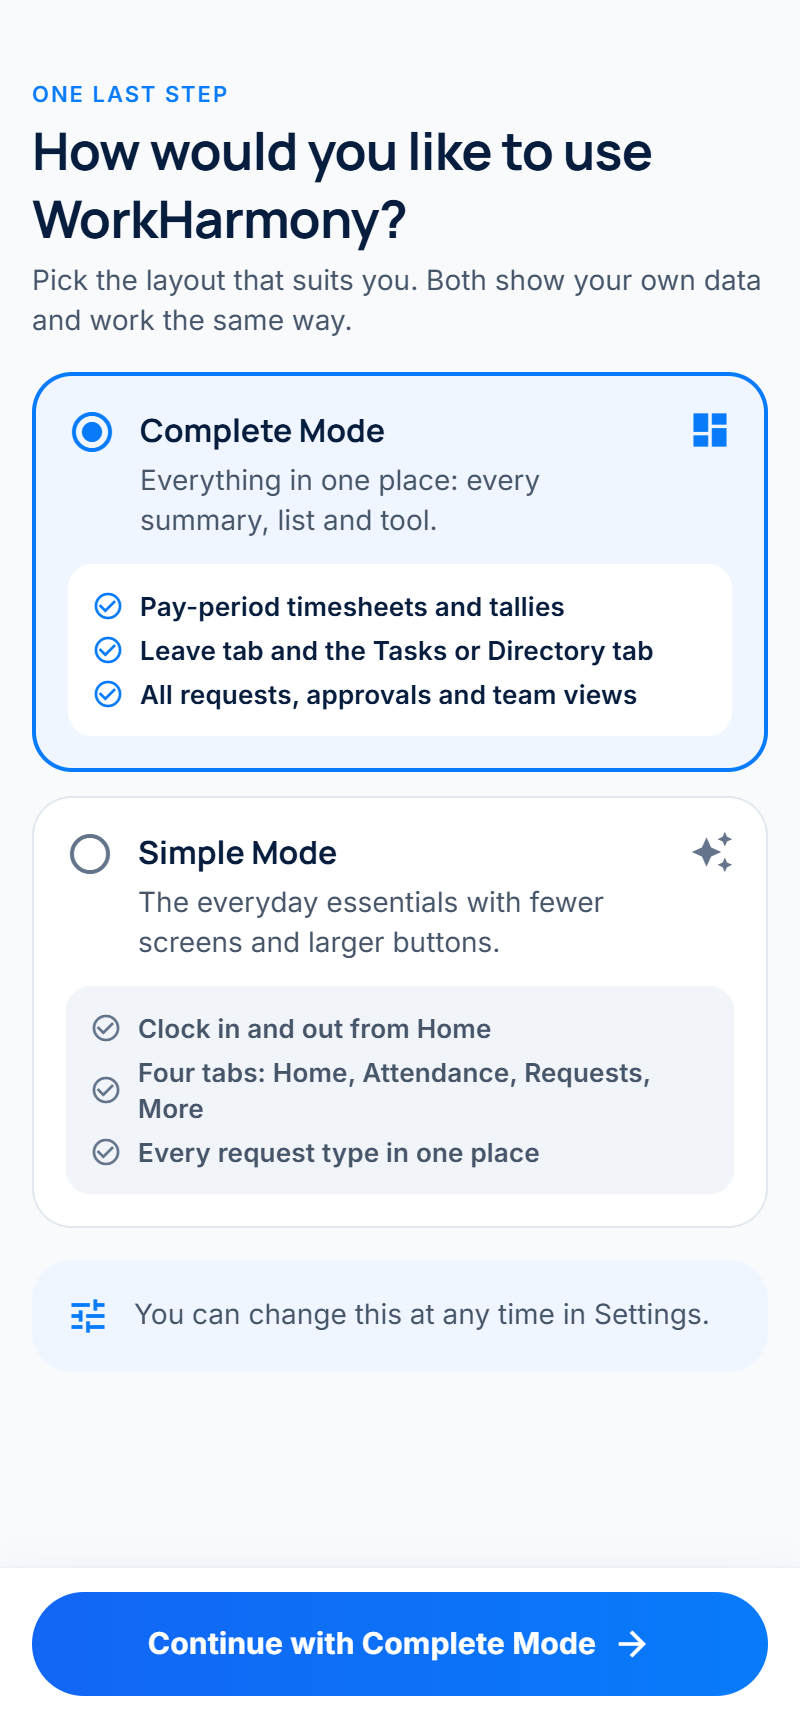
The How would you like to use WorkHarmony? screen shows the two layouts:
- Complete Mode shows everything in one place: every summary, list and tool. It is selected unless you choose otherwise.
- Simple Mode shows the everyday essentials with fewer screens and larger buttons.
Tap the layout you want and tap Continue. You can change it at any time in Settings, so there is no wrong choice.
3. Finding your way around
3.1 The top bar
Every main screen has the same bar at the top:
- WorkHarmony and the name of the area you are in (HOME, ATTENDANCE and so on).
- The bell opens your notifications. A red number shows how many are unread.
- Your photo (or initials) opens the account menu: Profile, Notifications, Change password, Security & 2FA and Sign out.
3.2 The bottom tabs
The tabs at the bottom take you to the main areas. Which tabs you see depends on the layout:
| Complete Mode | Simple Mode |
|---|---|
| Home | Home |
| Attendance | Attendance |
| Leave | Requests |
| Tasks (or Directory, if your company does not use Tasks) | More |
| More |
Other screens (a form, a request, a payslip) open on top of the tabs and have a back arrow (←) or a close button (✕) at the top left.
3.3 Refresh, offline and loading
- Pull down on any list to refresh it.
- Without a connection the app shows the last information it saved, with a note saying when it was saved. Clocking in and out, and sending requests, need a connection.
- While information loads you see grey placeholder shapes. They are replaced as soon as the information arrives.
4. Complete Mode
Complete Mode shows the full employee app. This chapter goes through it tab by tab.
4.1 Home
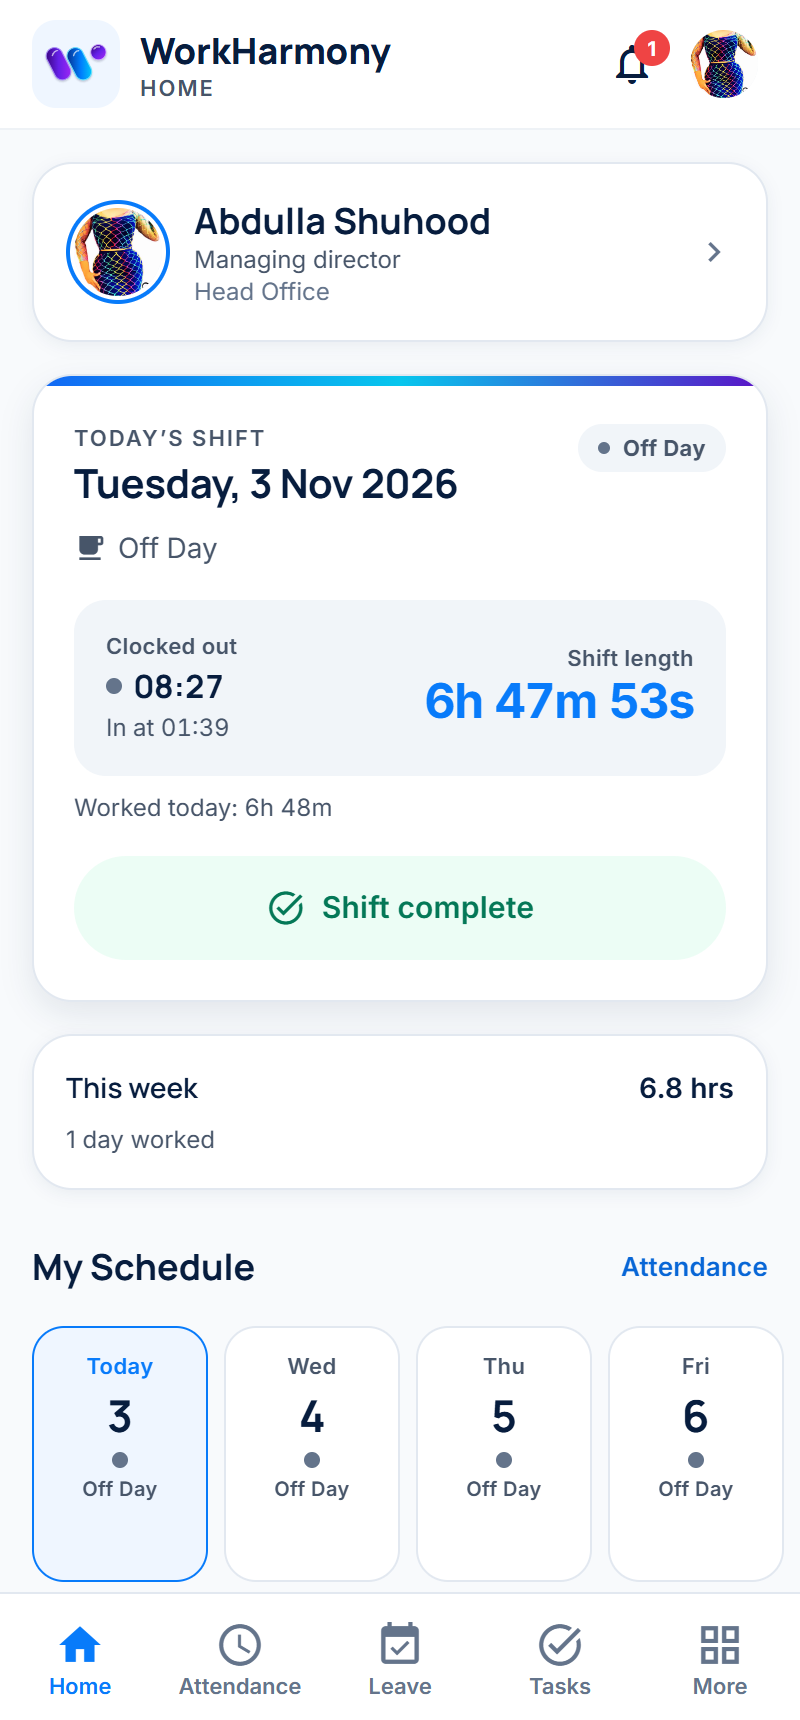
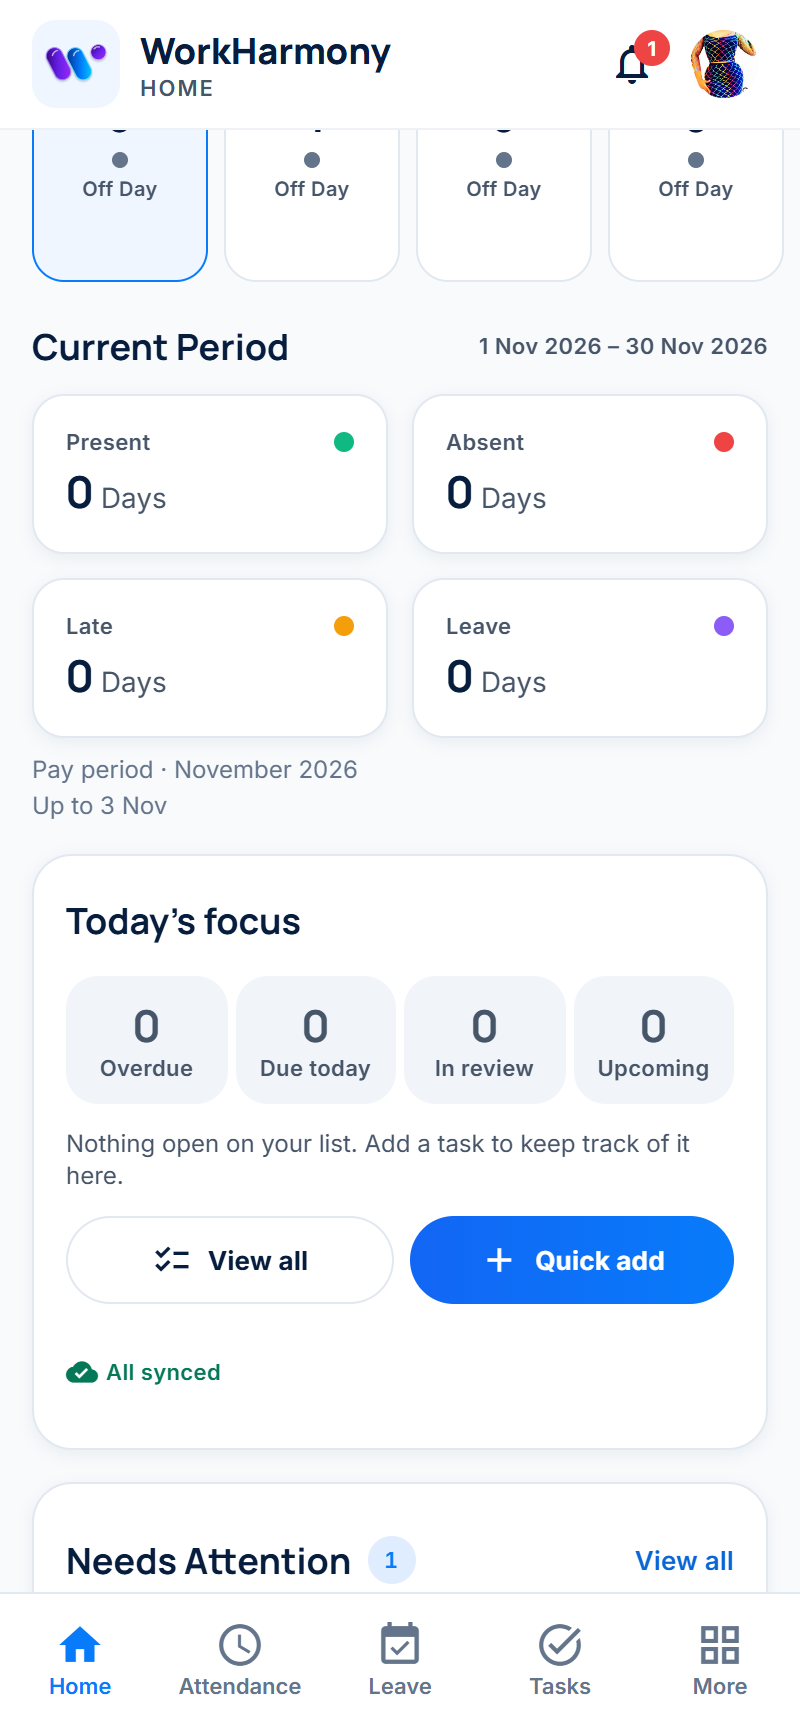
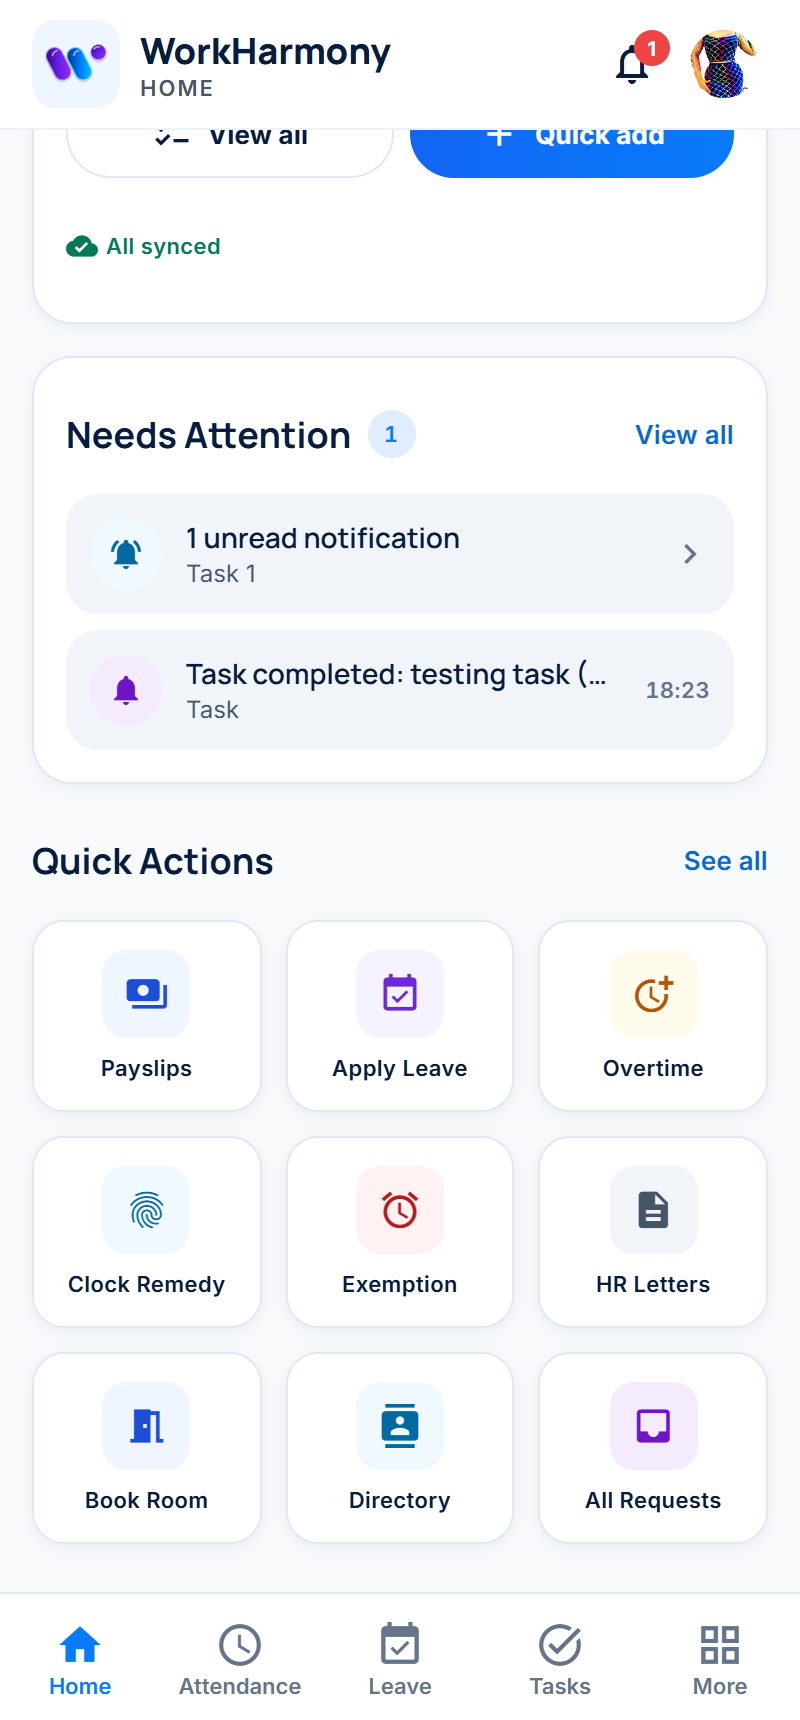
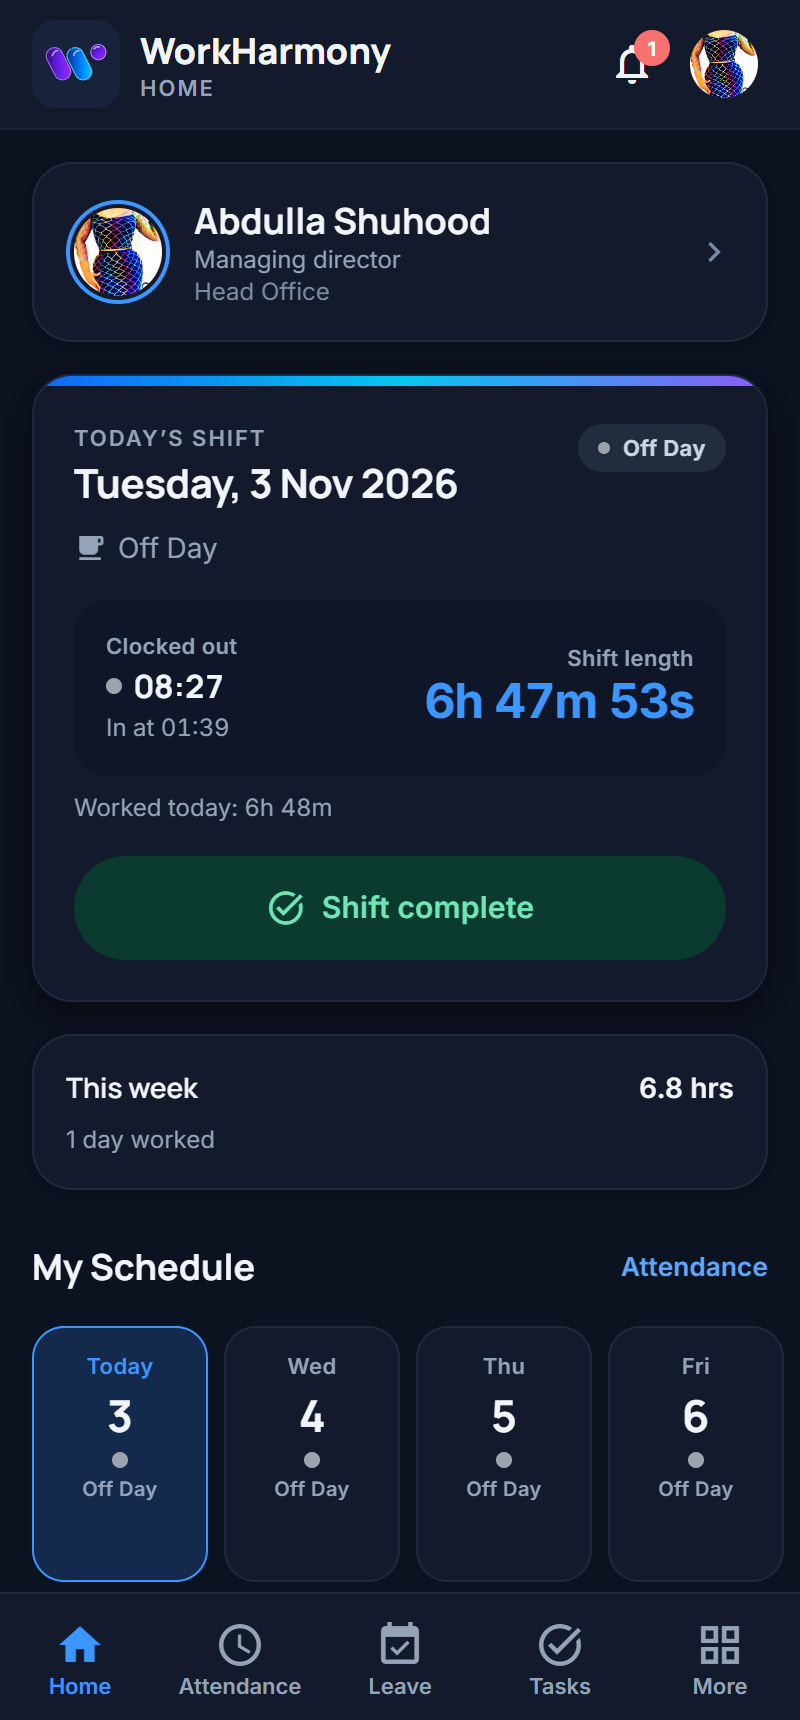
Home is your daily dashboard. From top to bottom it shows:
- Your name and job: tap the card to open your profile.
- Today's shift: the date, the kind of day (working day, off day, holiday or leave), your clock-in and clock-out times and how long you have worked. When you can clock in or out, the button is here.
- This week: the hours you have worked this week.
- My Schedule: your shifts for the coming days. Tap Attendance to see more.
- Current Period: how many days you have been present, absent, late or on leave in the current pay period.
- Today's focus: your tasks (overdue, due today, in review, upcoming), if your company uses Tasks.
- Needs Attention: things waiting for you, such as unread notifications or requests to approve.
- Quick Actions: shortcuts such as Payslips, Apply Leave, Overtime, Clock Remedy, Exemption, HR Letters, Book Room, Directory and All Requests. See all shows every shortcut.
Clock in and clock out
- On Home or the Attendance tab, find today's card.
- Tap Clock in when you start work and Clock out when you finish.
The app records the time and, if your company uses it, your location. A message confirms the punch.
- If you work more than one shift in a day, the button says which shift it is for, for example Clock in for shift 2.
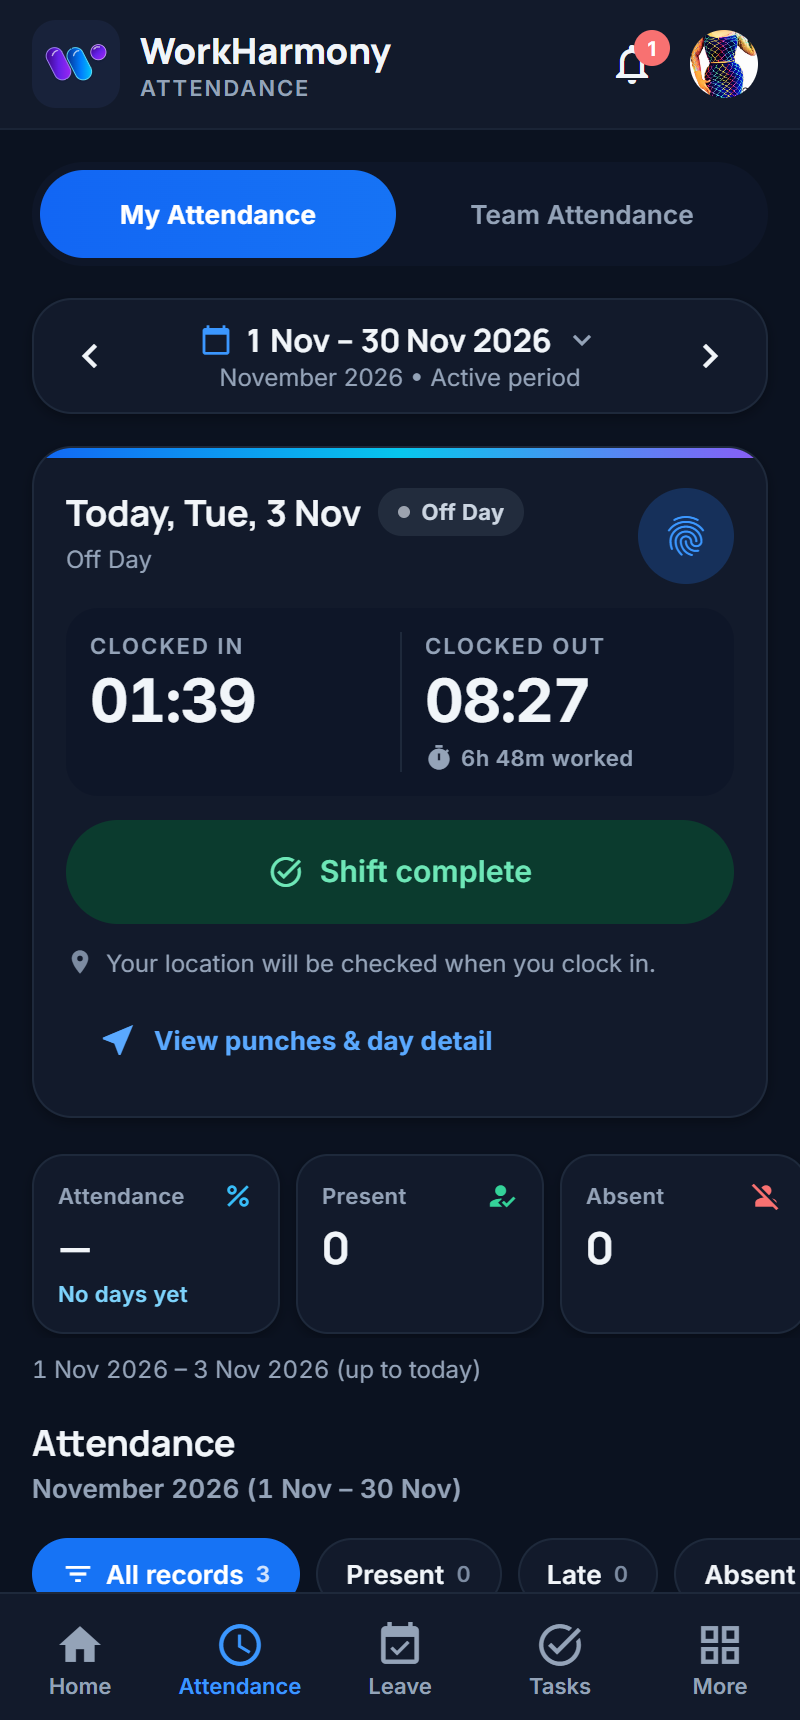
- When your last shift is finished, the card shows Shift complete and there is no button.
- On a leave day there is nothing to clock, and no button is shown.
- If your company only uses attendance devices (for example a fingerprint terminal), the app shows your times but has no clock button.
- If your company checks your location and you are too far from your workplace, the button is greyed out and the card says how far away you are and in which direction to go.
Important: Clocking needs a connection. If today's information cannot be loaded, the app shows Check again instead of a clock button, so that it never records the wrong punch. Tap Check again when you are back online.
4.2 Attendance
The Attendance tab is your timesheet for the pay period.
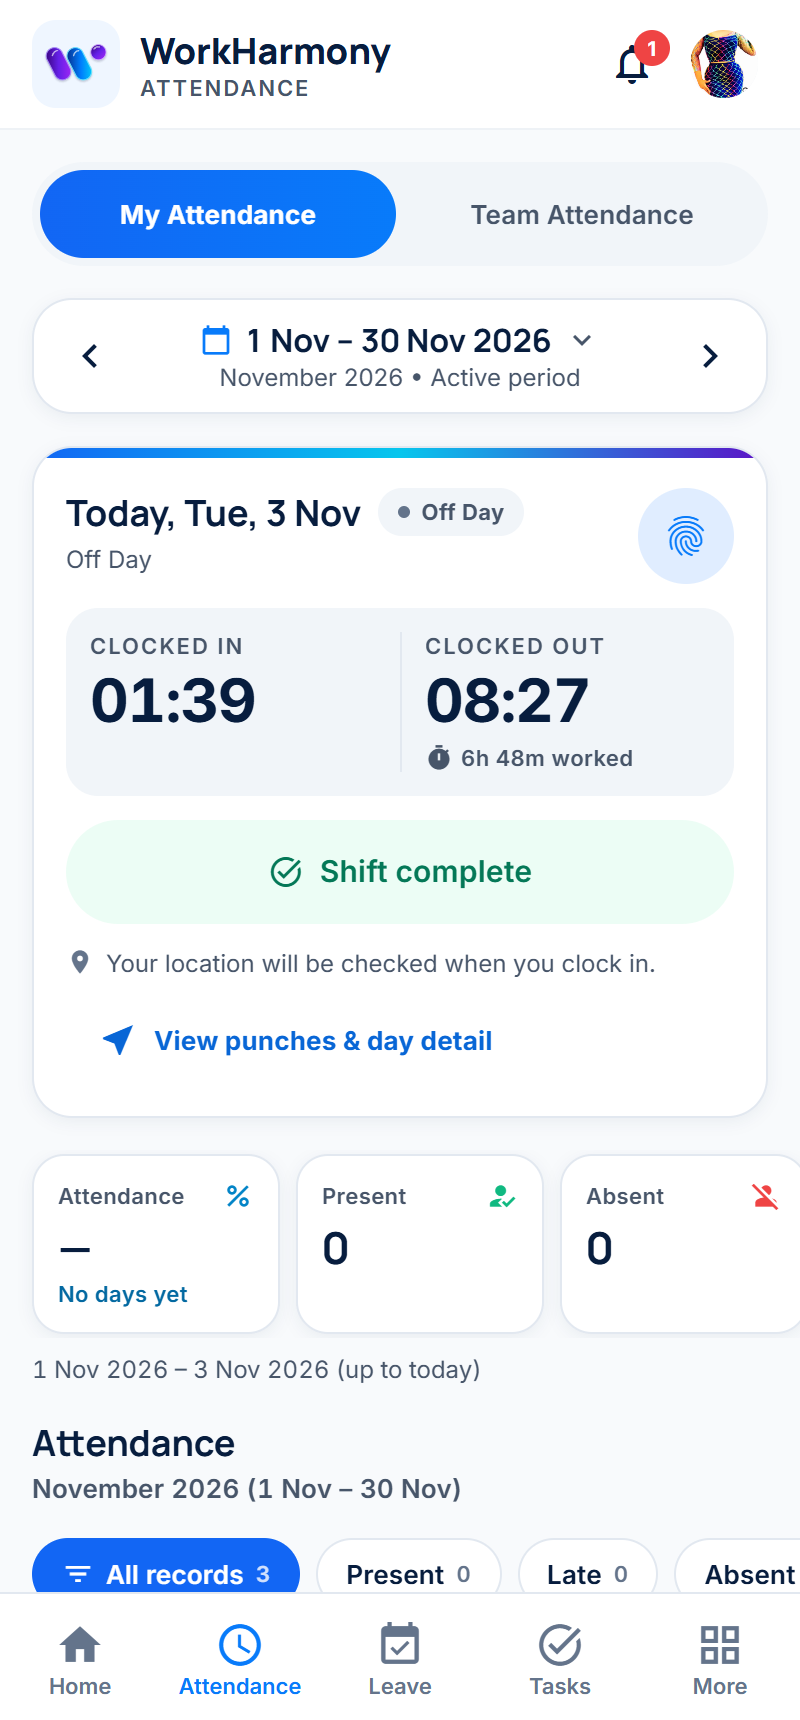
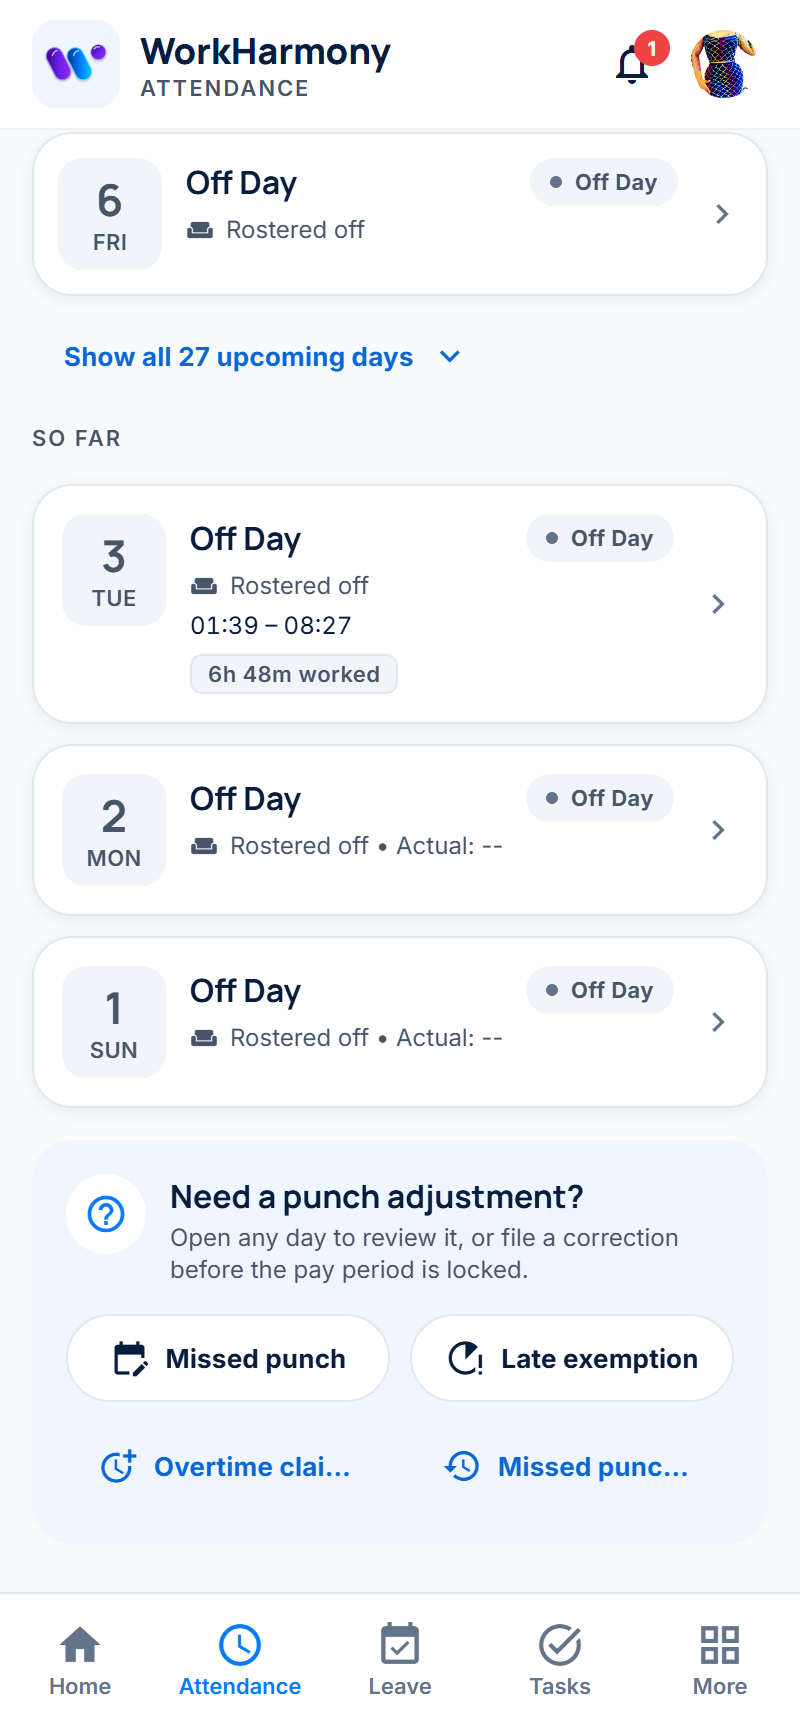
- My Attendance / Team Attendance: managers see a second tab with their team's attendance.
- Pay period: use the arrows (‹ ›) to move to the previous or next pay period, or tap the dates to pick one.
- Today: the same clock card as on Home, with View punches & day detail.
- Summary tiles: attendance percentage, days present and absent, late days, leave, holidays, off days, overtime and hours worked, counted up to today.
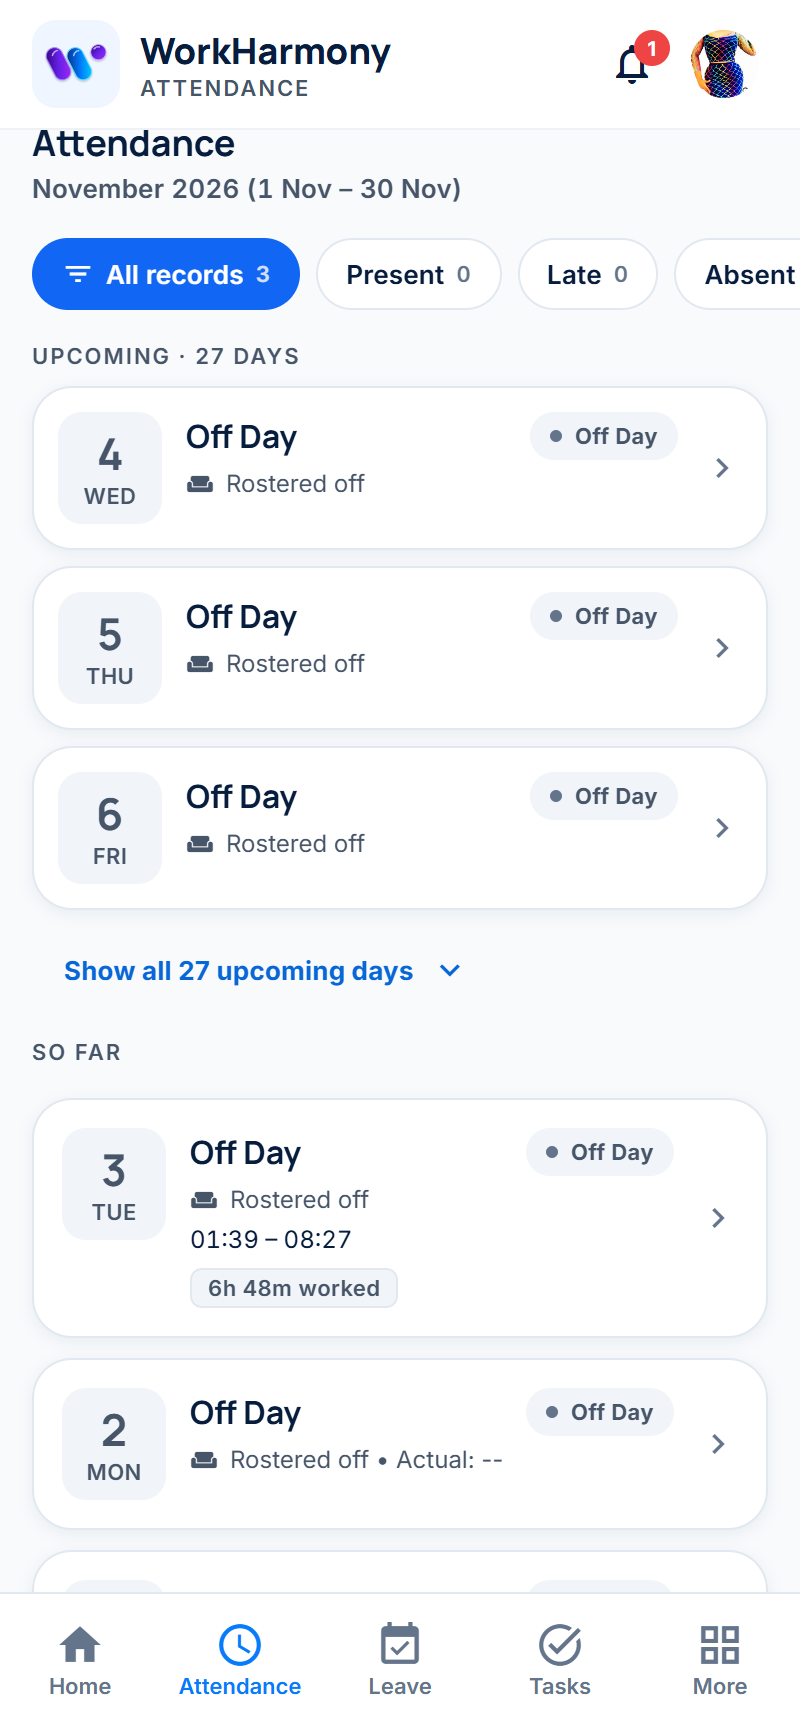
- Attendance: every day of the period. Use the filters (All records, Present, Late, Absent and so on) to narrow the list. Upcoming days are shown first, then the days so far.
- Need a punch adjustment?: shortcuts to report a missed punch, ask for a late exemption, and see your overtime claims and missed punches.
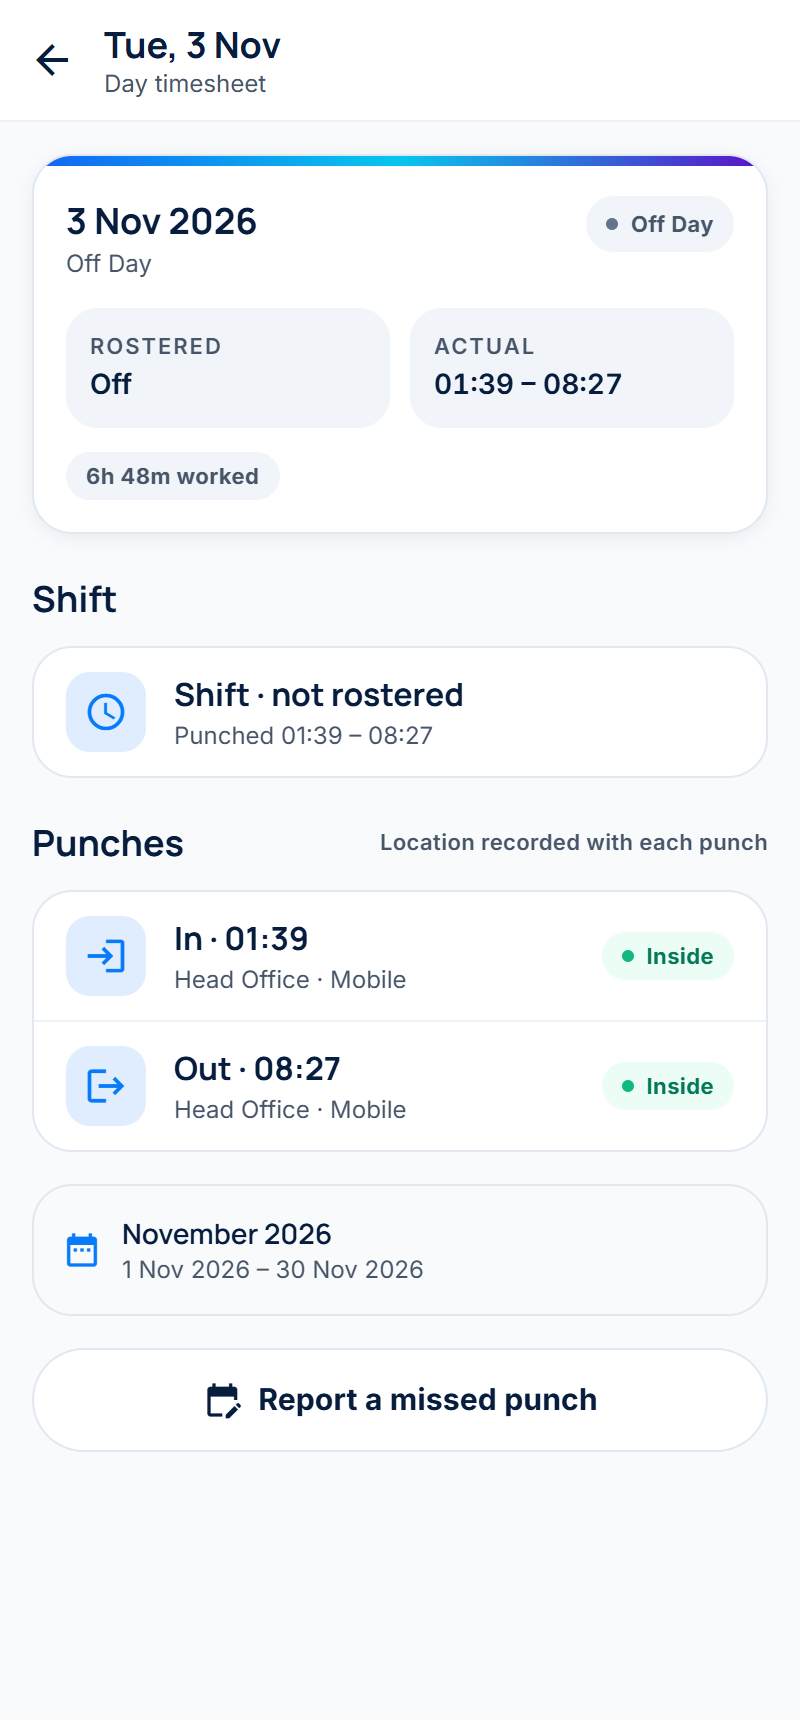
One day in detail
Tap any day to open its timesheet. It shows the rostered shift, your actual times, the hours worked and every punch with where it was recorded. Report a missed punch opens the missed-clocking form for that day.
4.3 Leave
The Leave tab shows your leave.
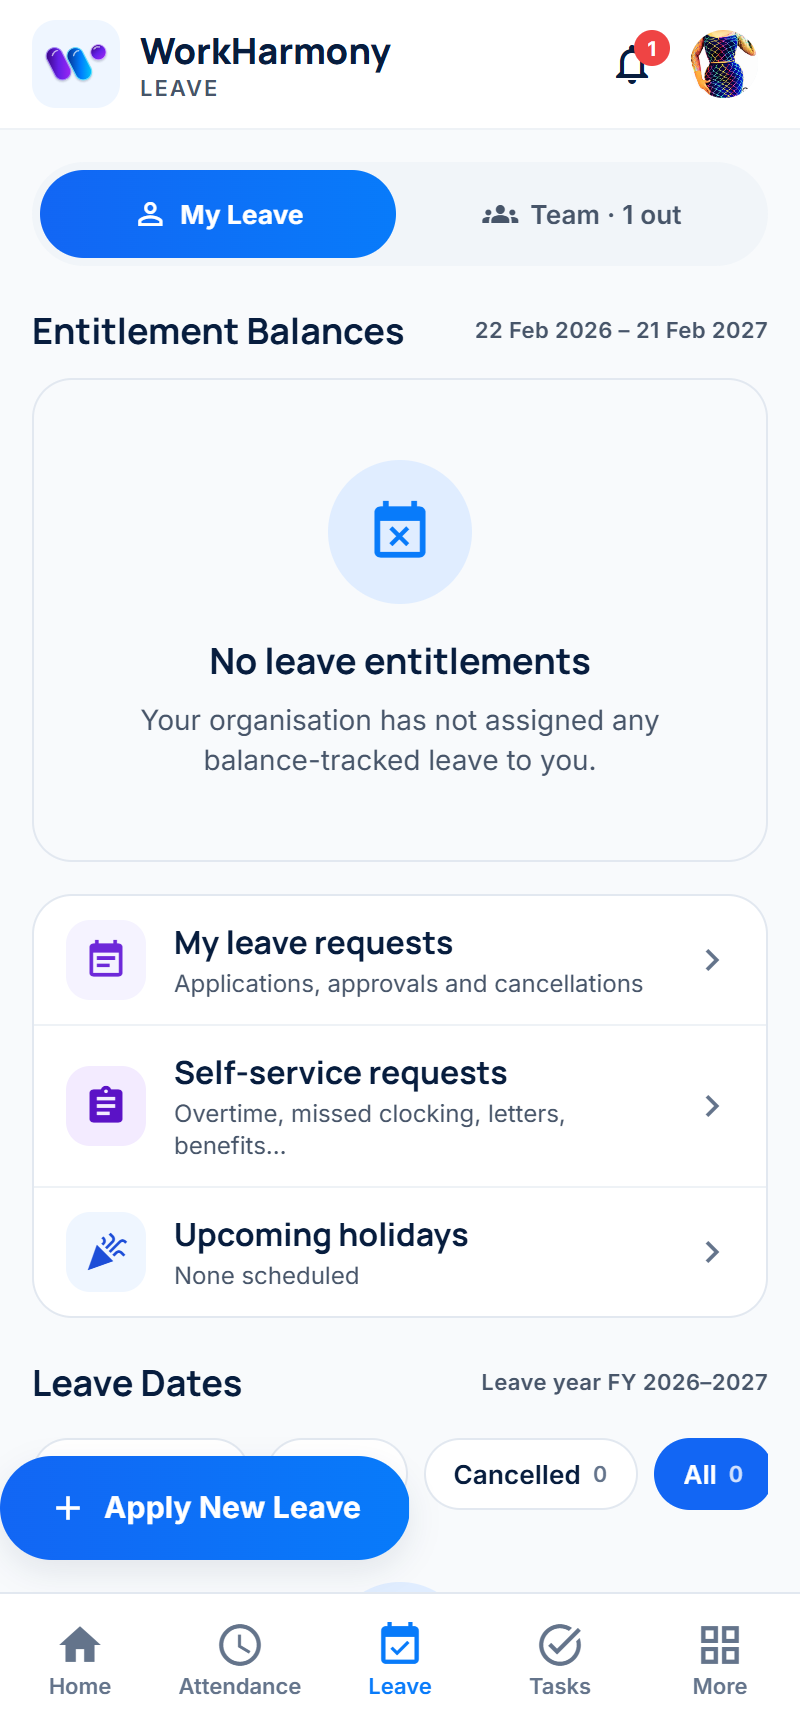
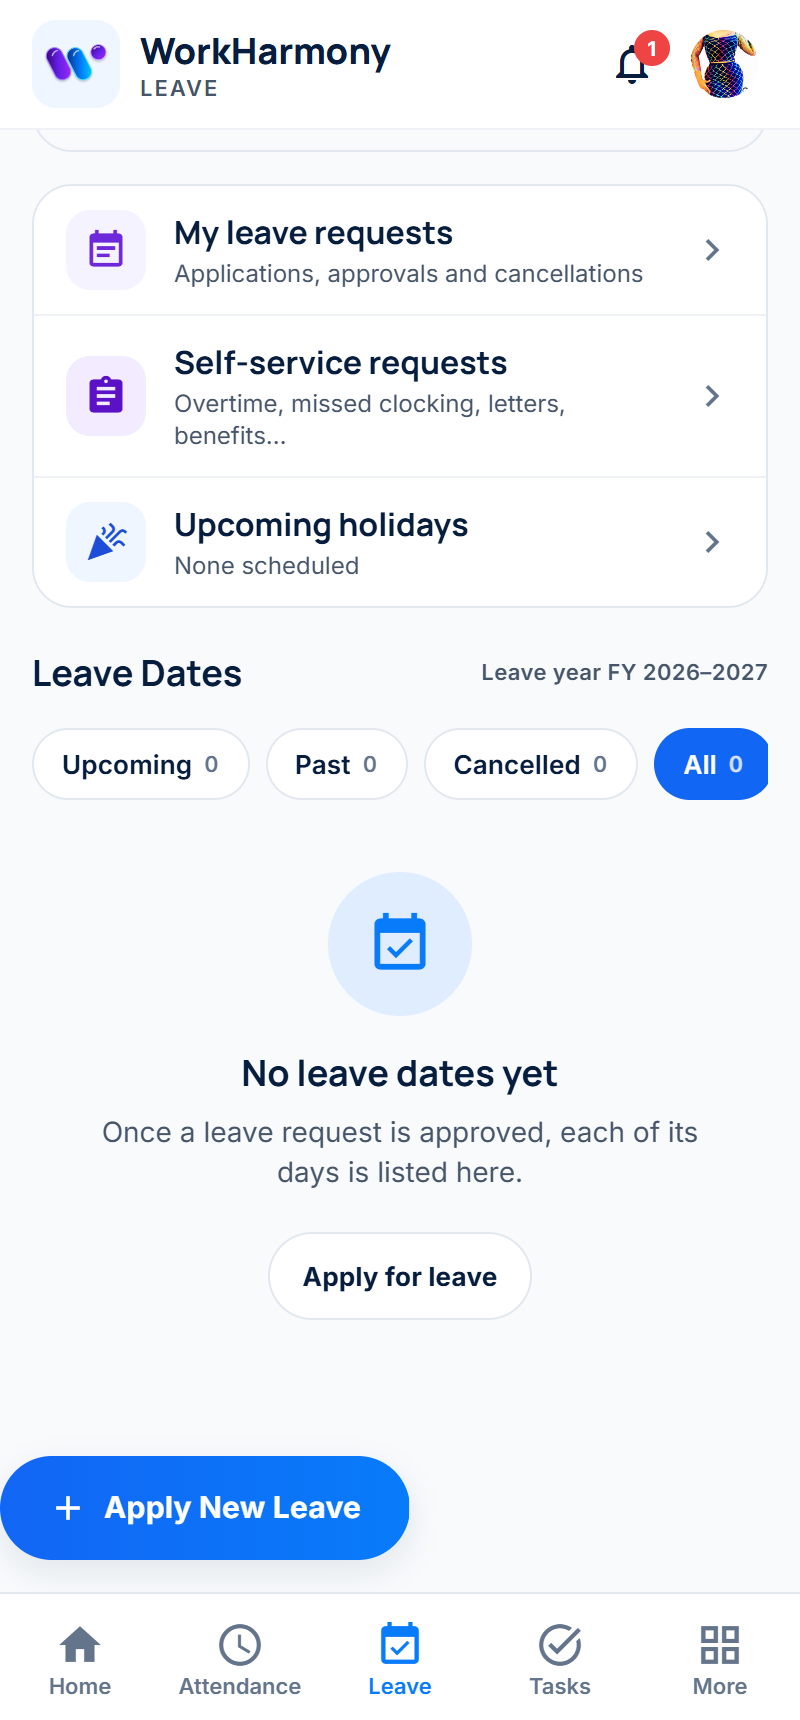
- Entitlement Balances: for each type of leave you are entitled to, how many days you have, have taken, are waiting for approval and can still take. Tap a balance to see the details.
- My leave requests: every leave application with its status.
- Self-service requests: your other requests (overtime, missed clocking, letters, benefits).
- Upcoming holidays: the next public and company holidays.
- Leave Dates: every day of approved leave, with filters for upcoming, past and cancelled days.
- Team: managers can see who in their team is out.
Apply for leave
- Tap Apply New Leave on the Leave tab, or Apply Leave on Home.
- Choose the Leave Category. Each type shows whether it is balance-tracked and how many days you have left.
- Under Schedule Period, tap From and To to choose the first and last day.
- Optionally add a Reason for Leave and attach Supporting Documents (for example a medical certificate). Some leave types require a document.
- If your company uses handover, choose who covers your work under Handover Coverage.
- Tap Submit Leave Application.
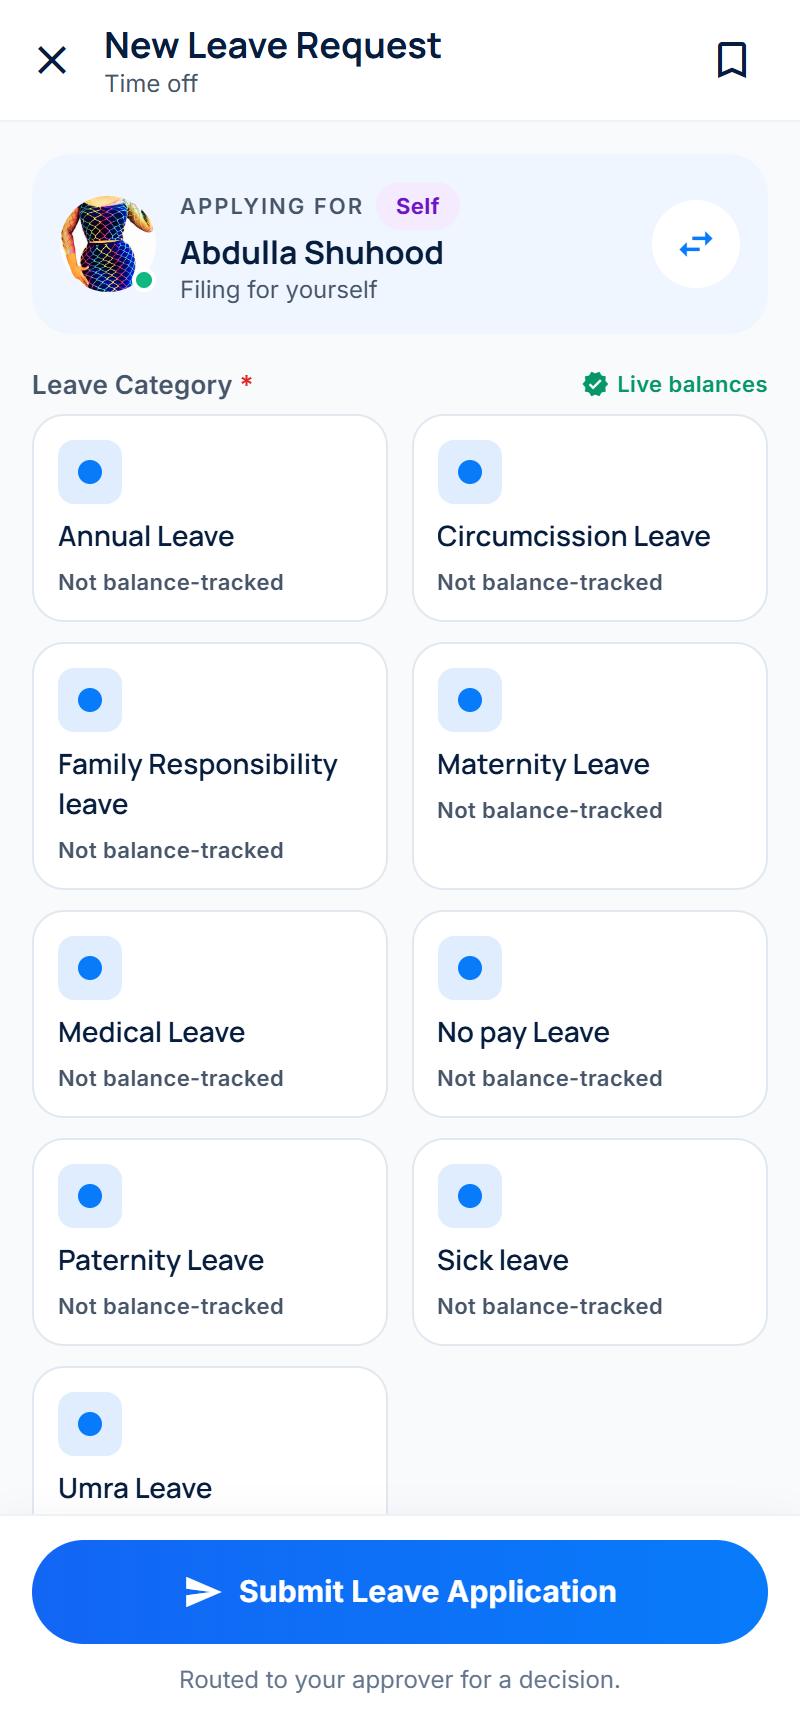
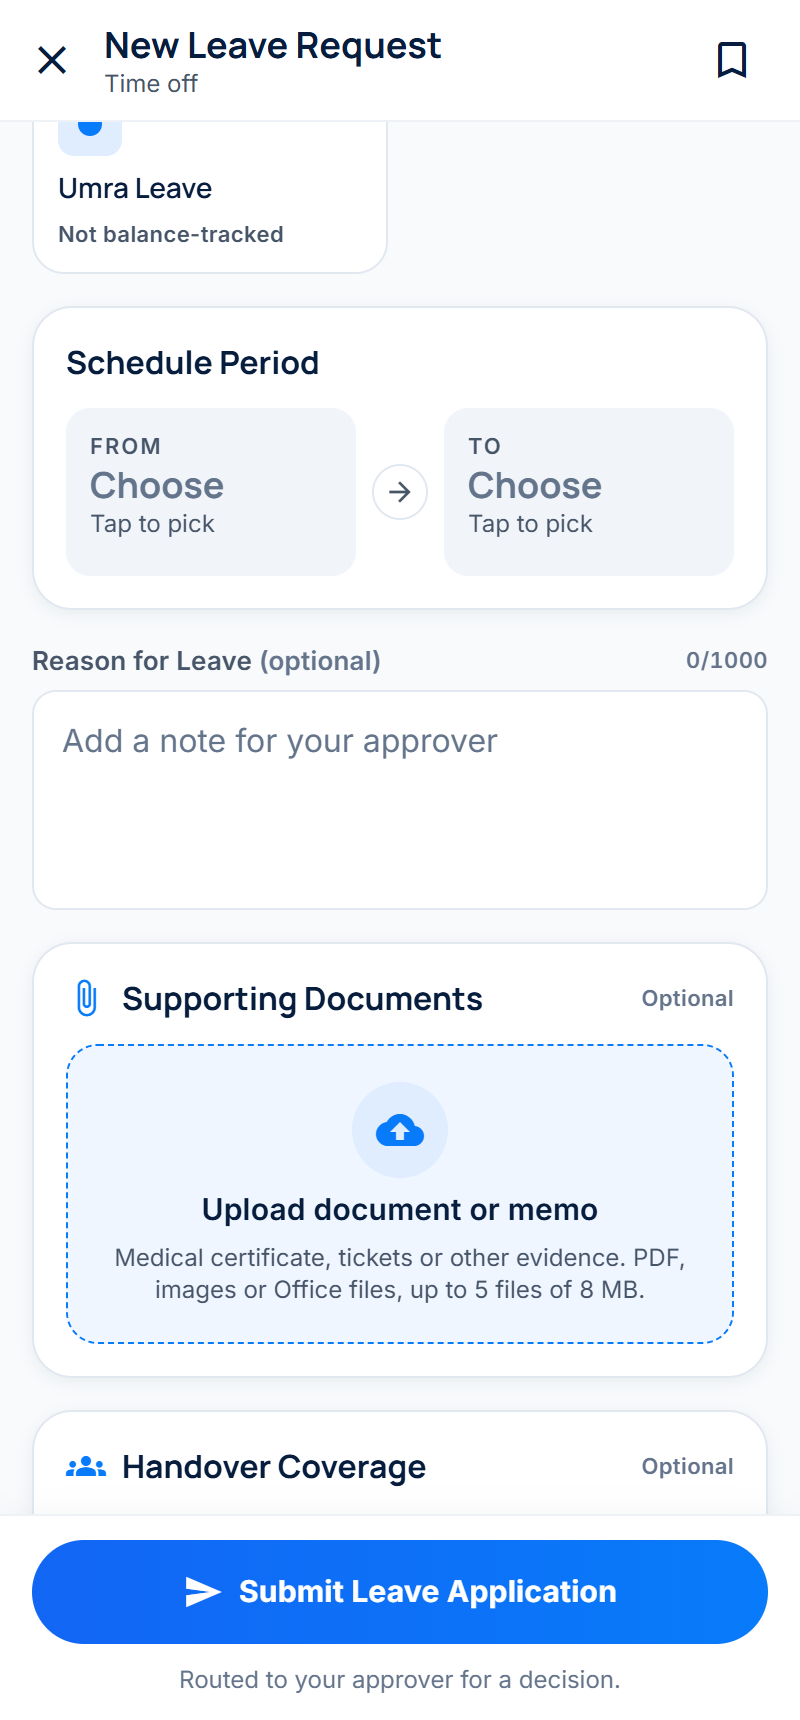
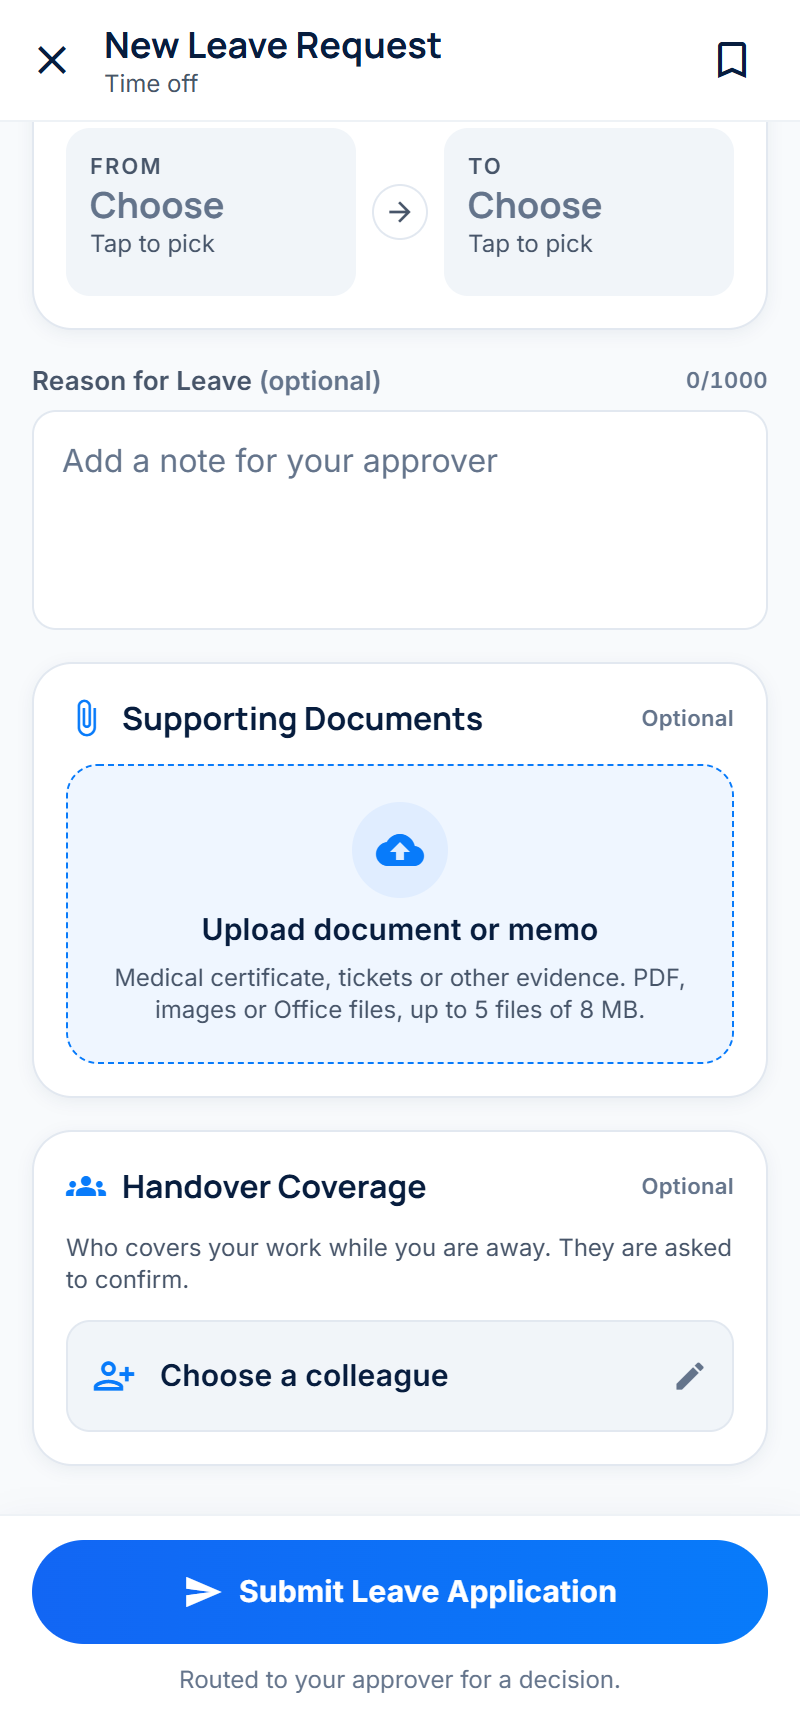
The request goes to your approver. You can follow it under My leave requests and you get a notification when it is decided. While it is still pending you can open it to change or cancel it.
Note: If the days you ask for are more than your available balance, the form tells you and you cannot submit it. Days already requested and waiting for approval count against your balance.
4.4 Requests
Open All Requests from Home, or Requests in the More tab, to see every type of request in one place.
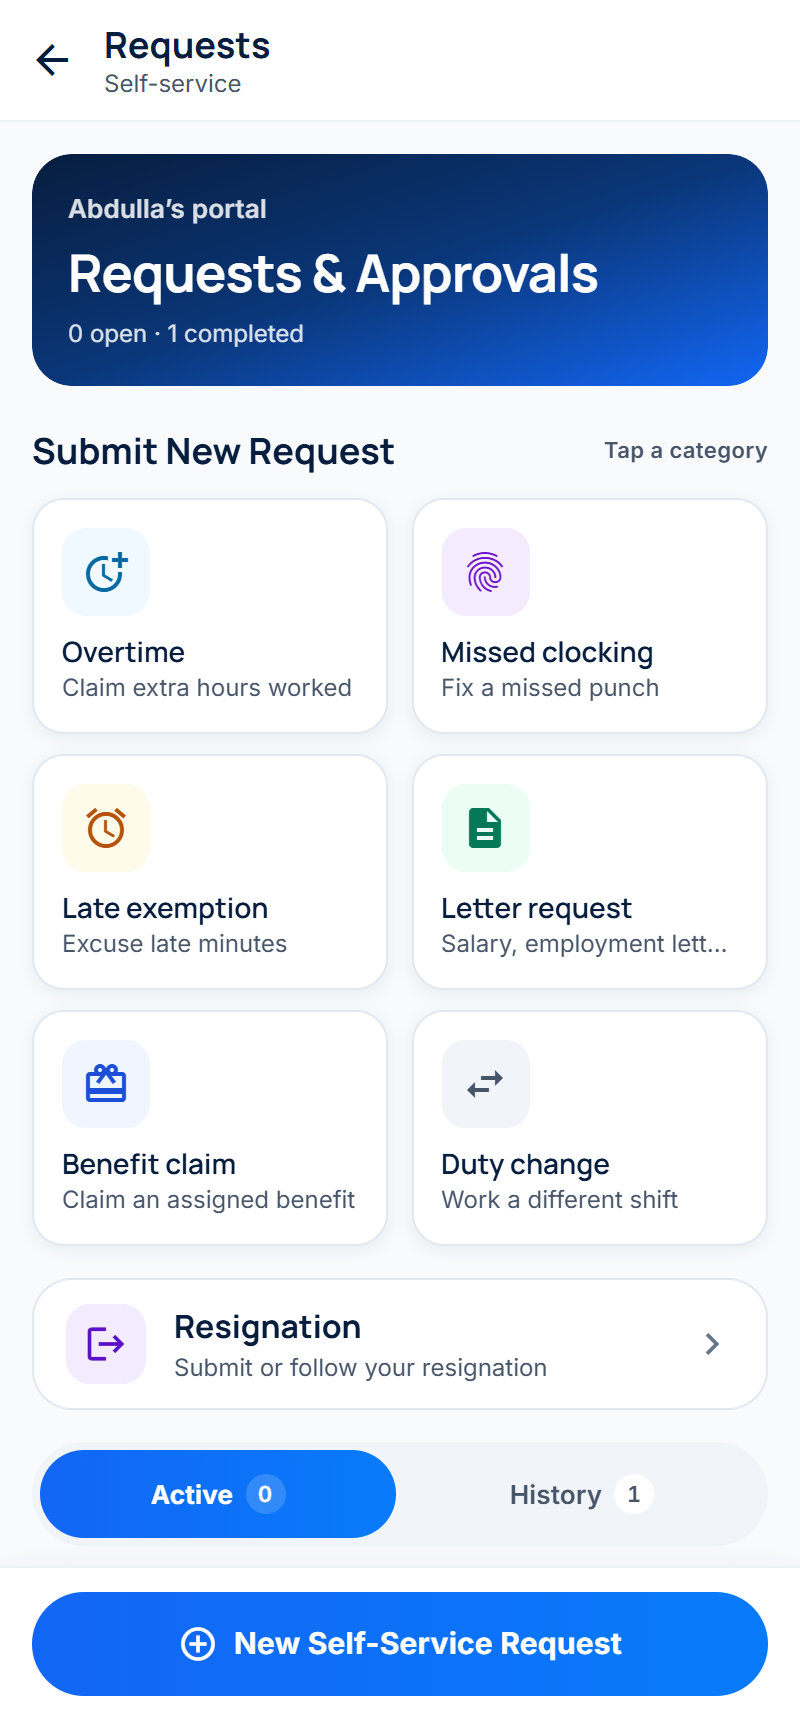
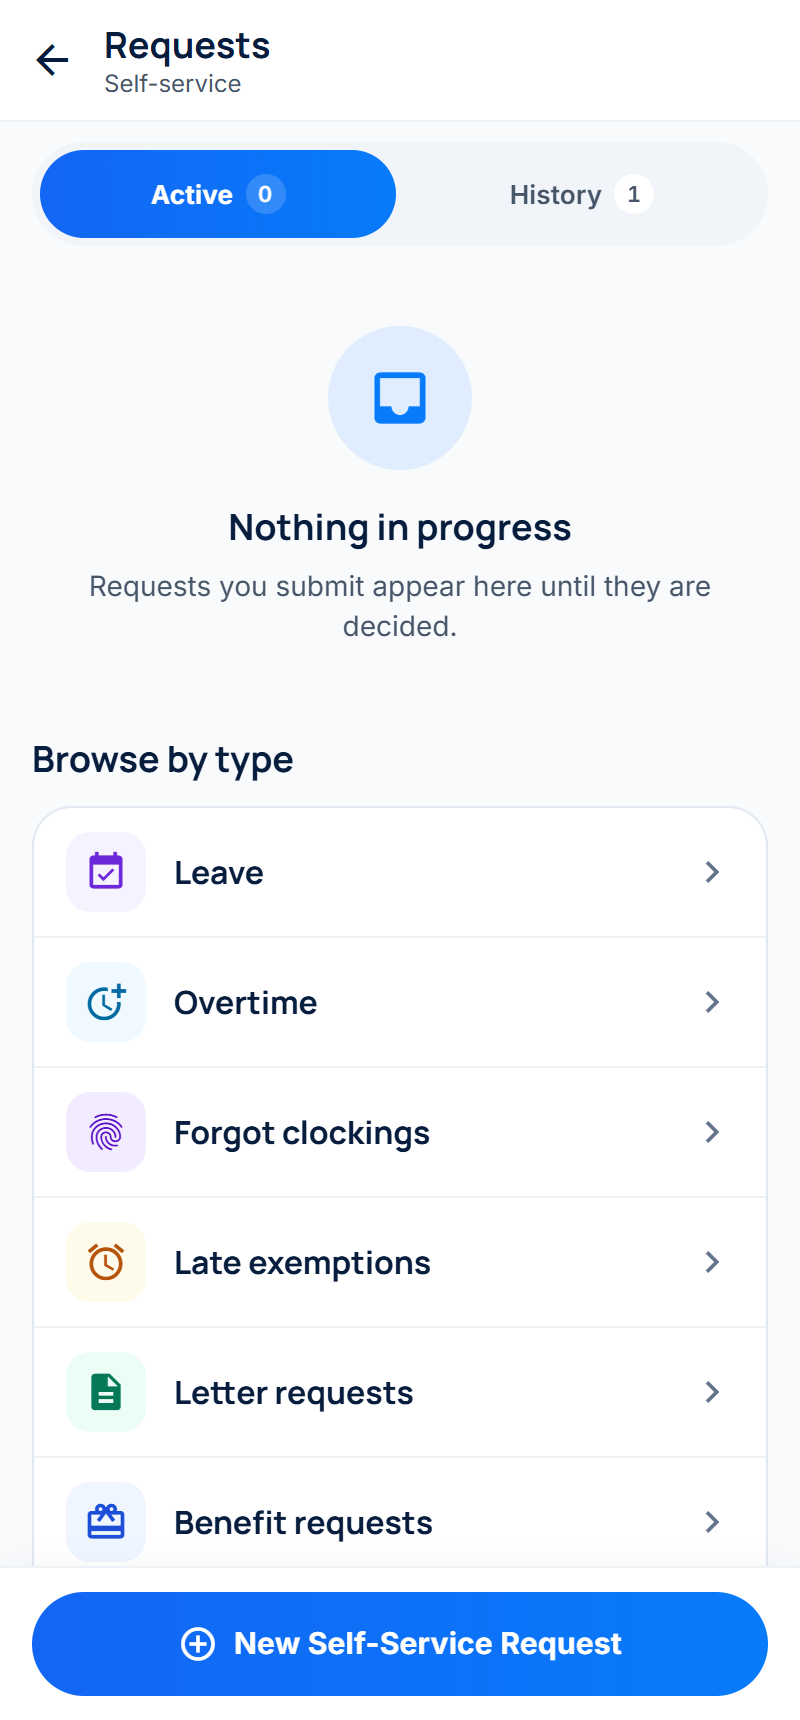
- Submit New Request: one tile for each type of request.
- Active / History: your requests that are still open, and those that have been decided.
- Browse by type: a separate list for each type.
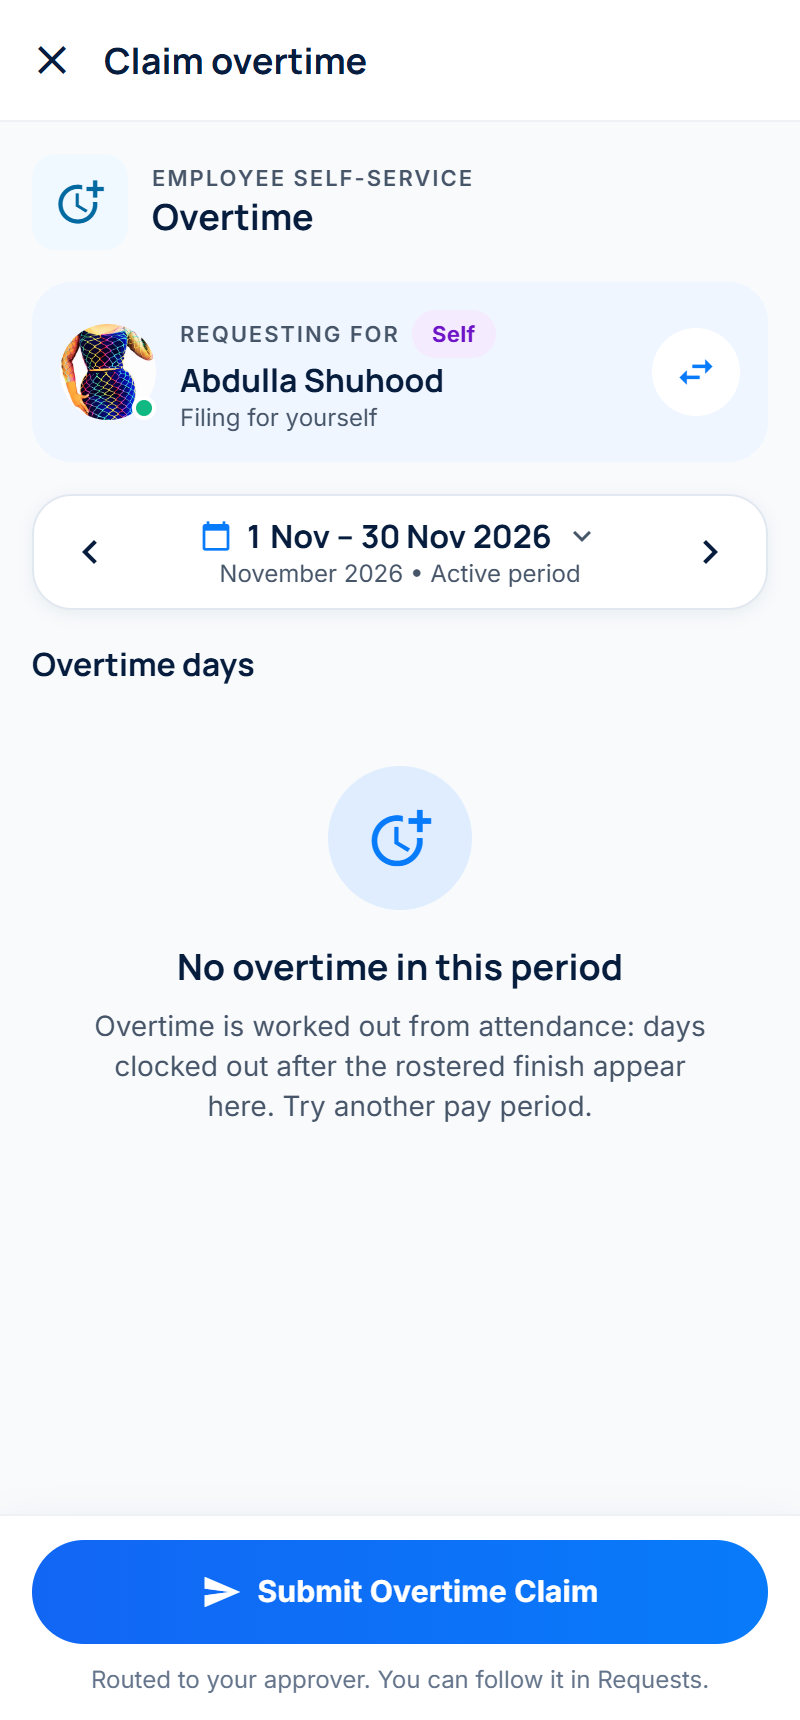
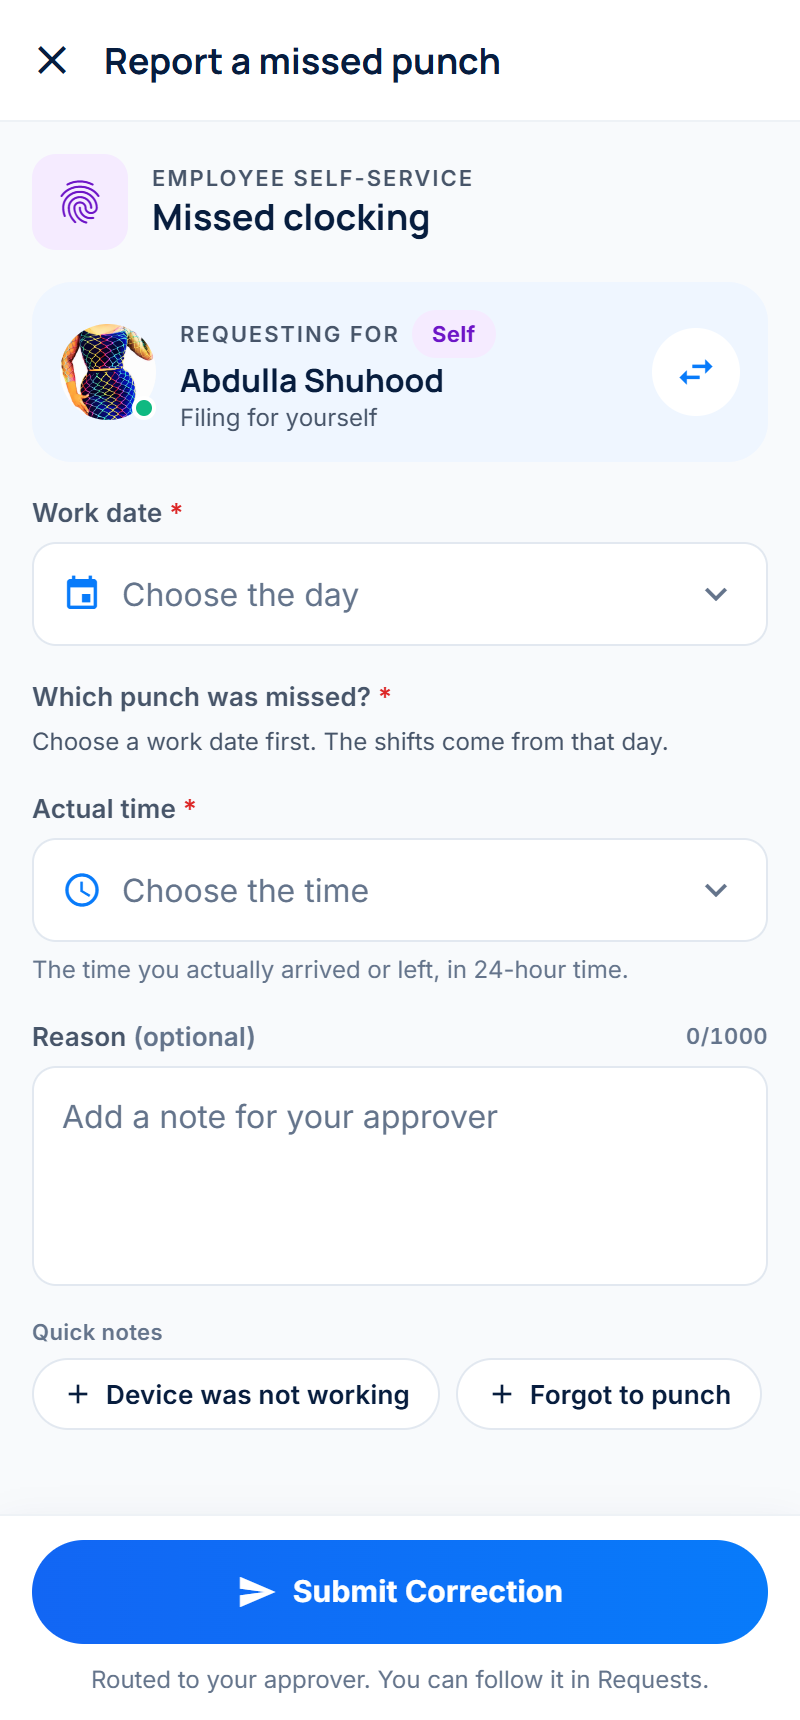
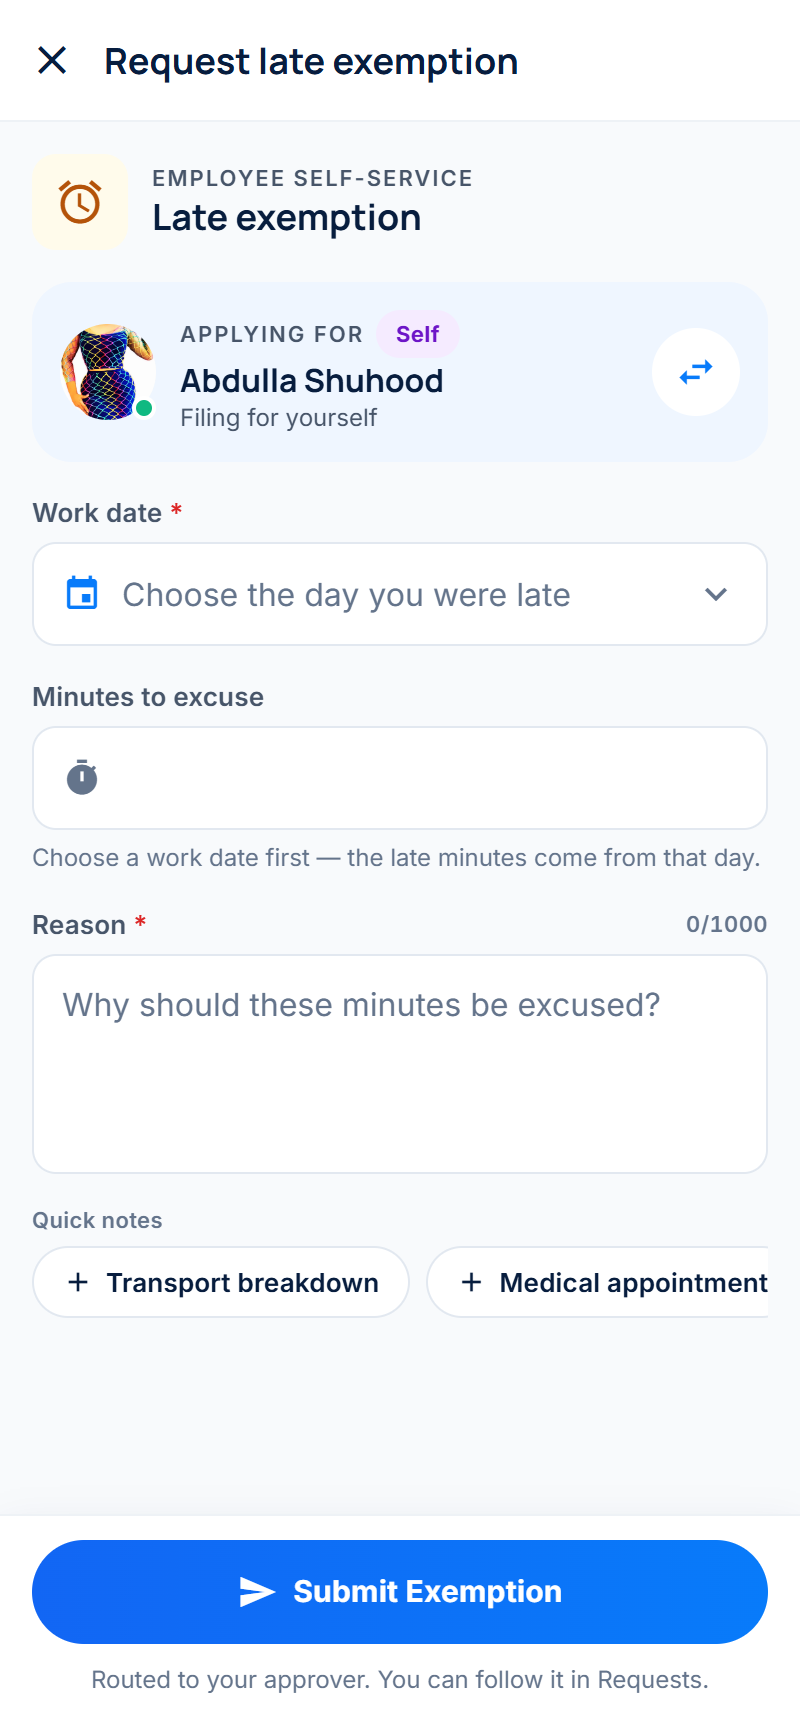
Every request form starts with Requesting for, which shows who the request is for. Managers can tap the swap button to file a request for one of their team members. All forms end with a button that sends the request to your approver. You can follow it in Requests and you get a notification when it is decided.
Overtime
Claim hours you worked after your rostered finish time. Choose the pay period: the form lists the days on which you clocked out later than your shift ended, with the overtime already worked out. Select the days to claim, add a reason if your company asks for one and tap Submit Overtime Claim.
Missed clocking
Report a clock-in or clock-out that was missed or recorded wrongly. Choose the Work date; the form then offers that day's shifts. Choose Which punch was missed, enter the Actual time you arrived or left, add a reason and tap Submit Correction.
Late exemption
Ask for late minutes to be excused, for example after a transport breakdown. Choose the day you were late; the form fills in the late minutes. Explain why and tap Submit Exemption.
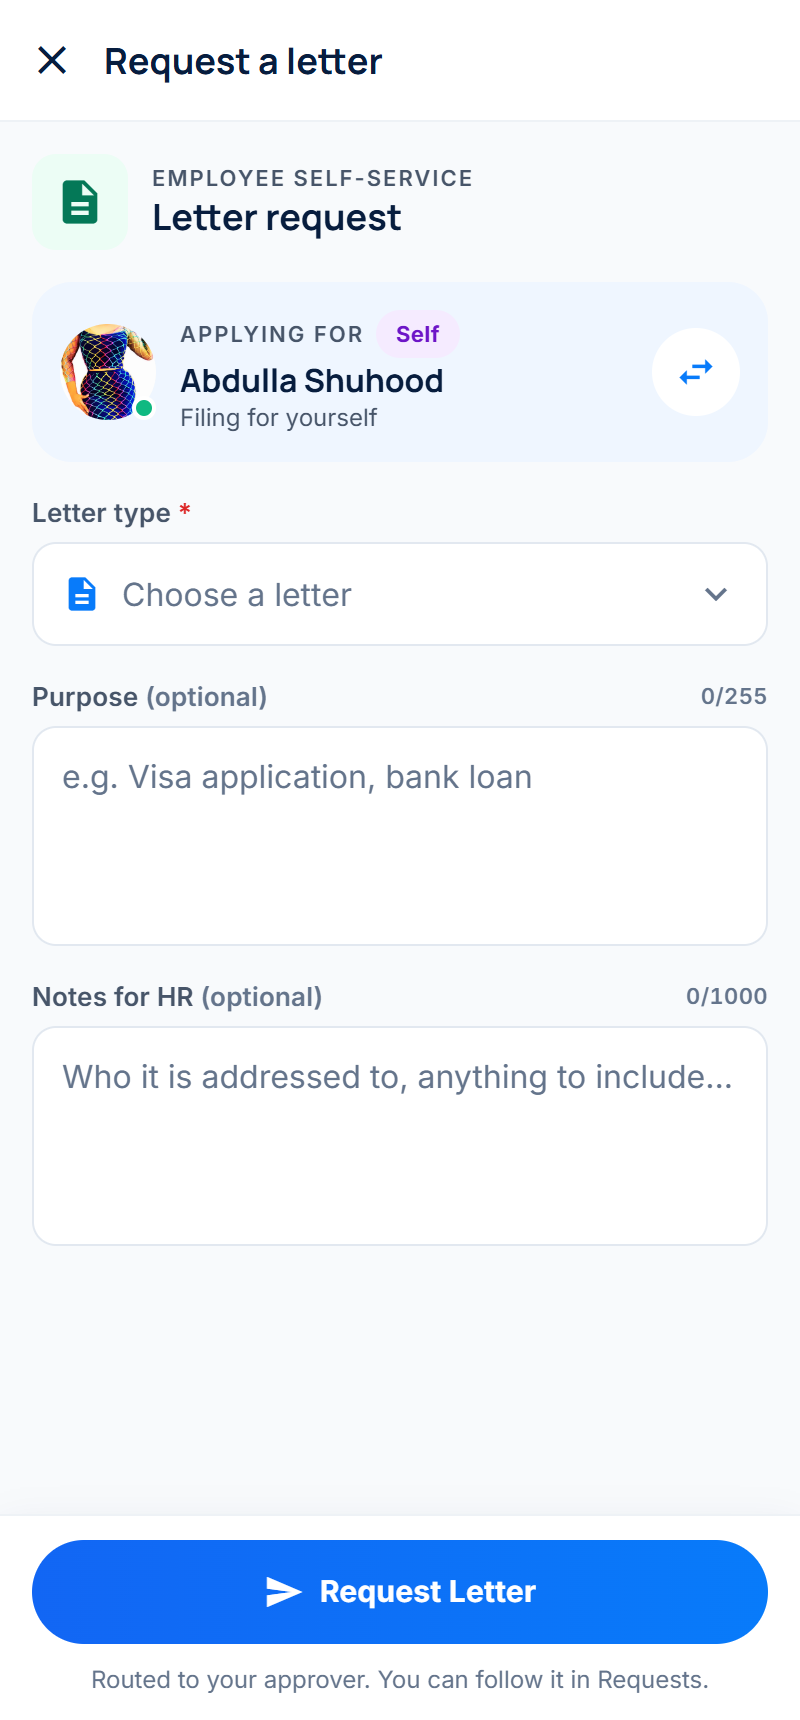
Letter request
Ask HR for a letter, such as a salary certificate or an employment letter. Choose the Letter type, add the purpose and any notes for HR, and tap Request Letter. When HR issues the letter you find it under My documents (section 4.6).
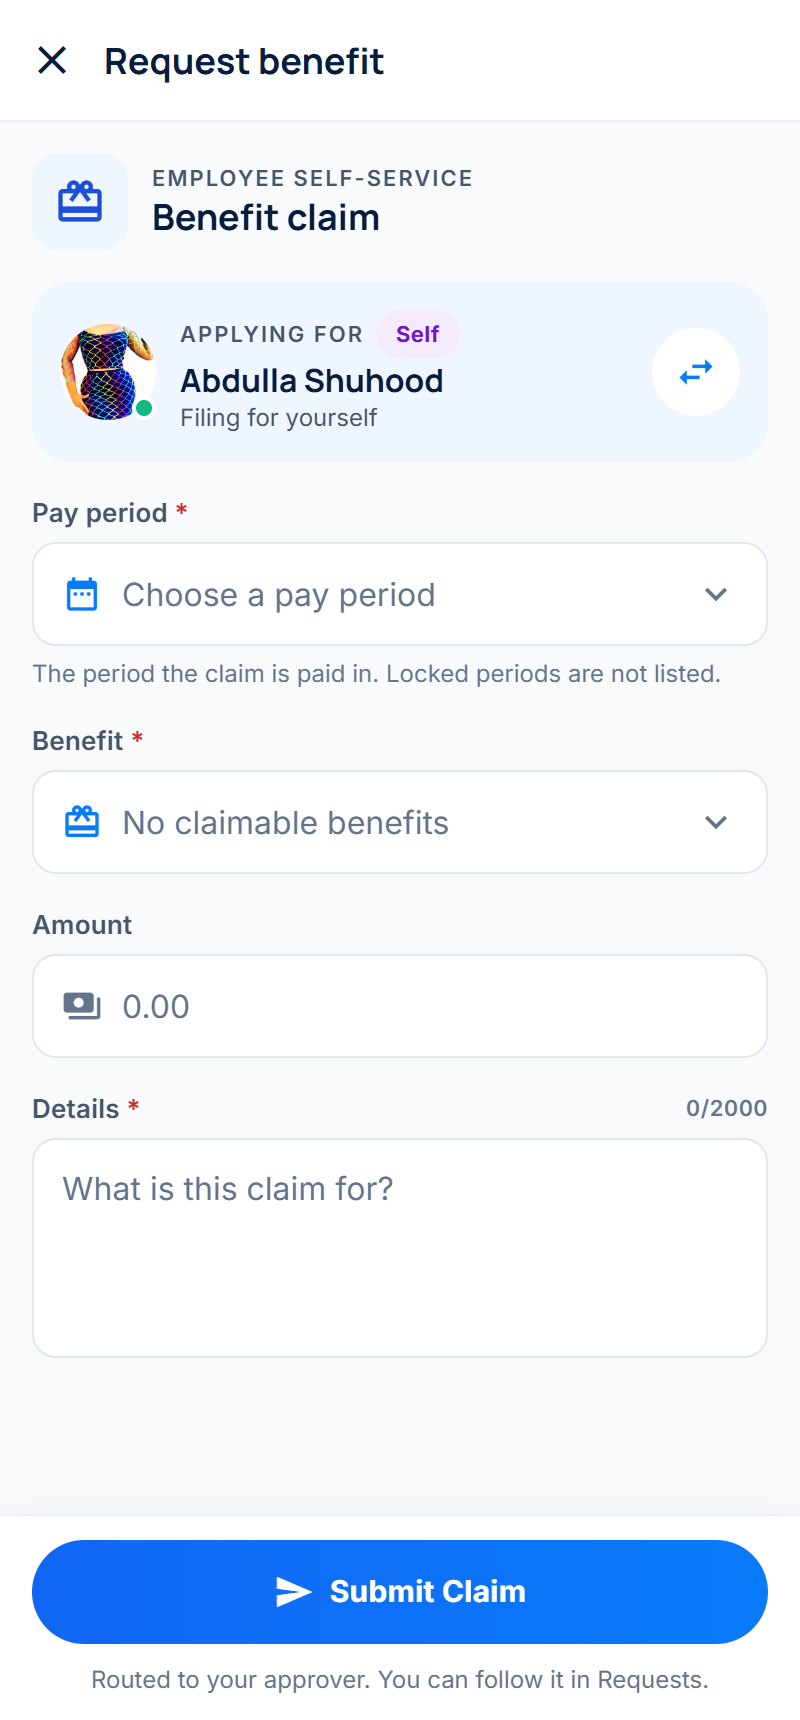
Benefit claim
Claim a benefit that is assigned to you. Choose the pay period and the benefit, enter the amount and details, attach a receipt if needed and tap Submit Claim. Only benefits your company has assigned to you appear in the list.
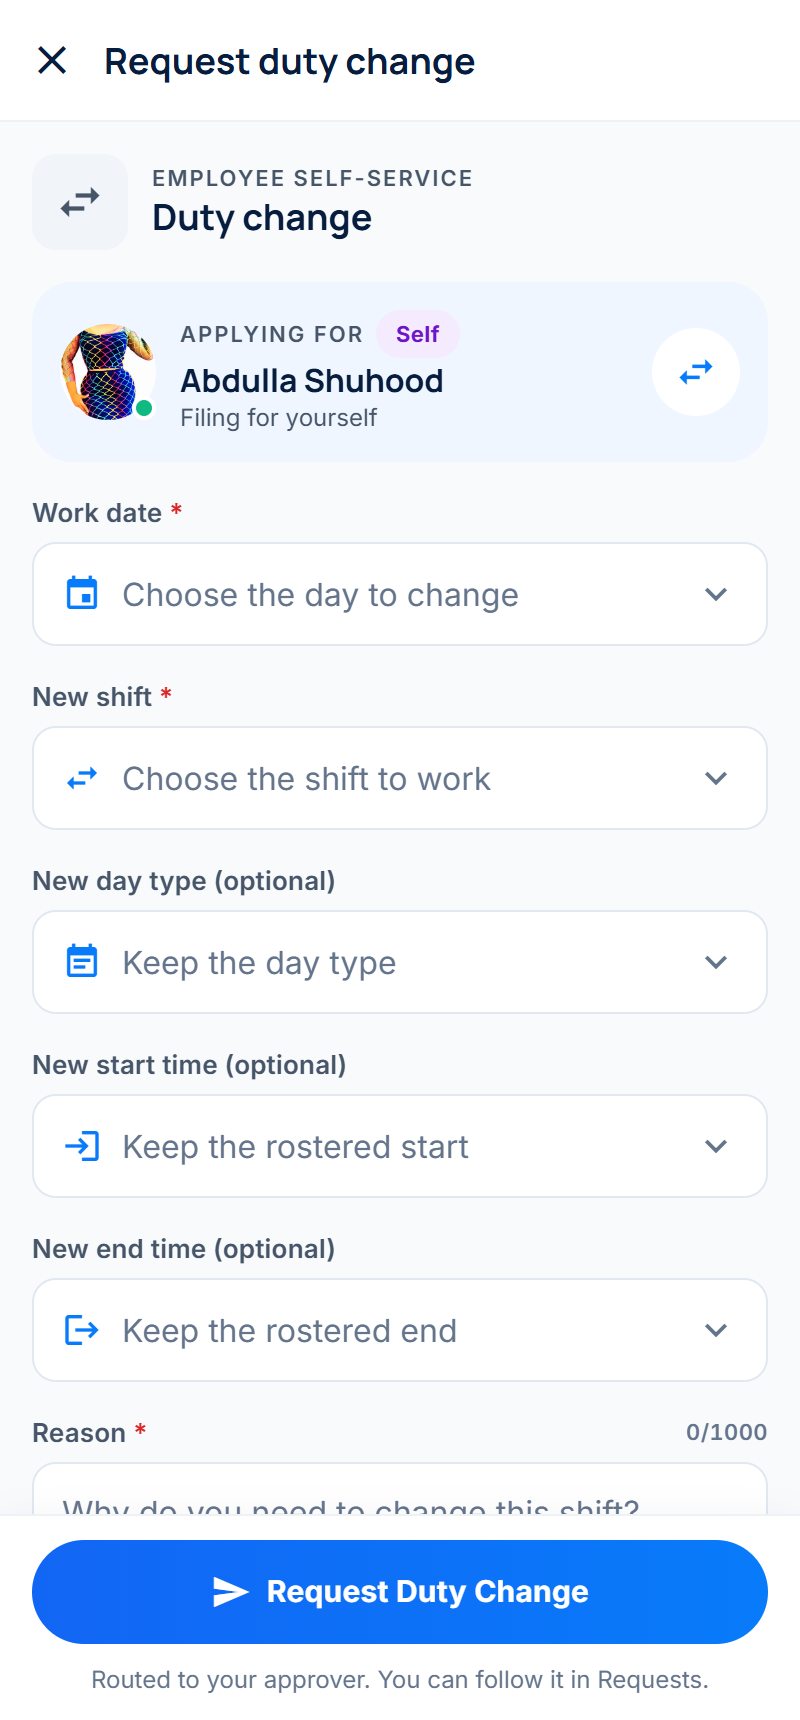
Duty change
Ask to work a different shift on a day. Choose the Work date and the New shift, optionally a new day type and start or end time, give a reason and tap Request Duty Change.
Follow a request
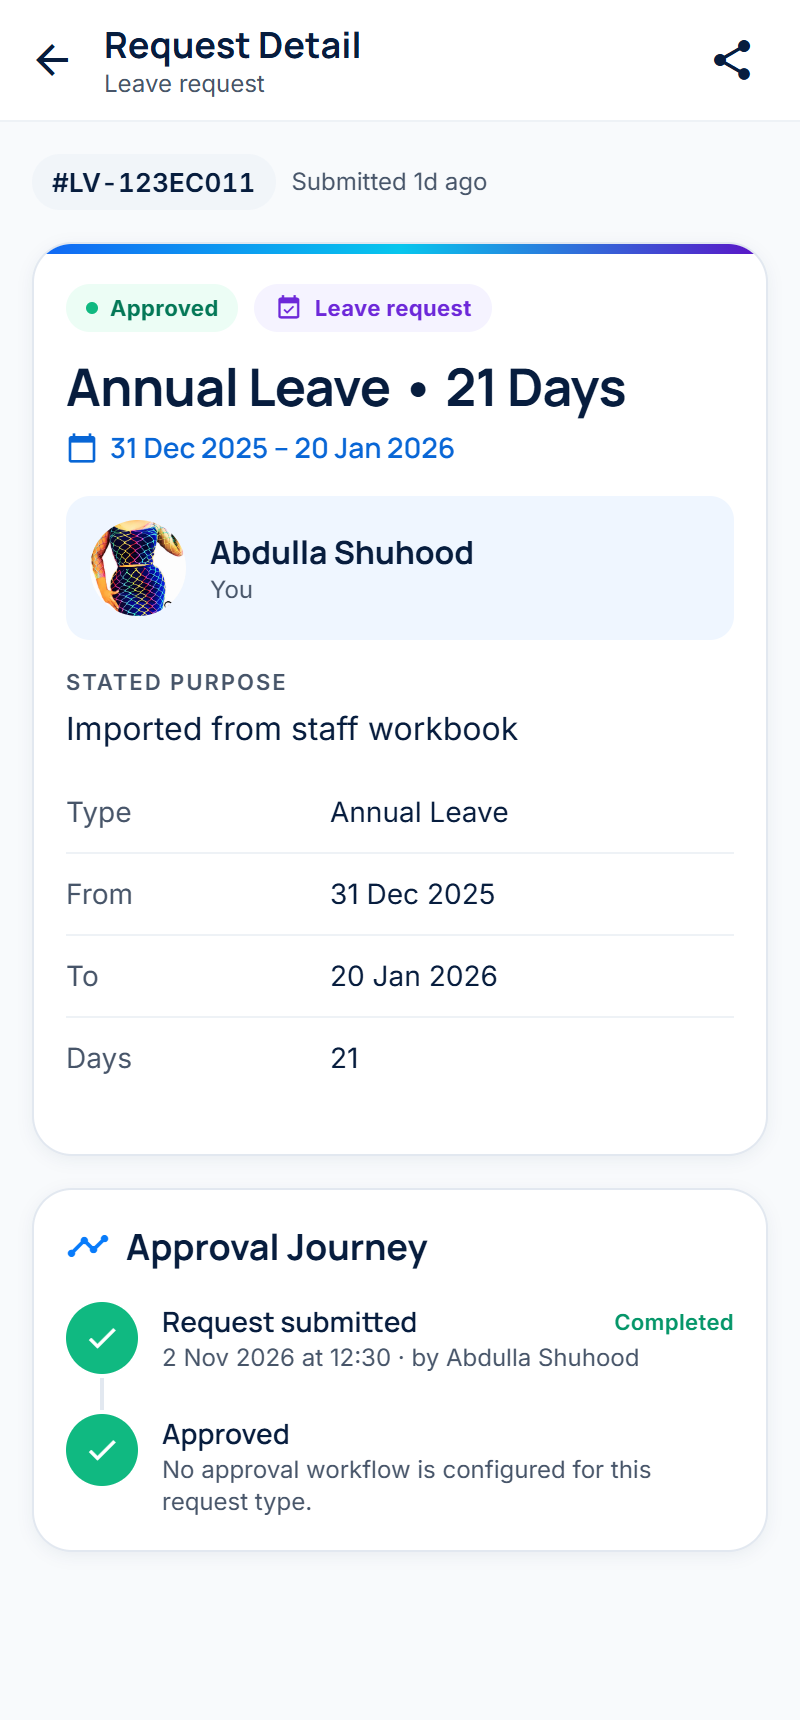
Tap any request to open it. It shows the details you sent, its status and the Approval Journey: who has approved it so far and who has it now. While a request is still pending you can change or cancel it from here.
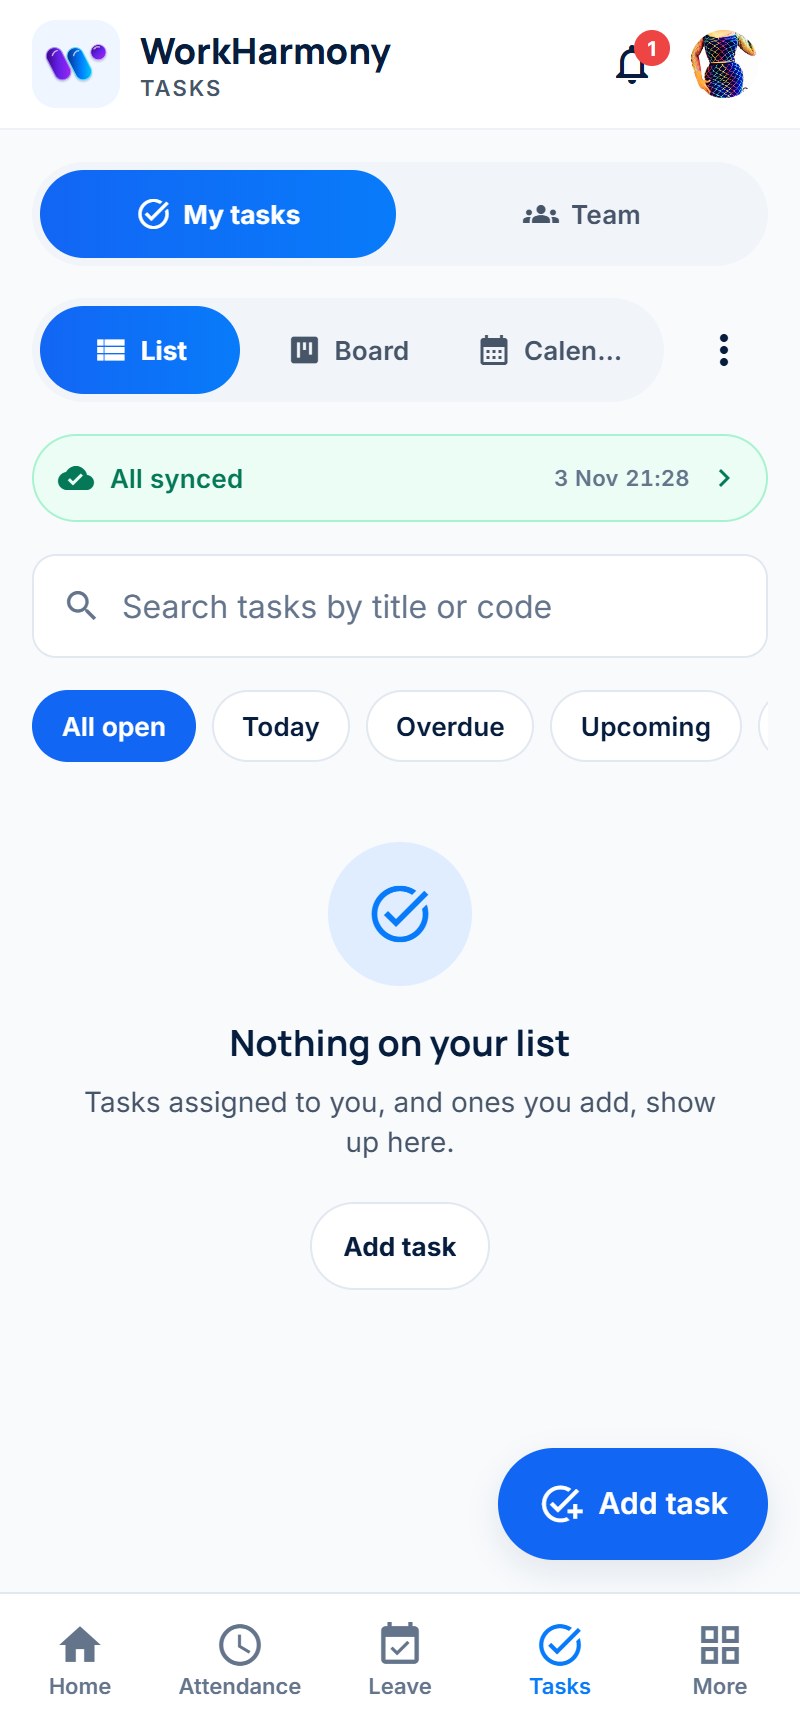
4.5 Tasks
If your company uses Tasks & Workflows, the fourth tab is Tasks. It lists the work assigned to you, with filters for today, overdue and upcoming tasks, and views as a list, a board or a calendar. Tap Add task to add your own. Managers also see a Team view.
If your company does not use Tasks, the fourth tab is Directory, where you can find colleagues and their contact details.
4.6 More
The More tab holds everything else.
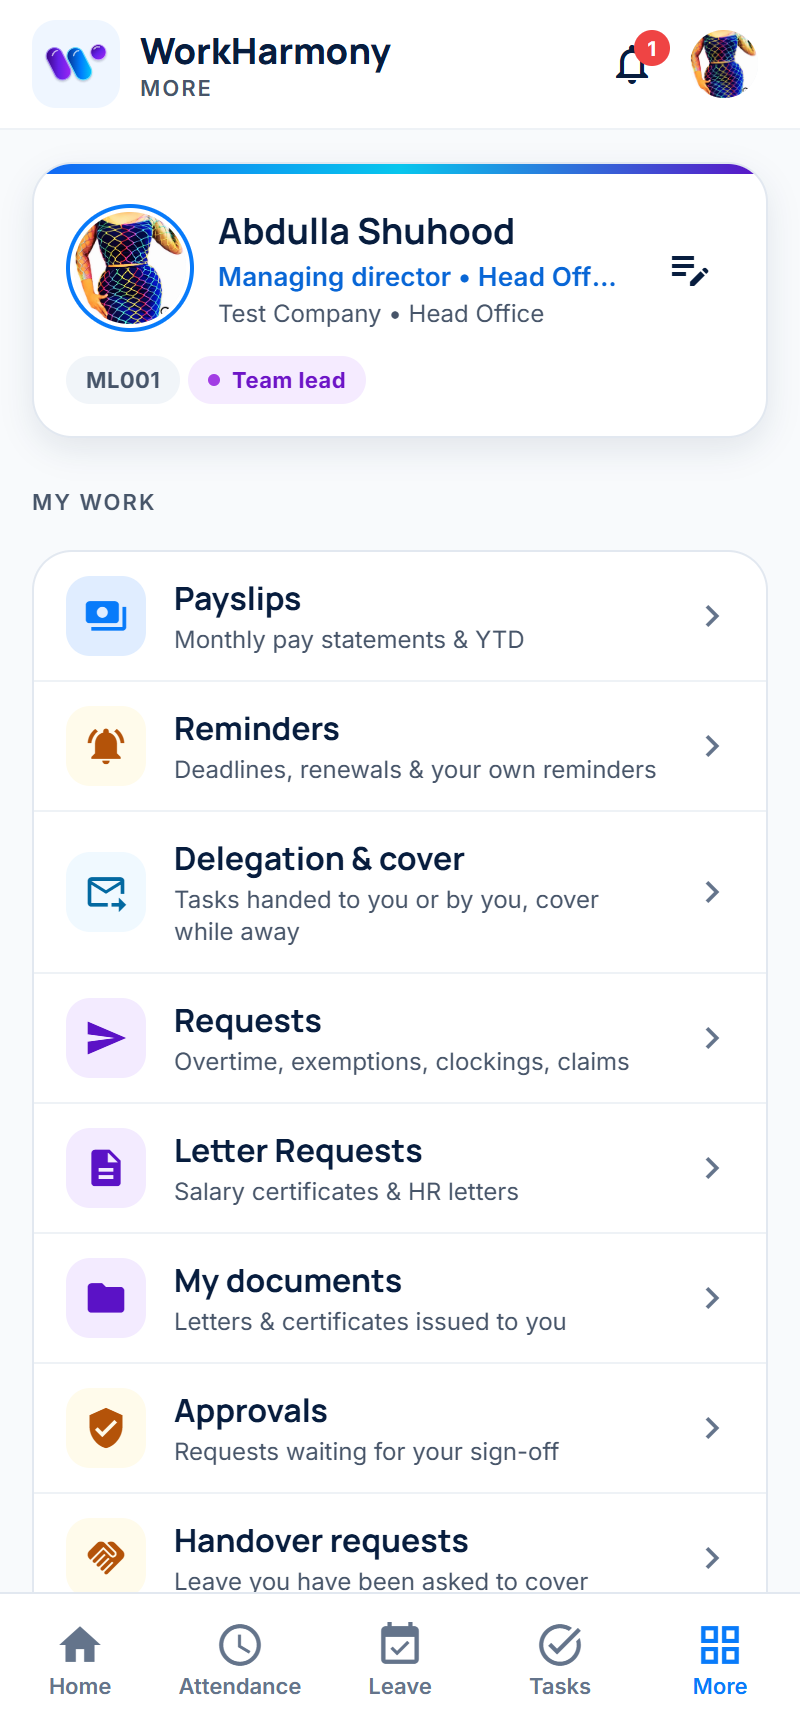
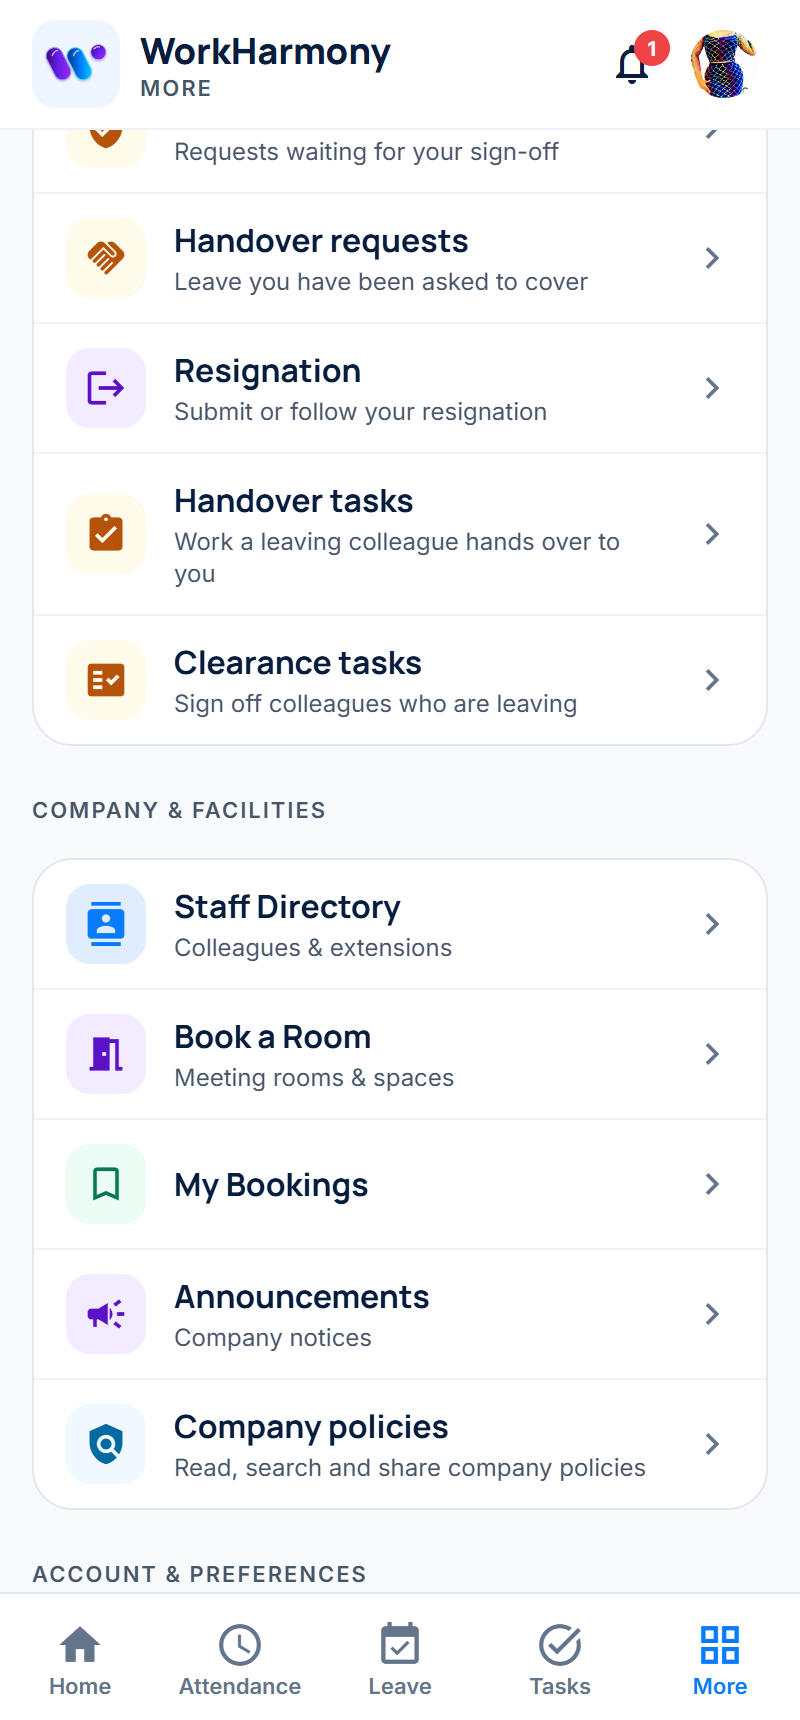
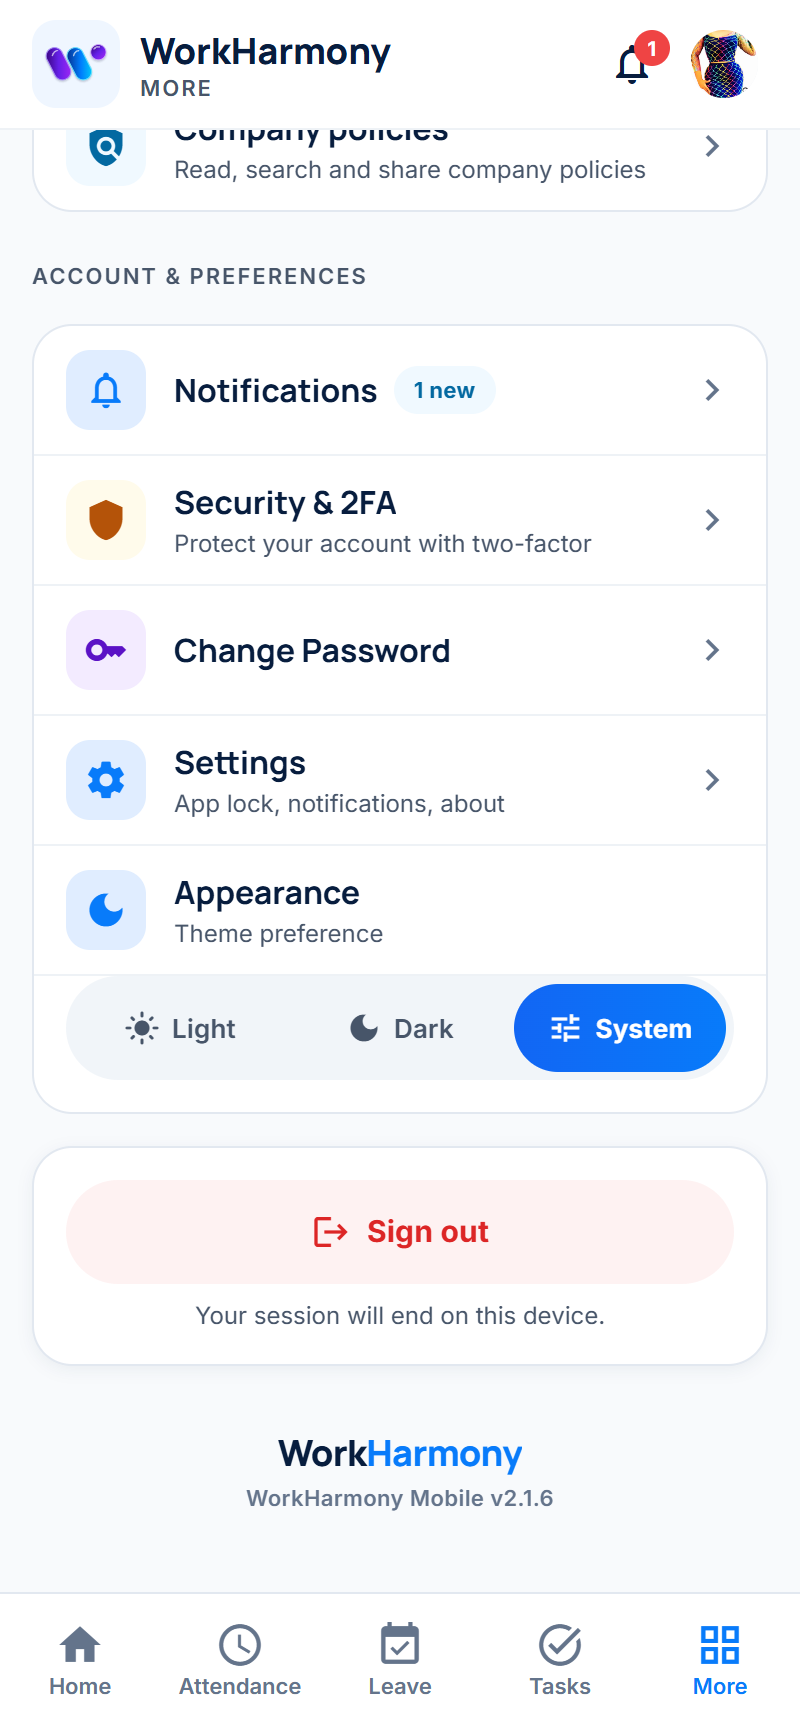
| Section | What you find there |
|---|---|
| Your profile card | Your name, job, department and employee code. Tap it to open your profile. |
| My work | Payslips, Reminders, Delegation & cover, Requests, Letter Requests, My documents, Approvals, Handover requests, Resignation and more, depending on your company and role |
| Company & facilities | Staff Directory, Book a Room, My Bookings, Announcements, Company policies |
| Account & preferences | Notifications, Security & 2FA, Change Password, Settings and Appearance |
| Sign out | Ends your session on this phone |
Payslips
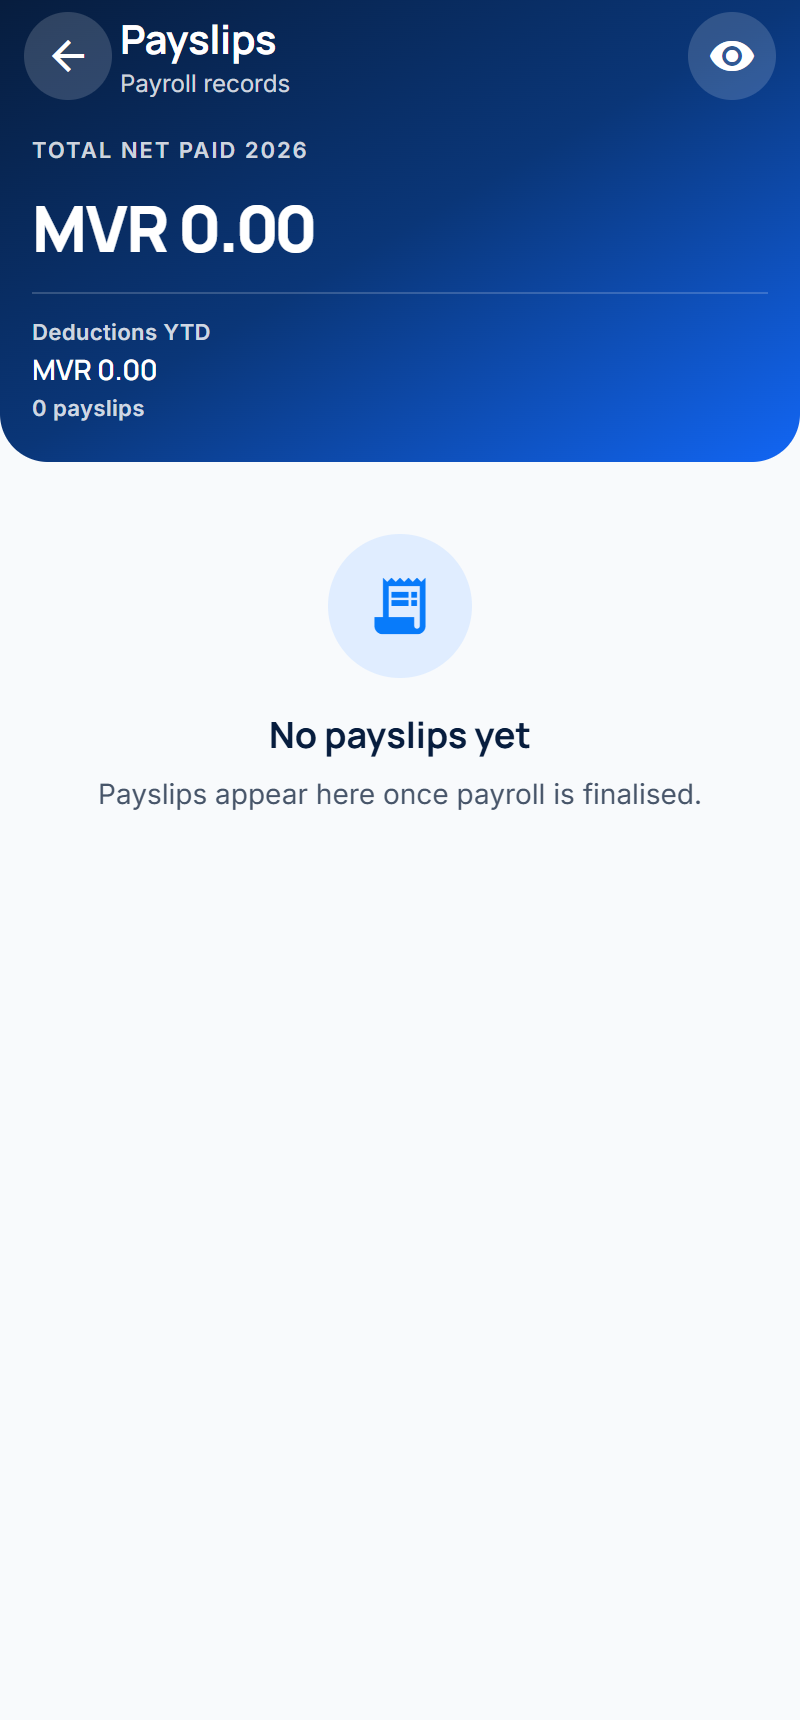
Your monthly payslips, newest first, with the total paid this year. Tap a payslip to see every earning and deduction, and to download or share it as a PDF. Tap the eye at the top to hide or show amounts.
My documents
Letters and certificates HR has issued to you, such as the letters you requested. Tap one to open or share it.
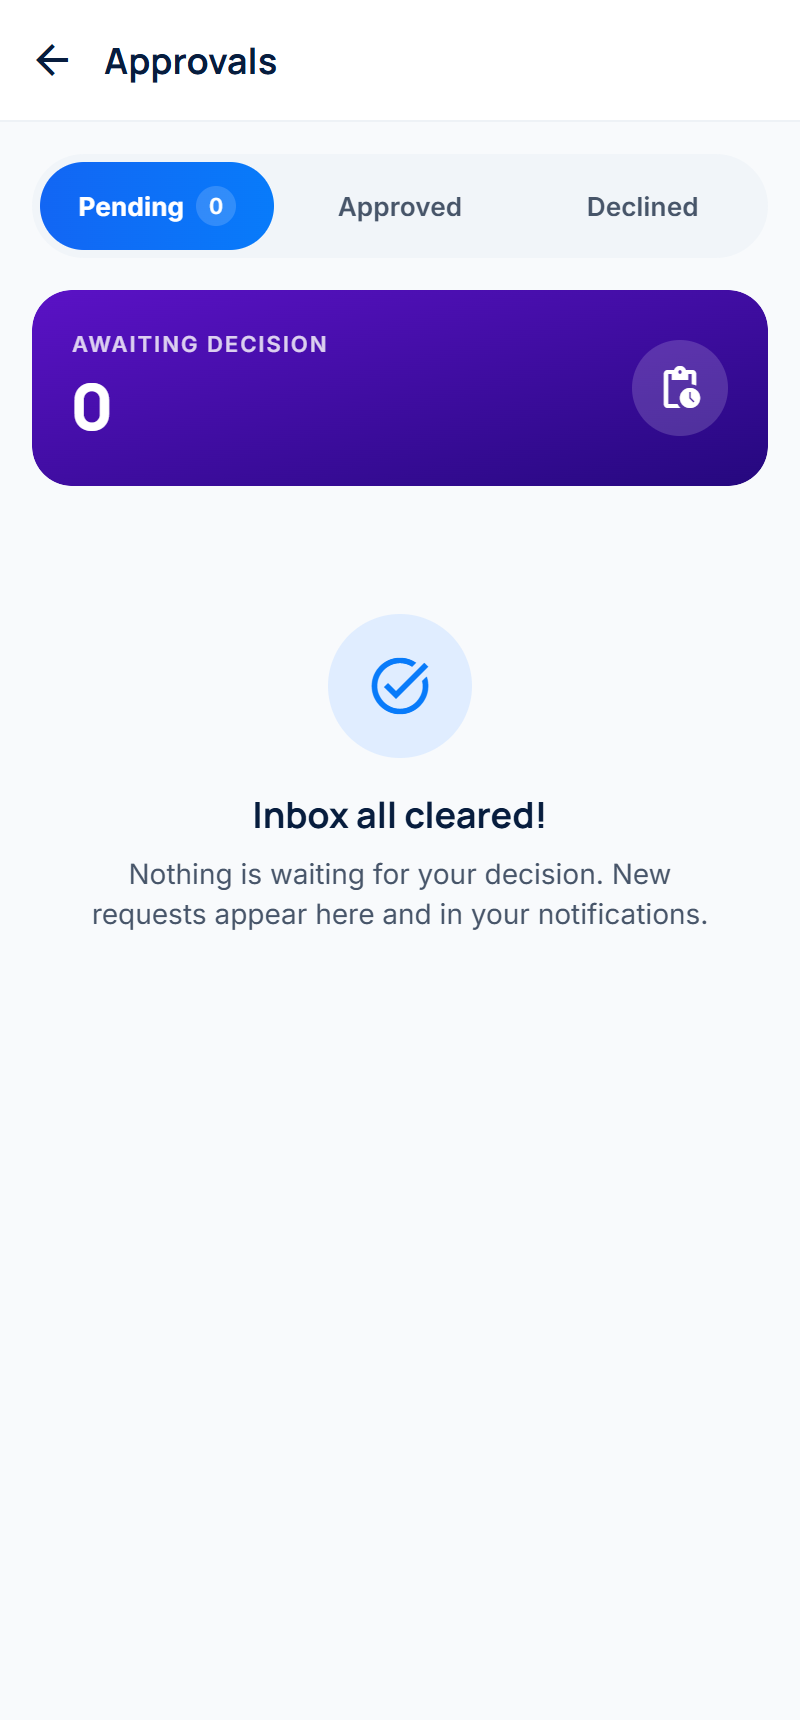
Approvals (managers)
Requests waiting for your decision. Open a request to see its details and approve, return or decline it. Approved and Declined show what you have already decided.
Announcements and notifications
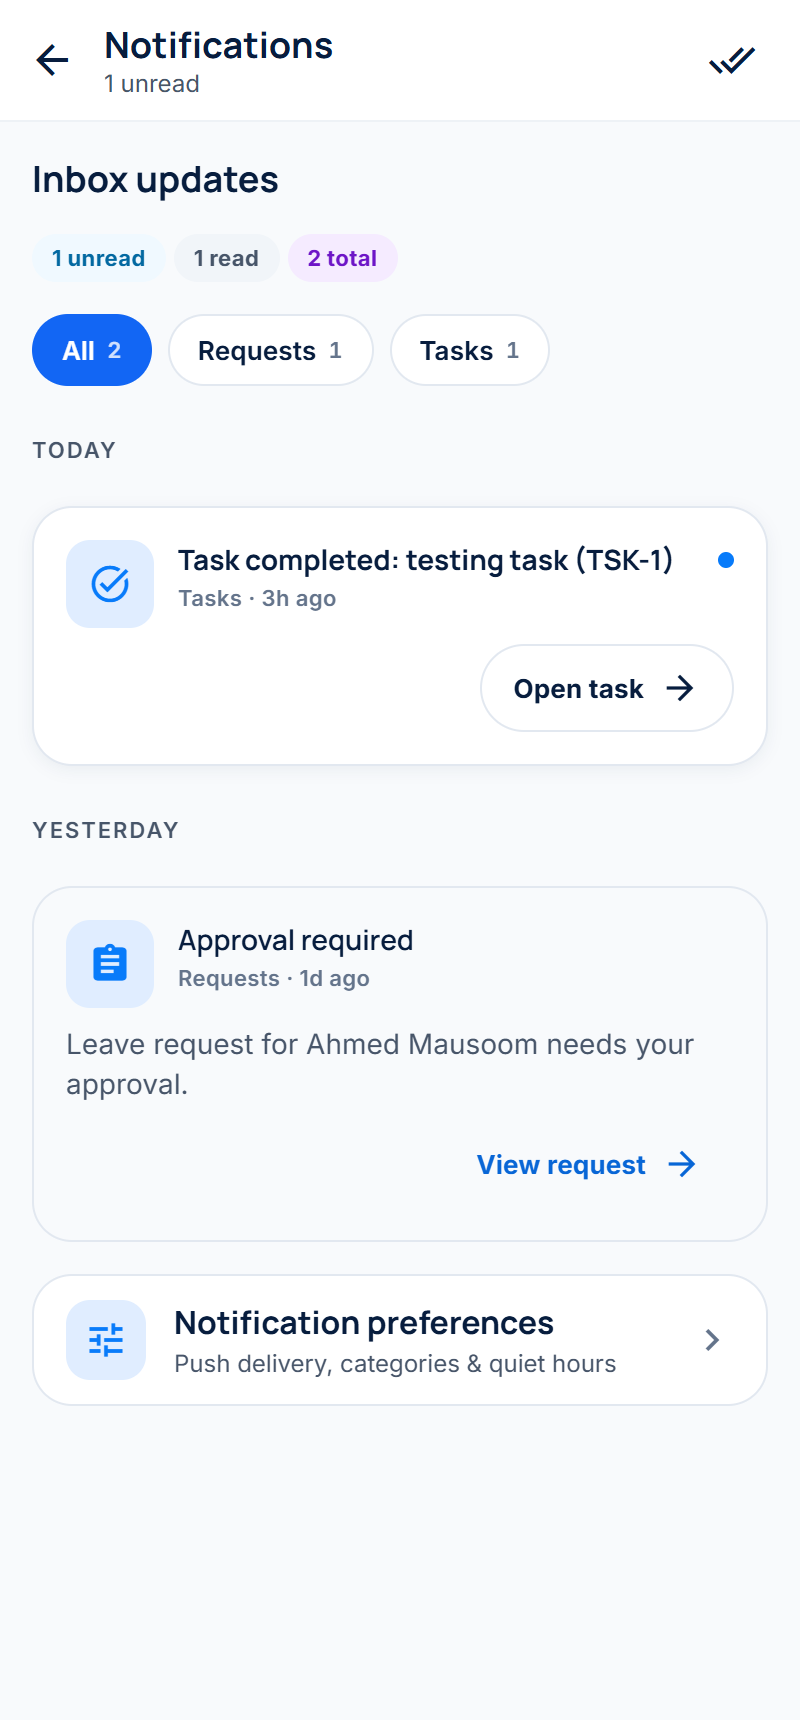
Announcements shows company notices. Notifications shows everything the app has told you: request decisions, approvals waiting, tasks and reminders. Tap a notification to go straight to what it is about.
Your profile
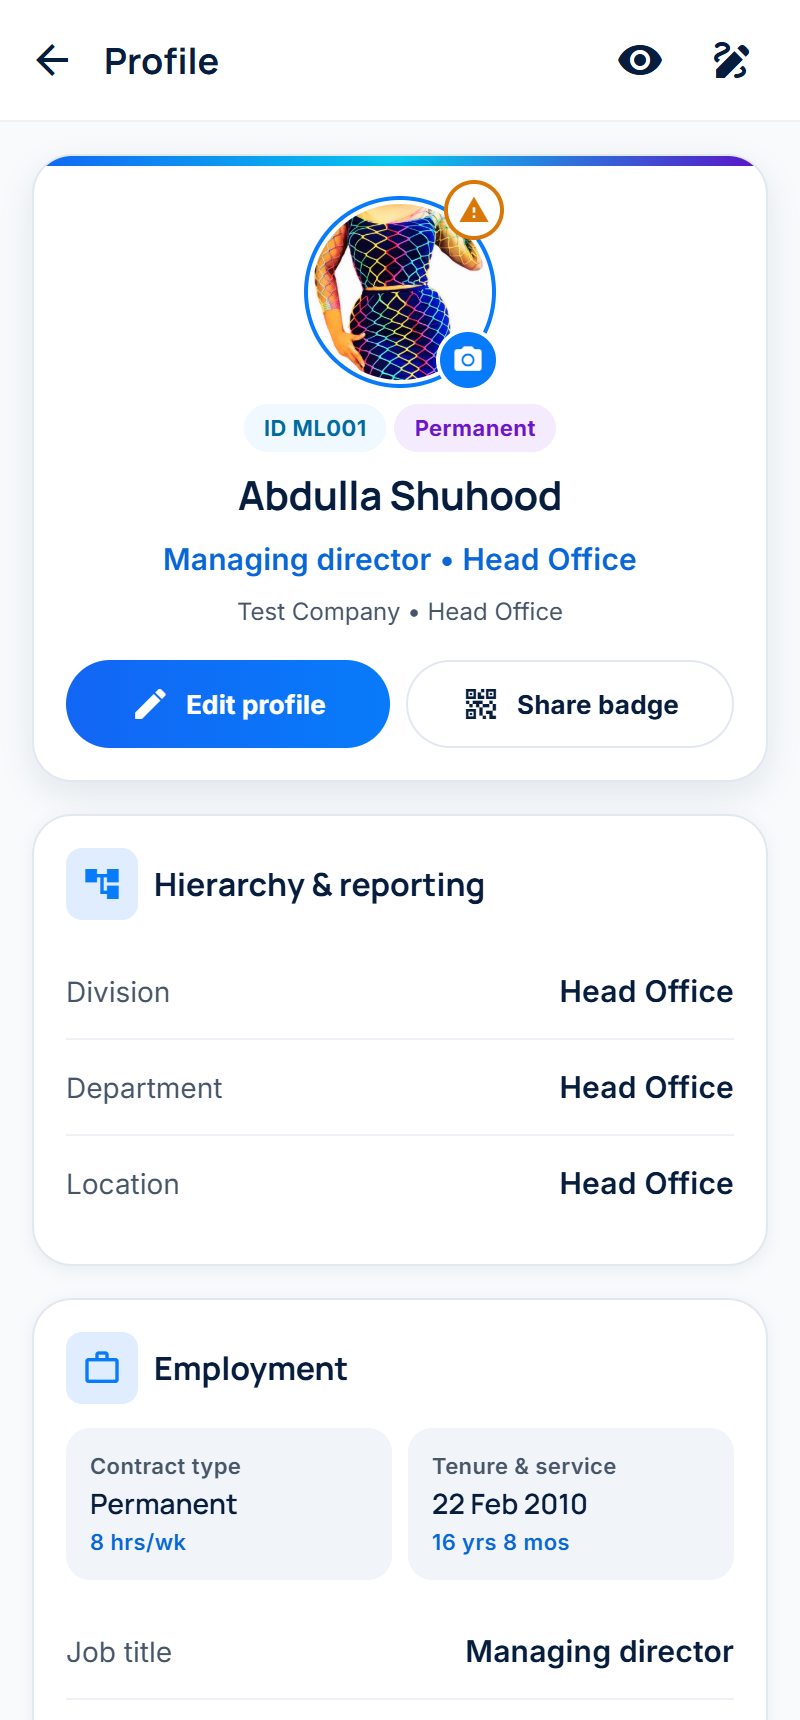
Your personal, employment and contact details as HR has them. Tap Edit profile to ask HR to change your contact details, address or photo; HR approves the change before it appears. Share badge shows your digital staff badge.
5. Simple Mode
Simple Mode puts the everyday tasks first, with larger buttons and fewer screens. It shows the same information and sends the same requests as Complete Mode.
To switch to Simple Mode, open More › Settings and tap Simple Mode under Interface mode. The change happens at once; you stay signed in and nothing is lost.
5.1 Home
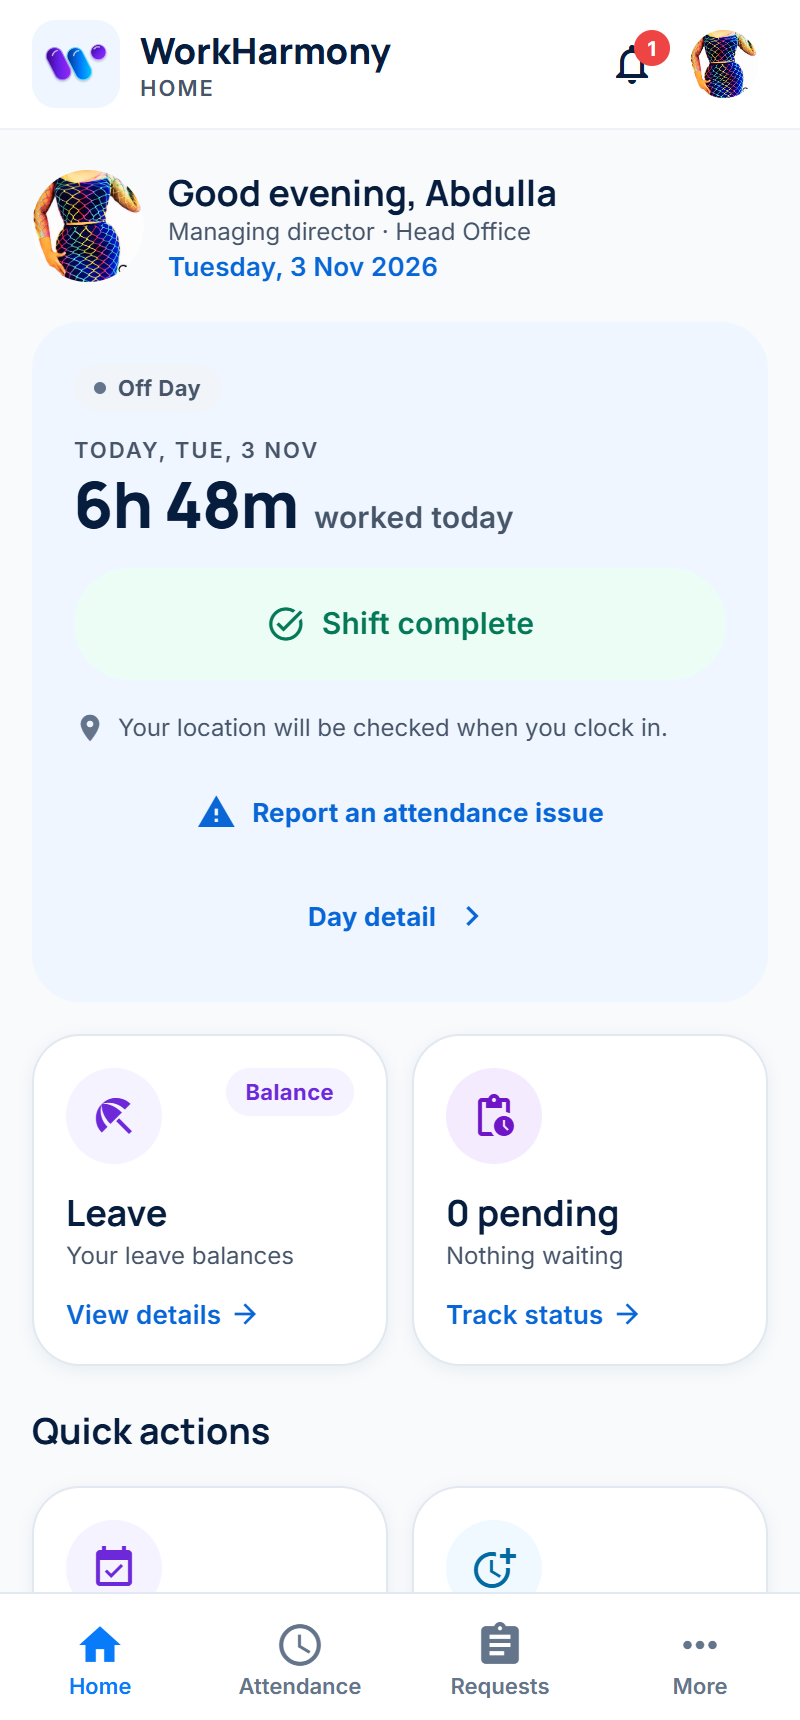
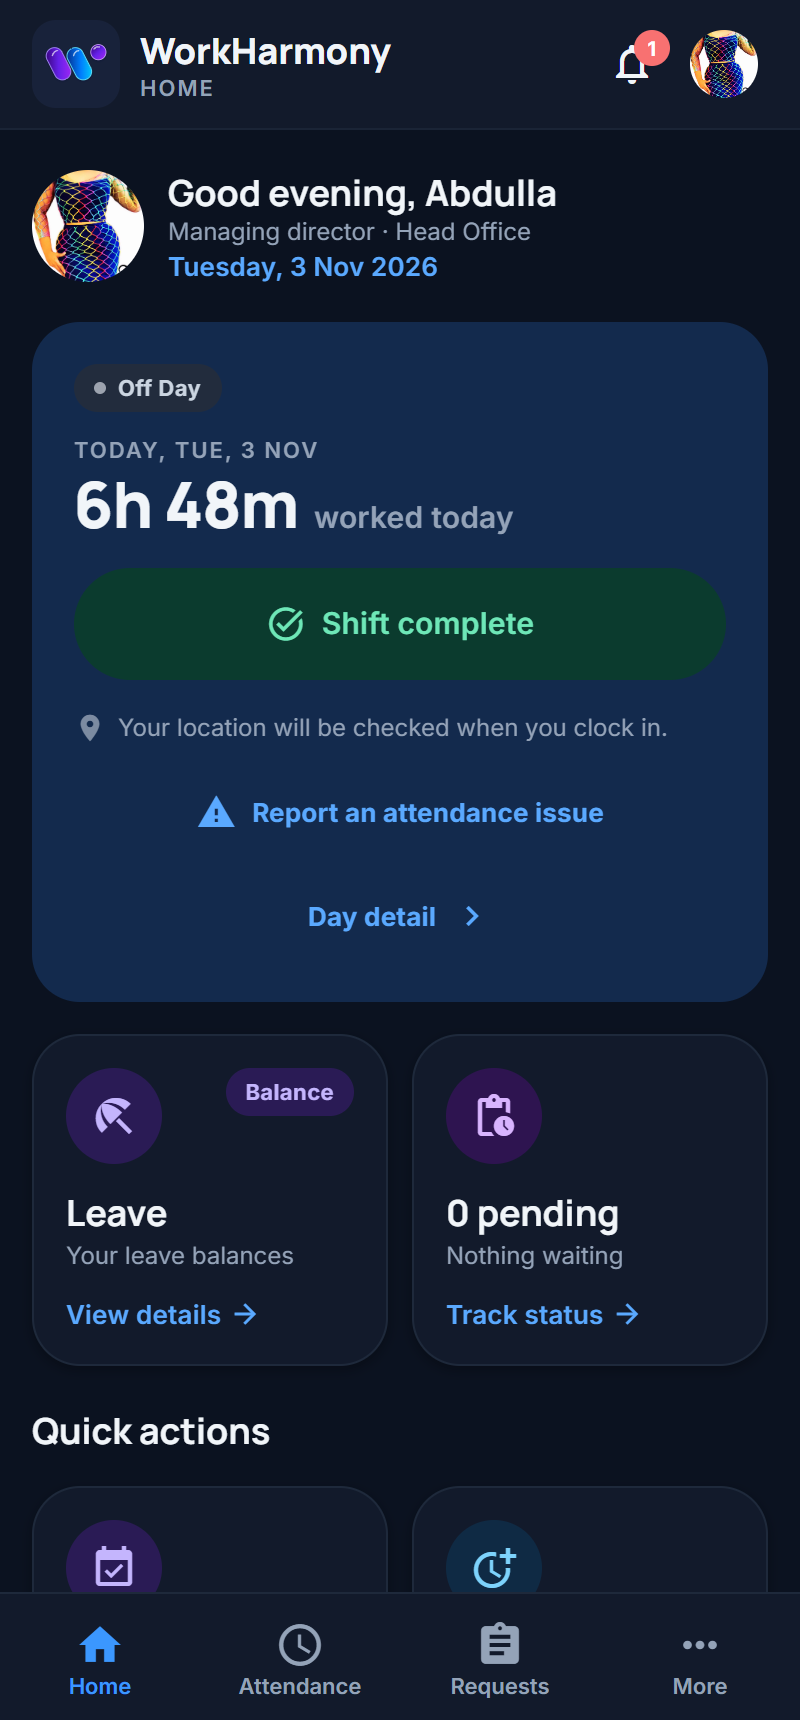
Simple Home shows, from top to bottom:
- A greeting with your name, job and today's date. Tap it to open your profile.
- Today's attendance: what you have worked today and the large Clock in or Clock out button, with Report an attendance issue and Day detail below it.
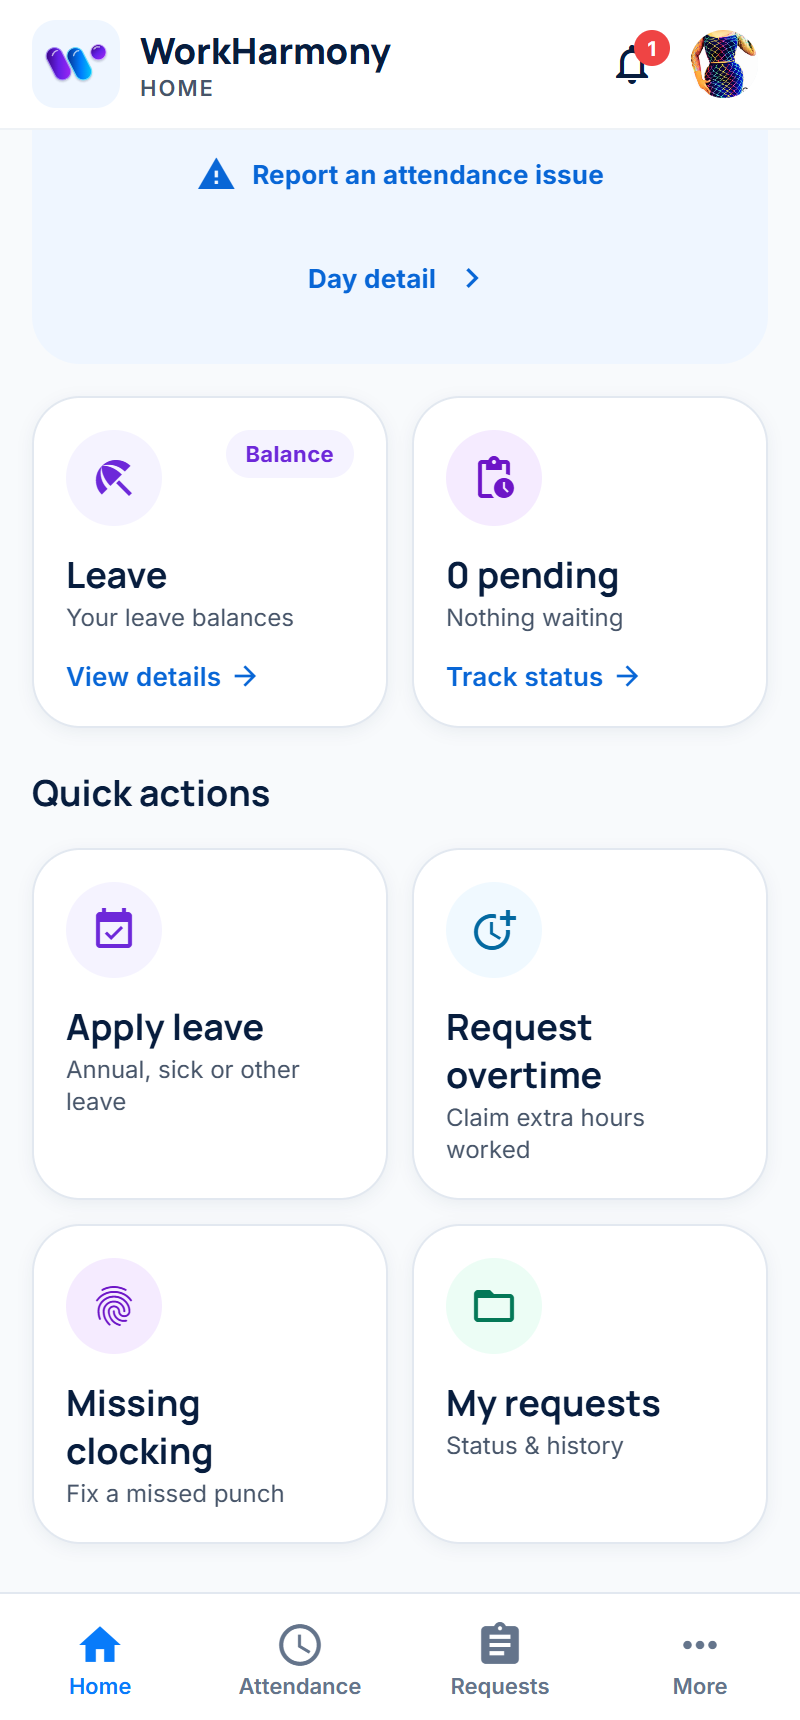
- Leave and Requests tiles: your leave balance and how many of your requests are waiting for a decision. Tap them for the details.
- Needs you: shown only when something waits for you, such as requests to approve or leave you have been asked to cover.
- Quick actions: Apply leave, Request overtime, Missing clocking and My requests.
- Announcement: the latest company notice.
5.2 Attendance
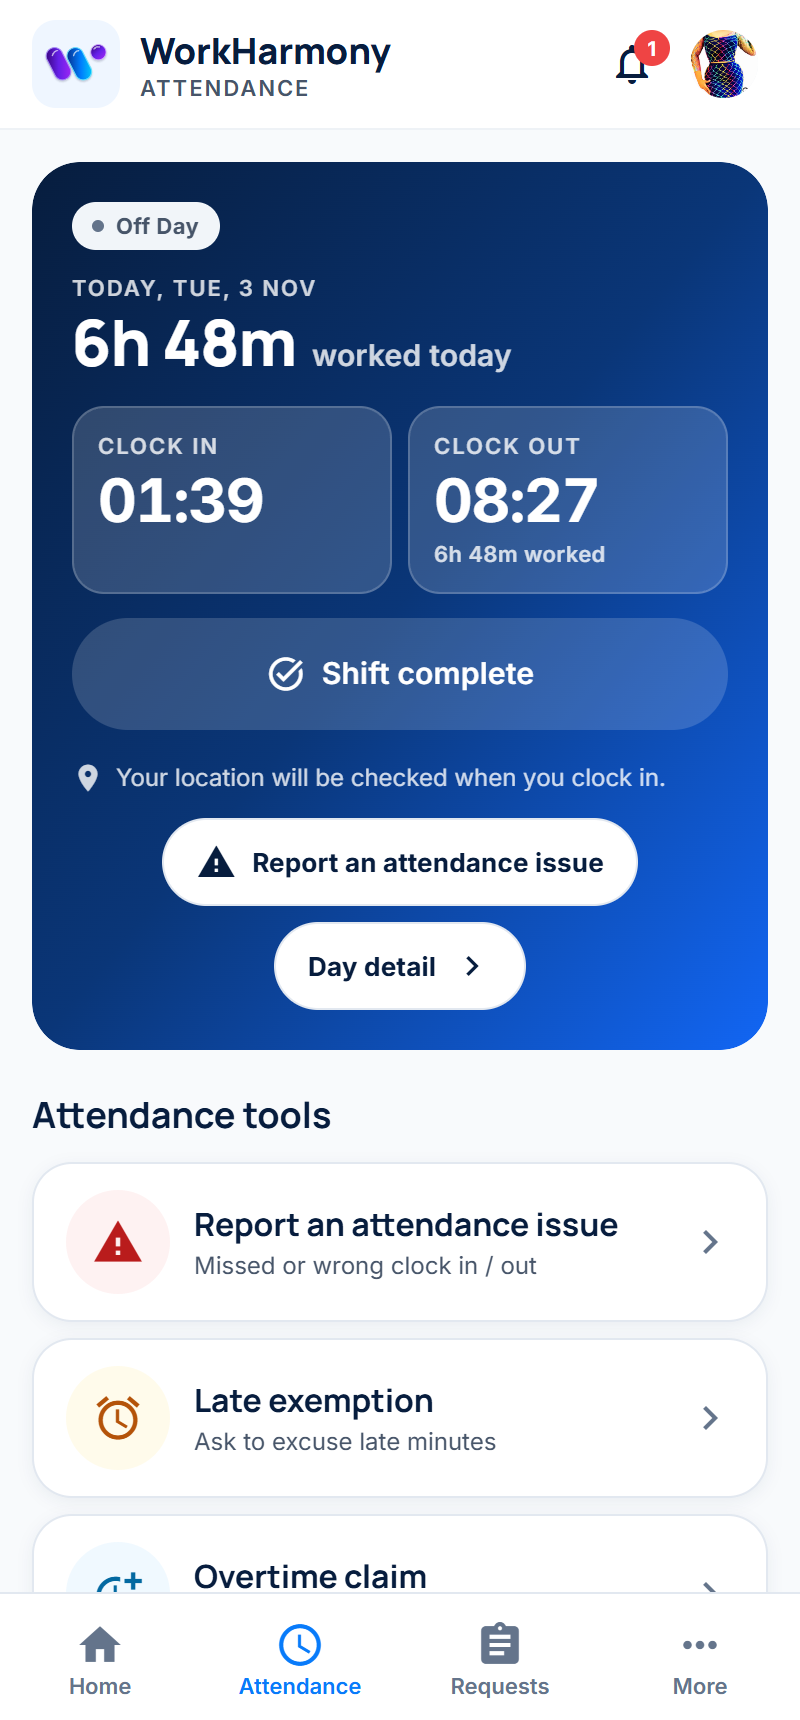
The Simple Attendance tab shows today in a large card: your clock-in and clock-out times, how far through your shift you are, and the clock button. Below it you find:
- Attendance tools: Report an attendance issue, Late exemption and Overtime claim.
- Recent days: your last few days, each with the shift, the times in and out, and any late minutes or overtime. Tap a day for its full timesheet.
- See full history: your attendance a week at a time.
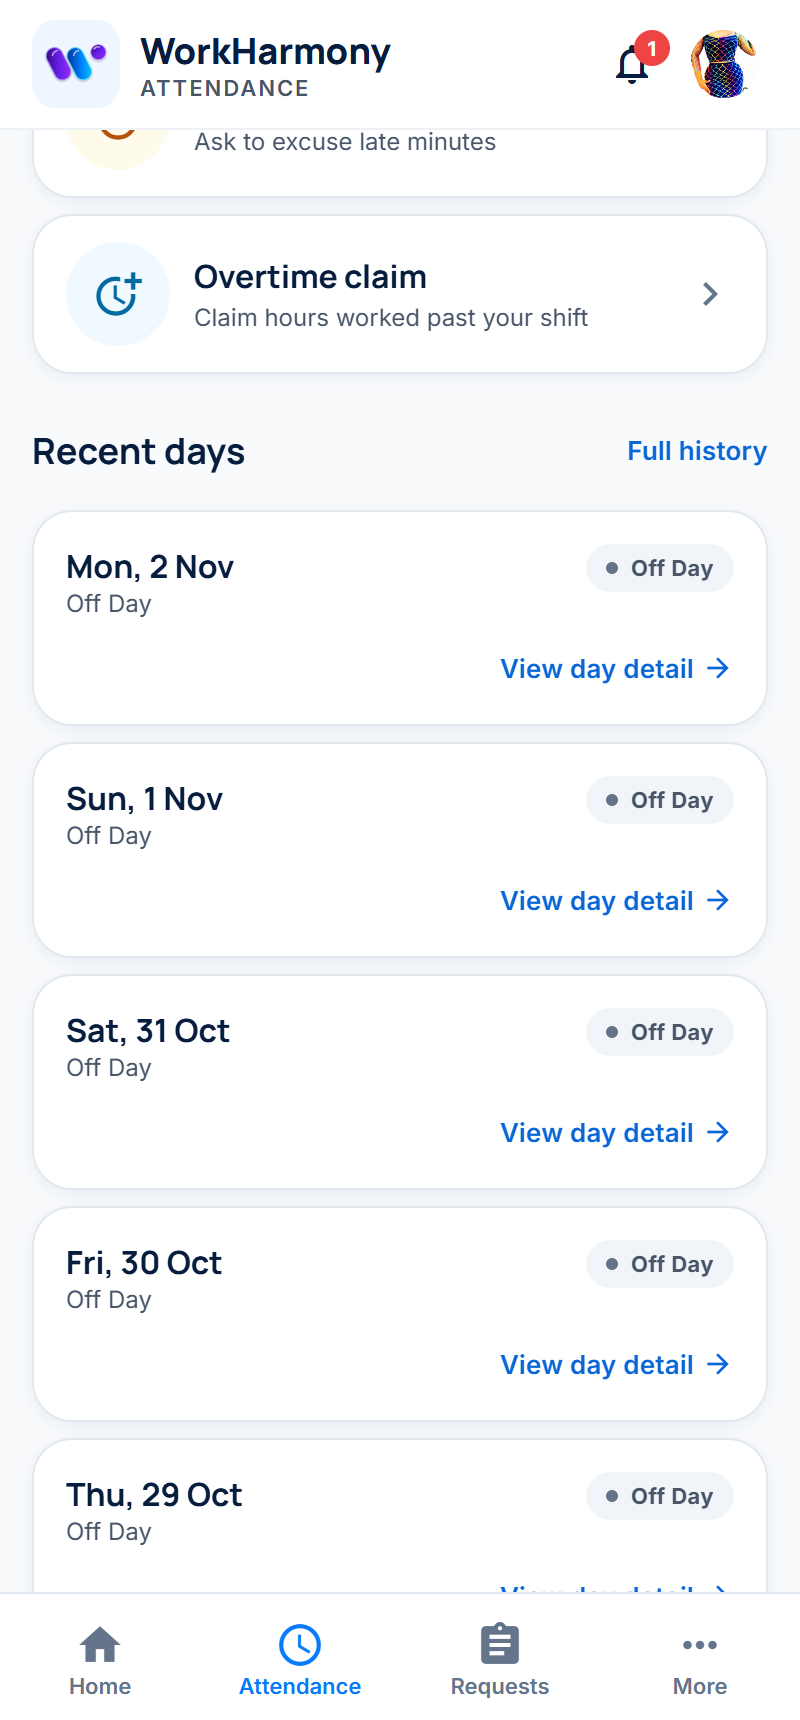
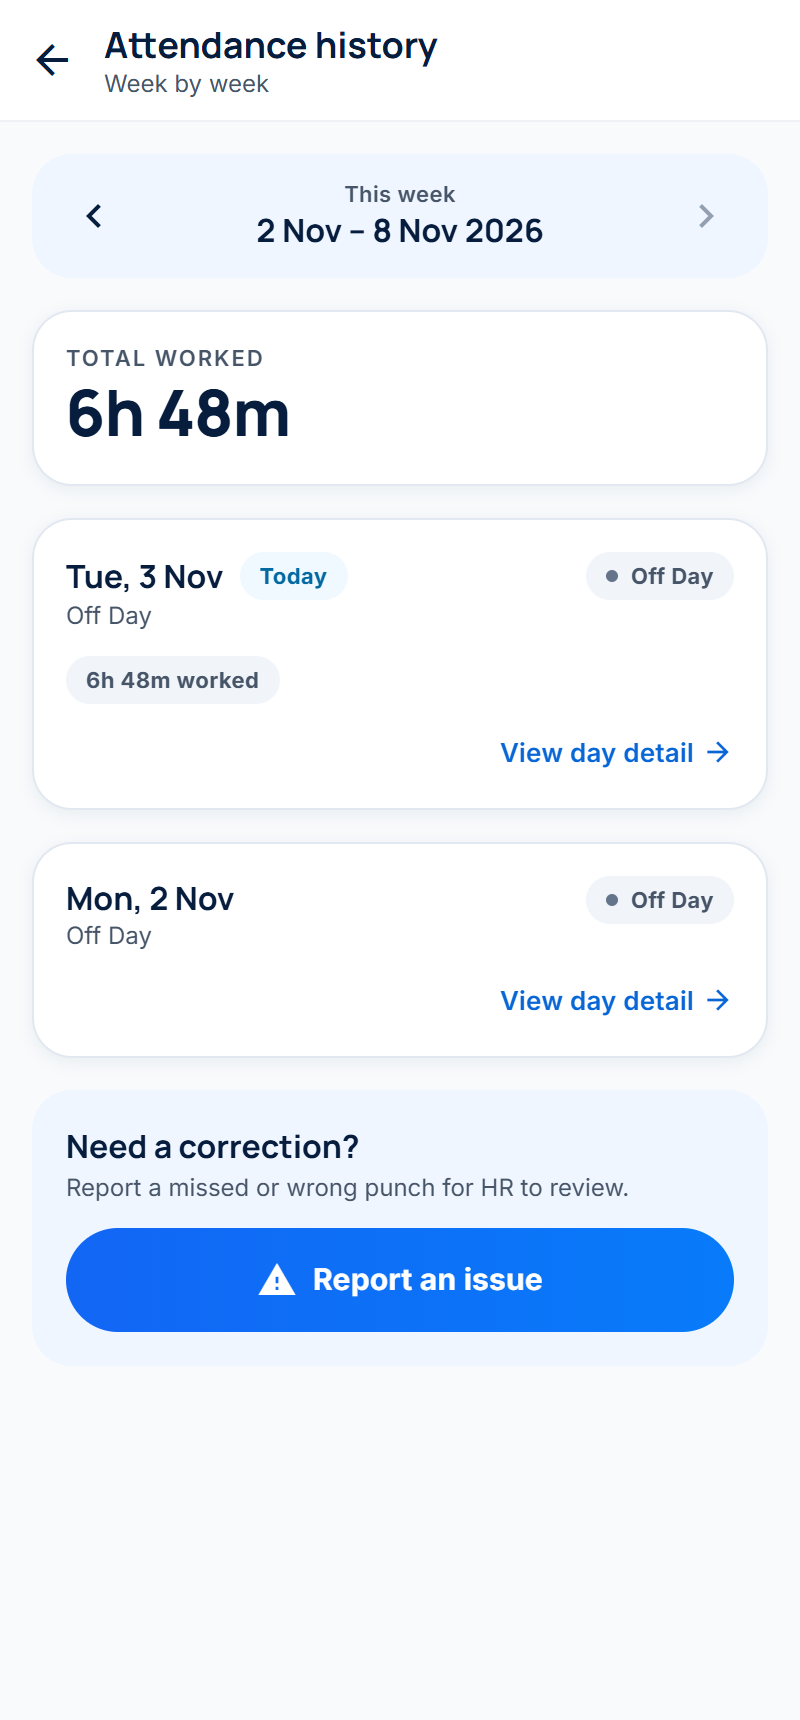
In Attendance history, use the arrows to move between weeks. The card at the top shows the total hours worked that week. Report an issue at the bottom opens the missed-clocking form.
5.3 Requests
The Simple Requests tab is where every request starts.
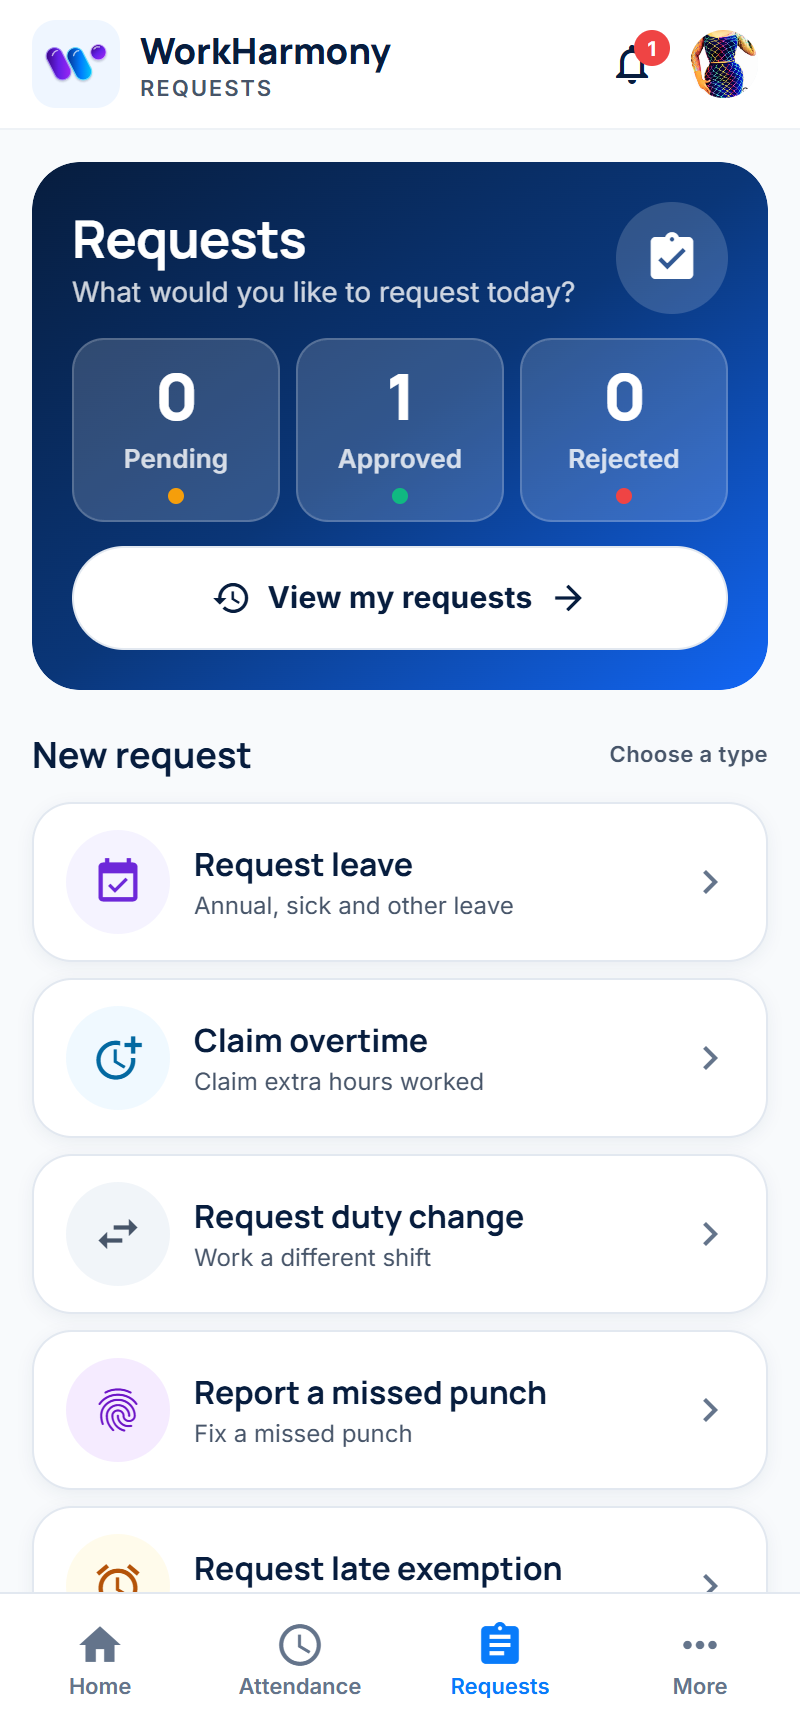
- The blue card at the top counts your requests that are Pending, Approved and Rejected. Tap a number, or View my requests, to see them.
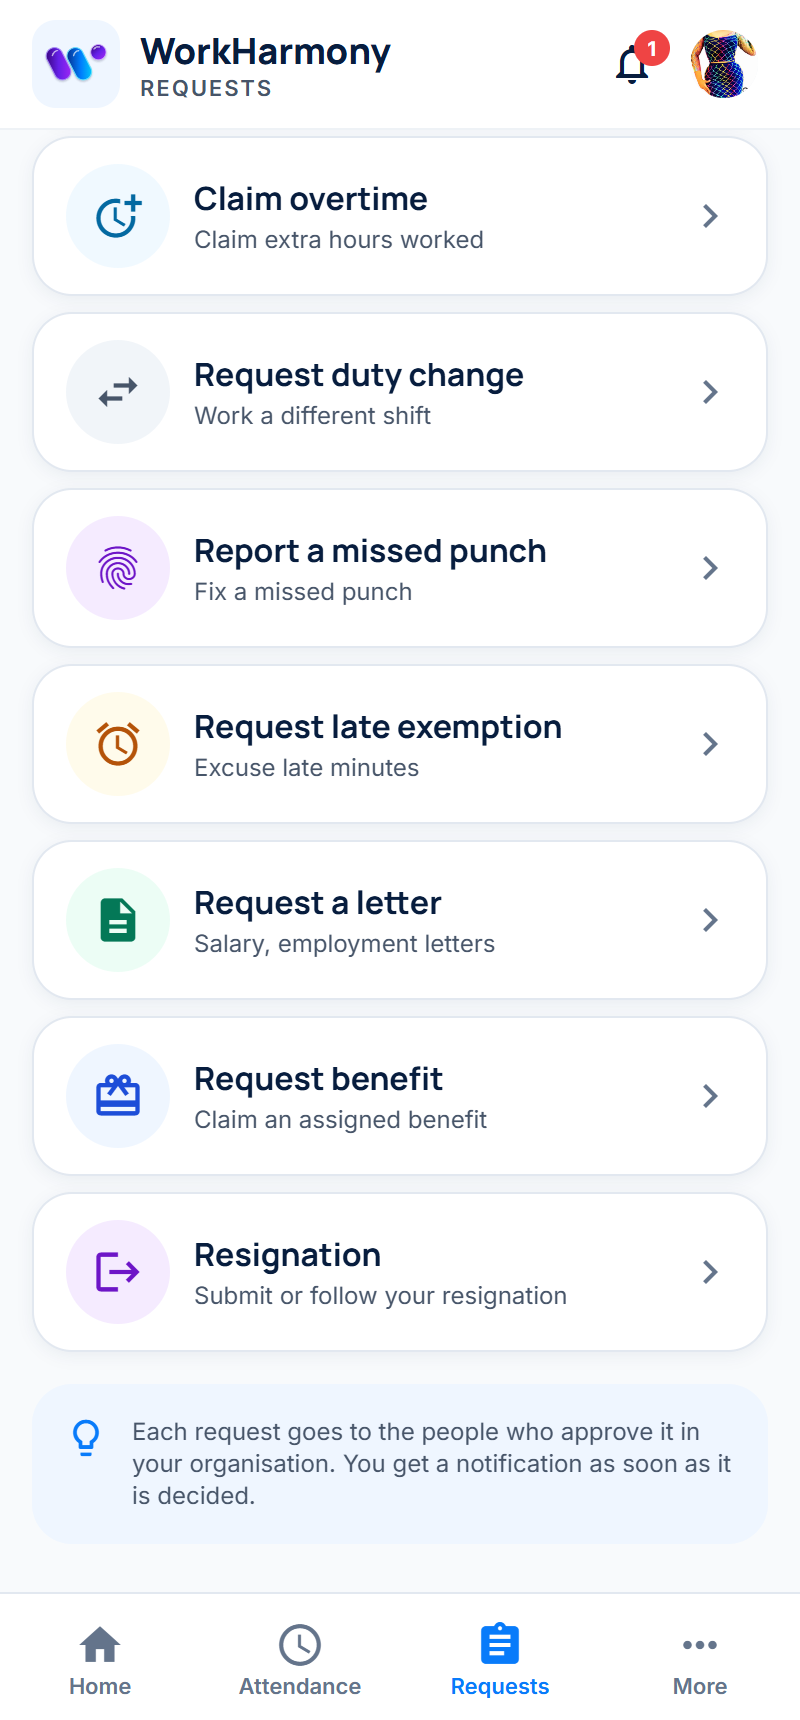
- New request lists every type you can ask for: leave, overtime, duty change, a missed punch, late exemption, a letter and a benefit. Tap one to open its form. The forms are the same as in Complete Mode (section 4.4).
My requests
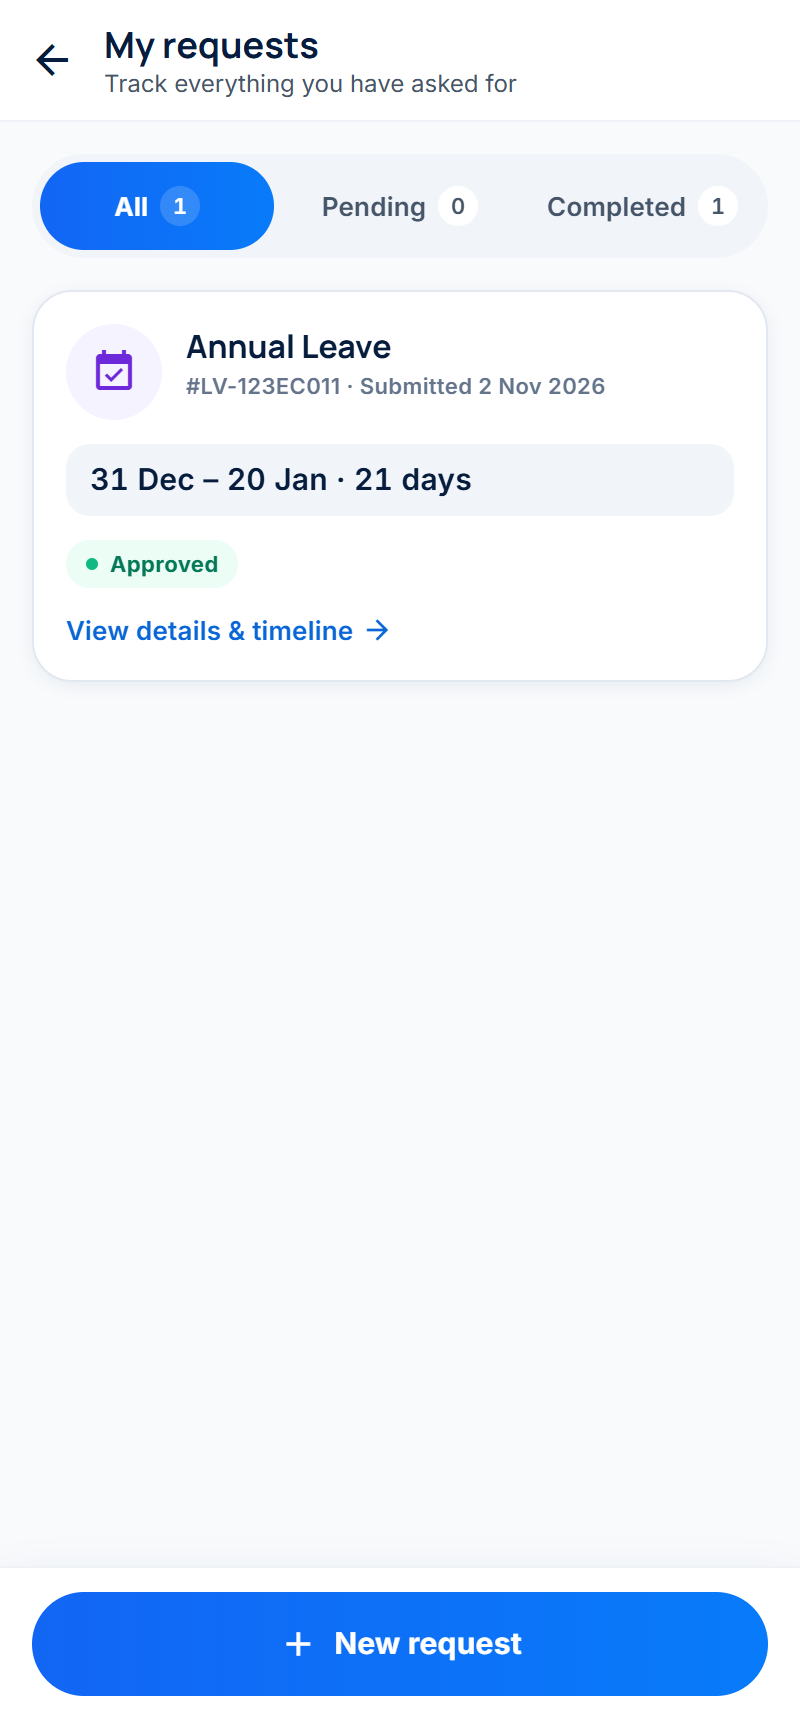
My requests shows every request you have made, newest first. Use All, Pending and Completed at the top to filter the list. Each request shows its type, reference, the date you sent it, the days it covers and its status. Tap View details & timeline to open it. New request at the bottom takes you back to the request types.
5.4 More
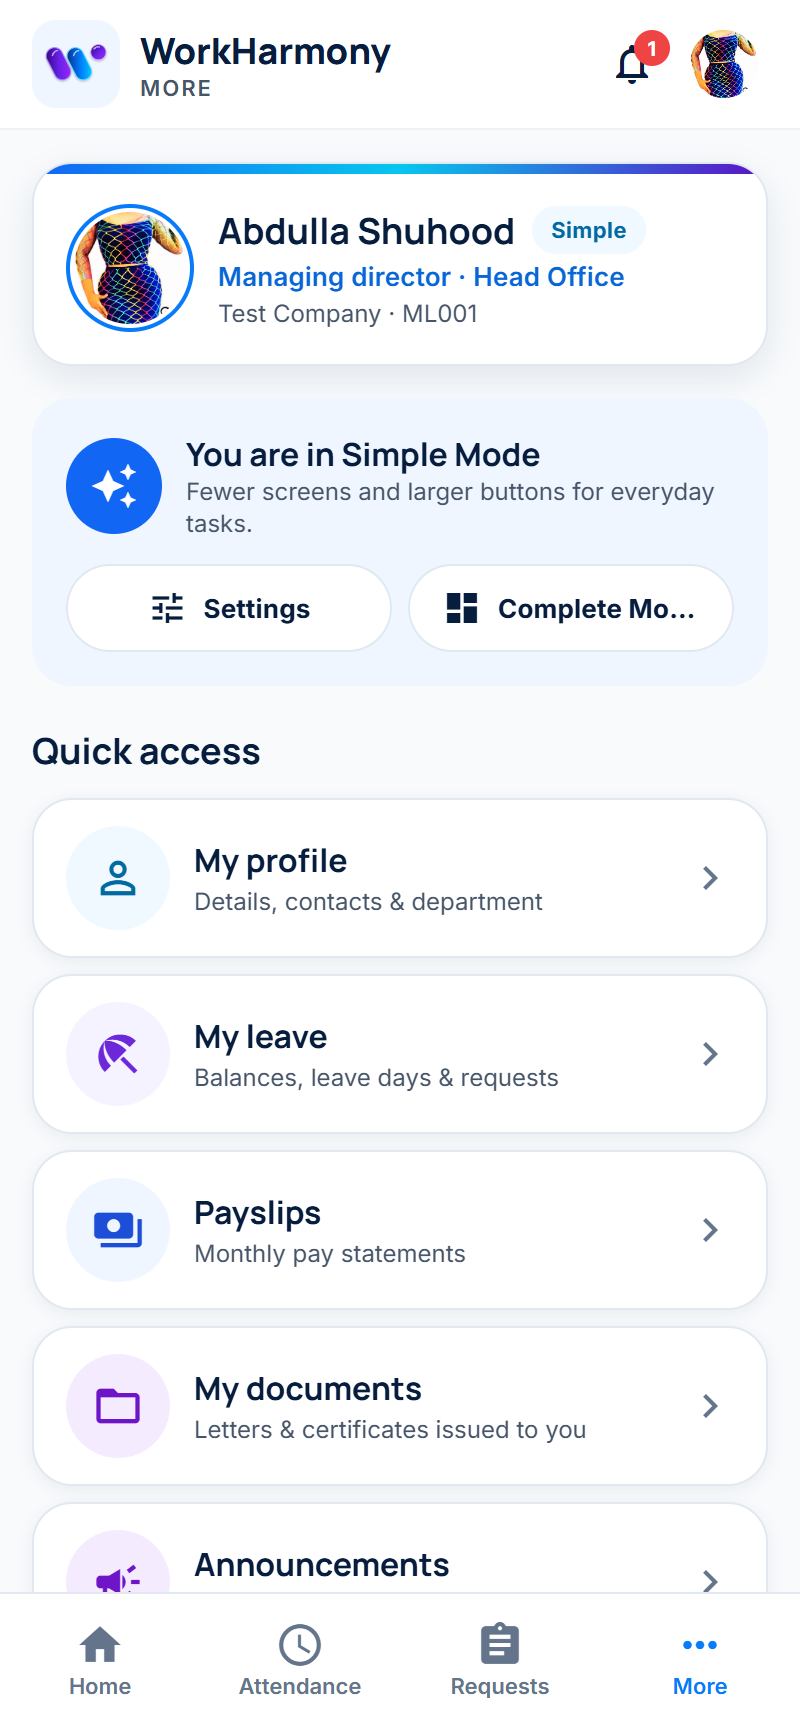
Simple More shows your profile card and a You are in Simple Mode panel with buttons for Settings and Complete Mode. Below it, large buttons open:
- My profile, My leave (balances and leave days), Payslips, My documents
- Announcements and Notifications
- Approvals, if you are a manager
- Company policies, if your company publishes them
- Tasks (or Directory)
- Settings
and Sign out at the bottom.
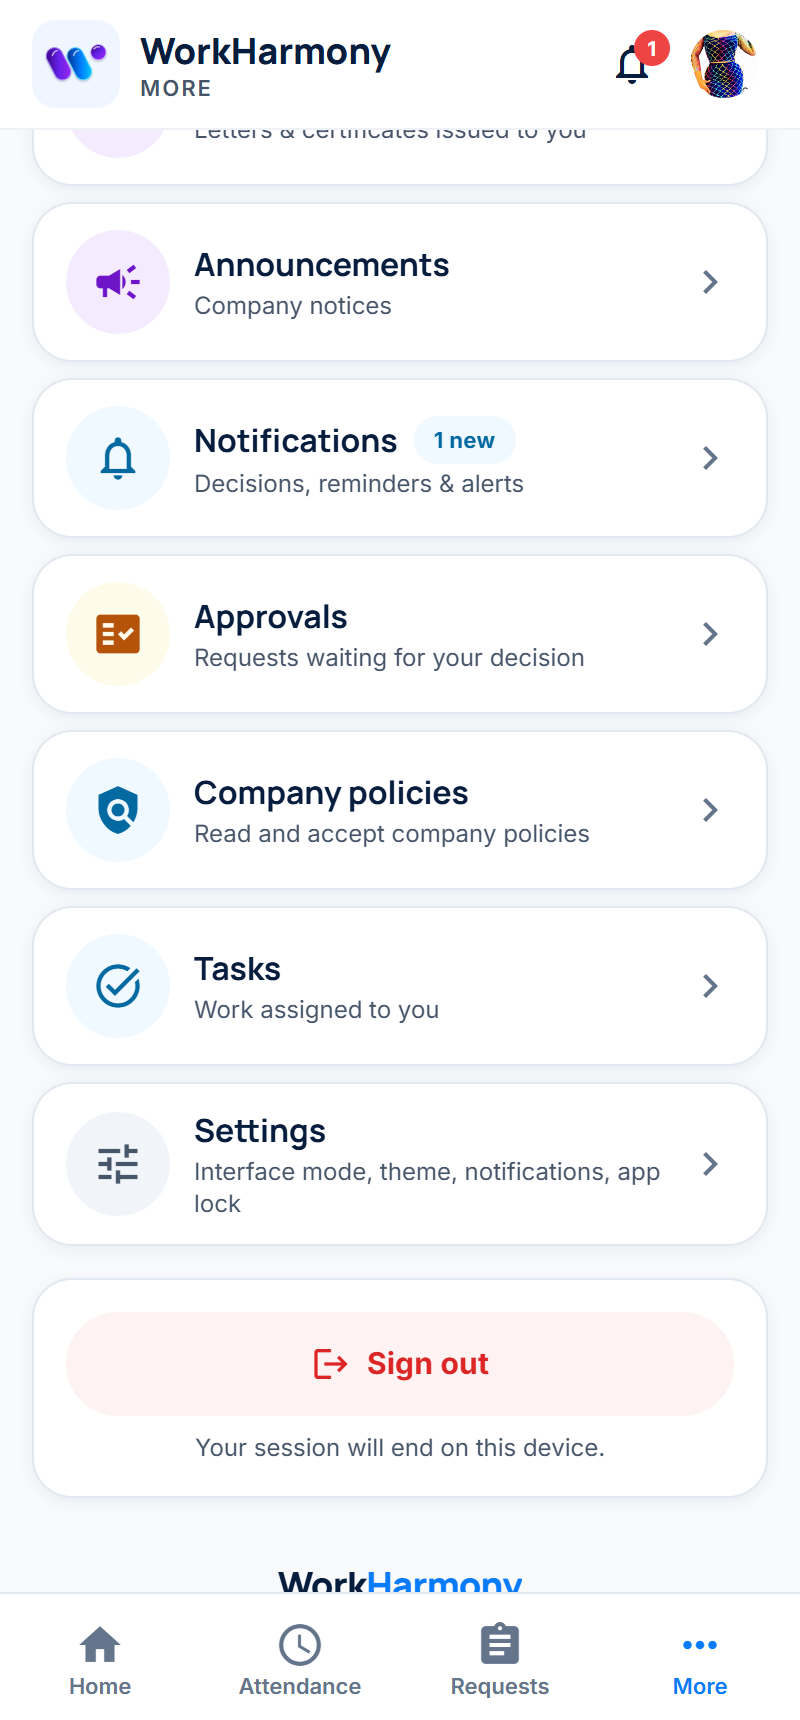
To go back to the full layout, tap Complete Mode on this screen, or choose it in Settings.
6. Settings and security
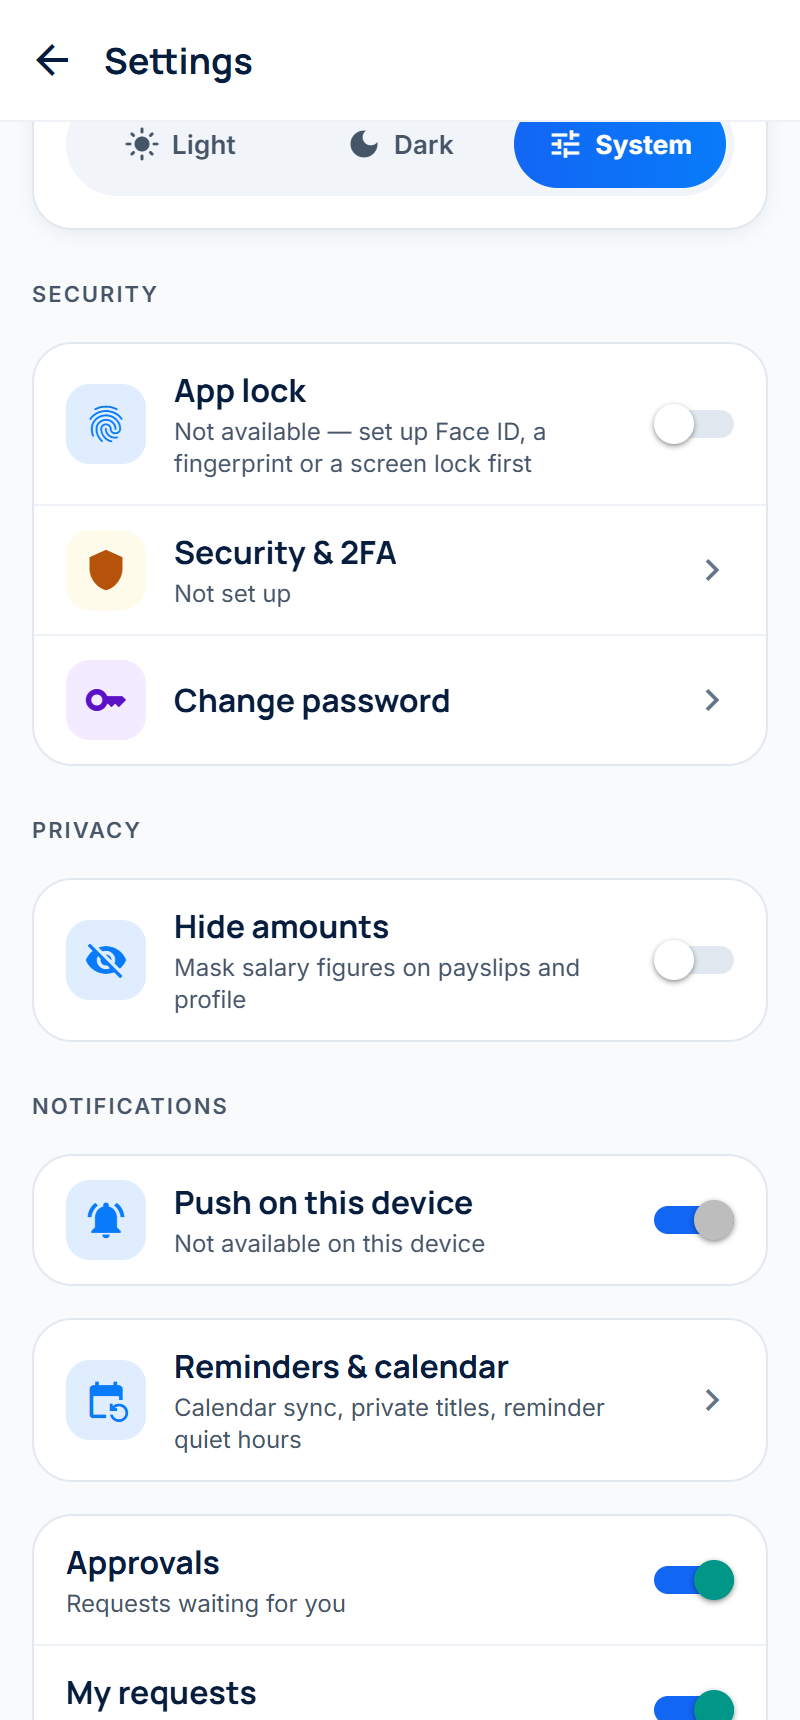
Open Settings from the More tab in either layout.
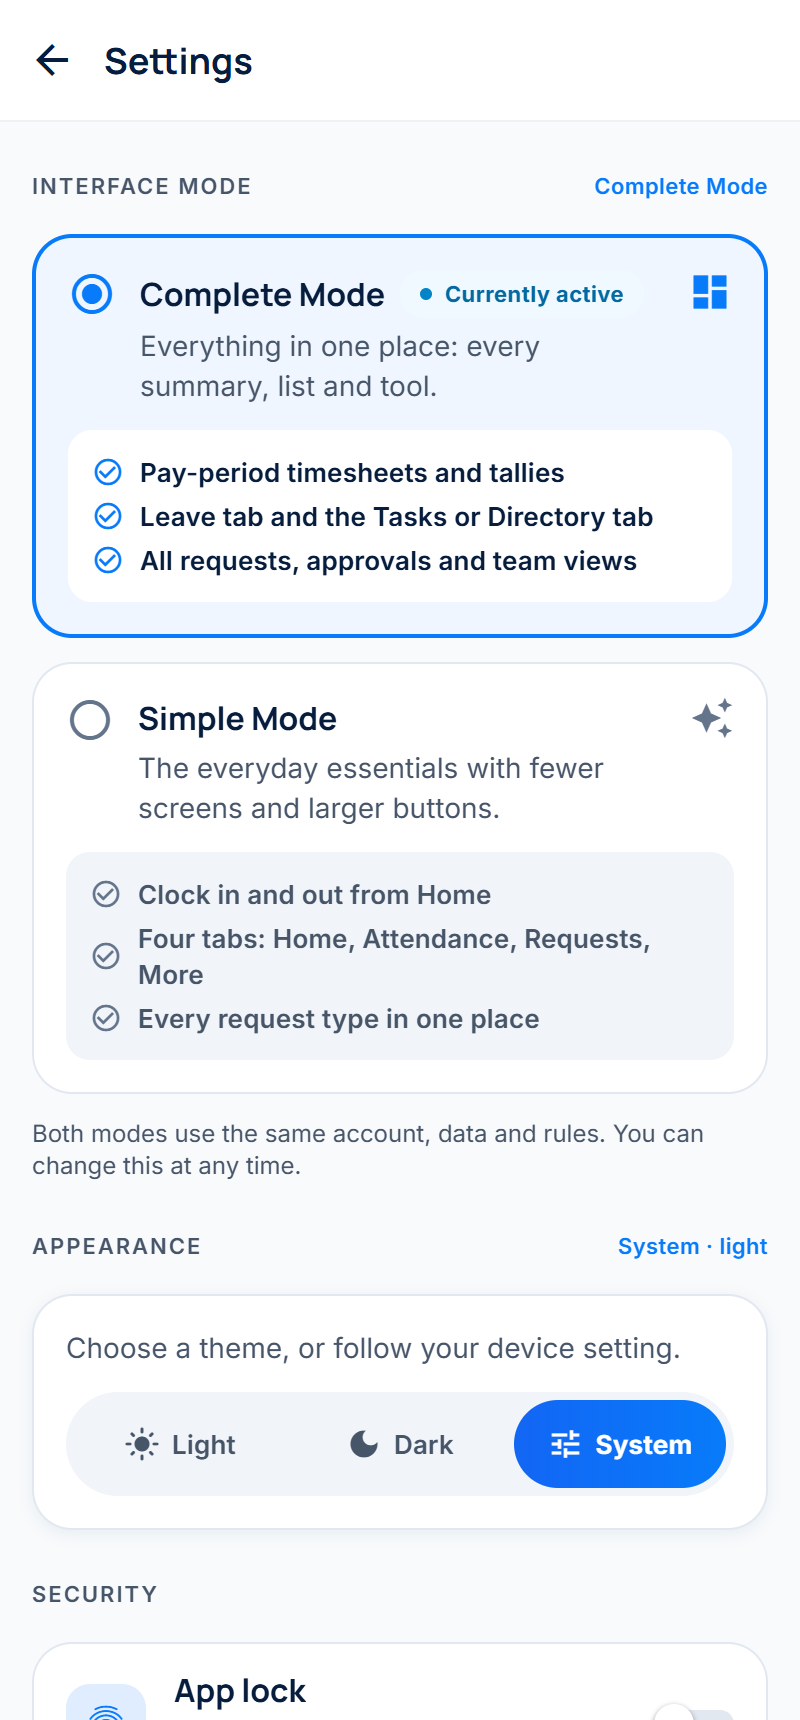
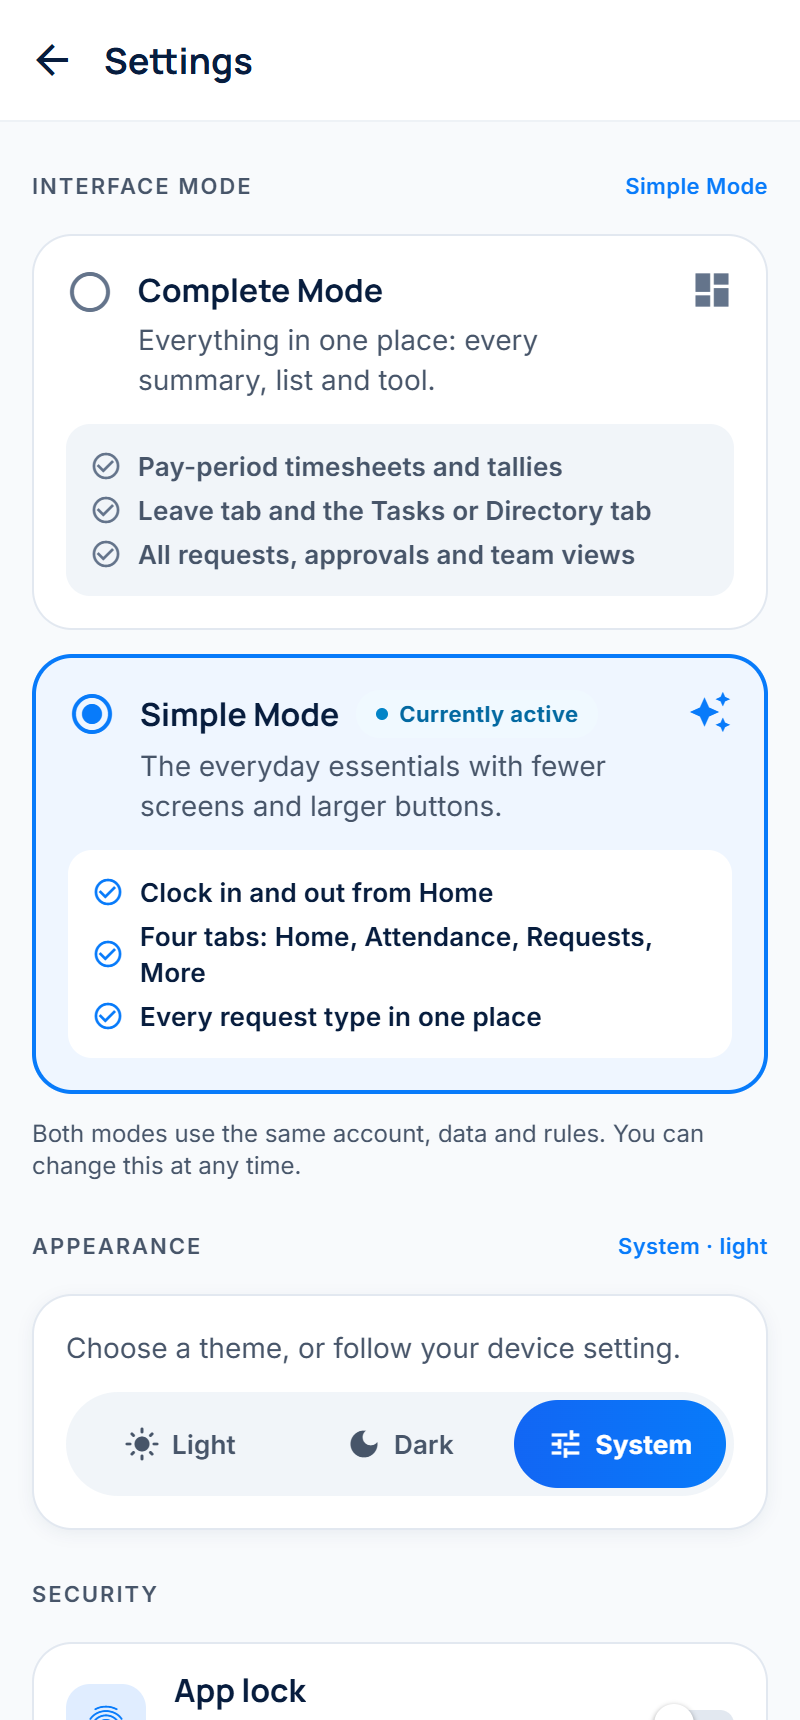
6.1 Interface mode
Choose Complete Mode or Simple Mode. The change is immediate, and the app remembers it on this phone. Your account, data and company rules are the same in both.
6.2 Appearance
Choose Light, Dark or System (follow the phone's own setting). The app looks the same in both modes in either theme.
6.3 App lock
Switch on App lock to unlock the app with Face ID, Touch ID or your fingerprint. The phone must have one of these set up first.
6.4 Security & 2FA
Two-factor authentication adds a second check when you sign in: a code from an authenticator app or a code sent by SMS. Open Security & 2FA to set it up or change it. Your company may require it.
6.5 Change password
Open Change password, enter your current password and then your new one twice. The new password must meet your company's rules, and you cannot reuse a recent password.
6.6 Privacy and notifications
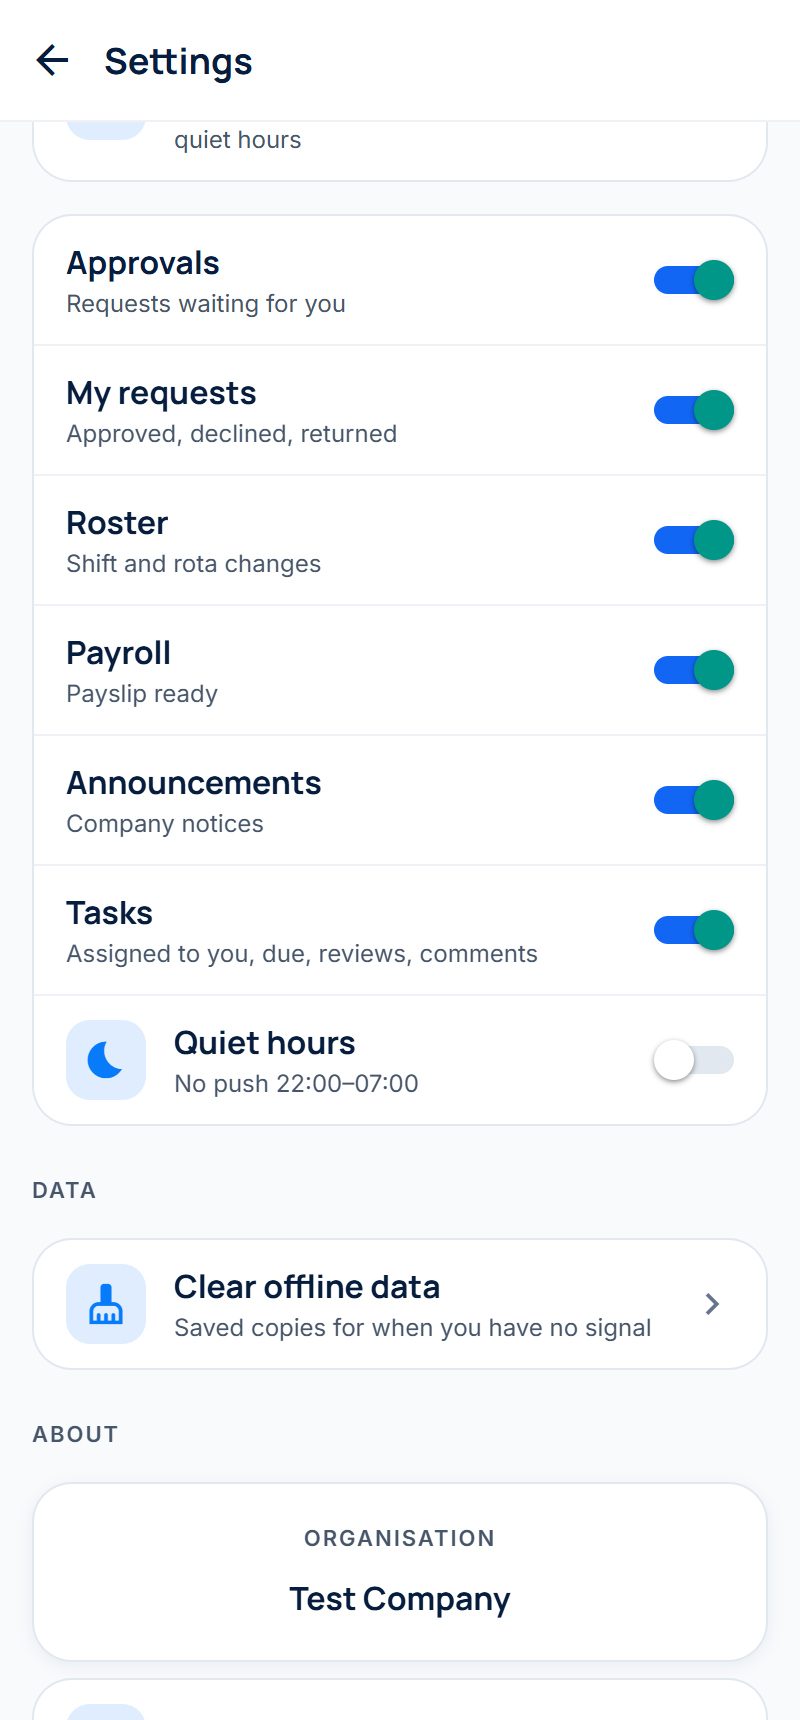
- Hide amounts masks salary figures on payslips and your profile, for when other people can see your screen.
- Push on this device turns notifications for this phone on or off. Below it you can choose which kinds of notification you receive (approvals, your requests, roster, payroll, announcements, tasks) and set Quiet hours.
6.7 Data, about and sign out
- Clear offline data removes the information the app saved for when you have no signal. Nothing on the server changes.
- About shows your organisation and the app version.
- Sign out ends your session on this phone. Your company stays connected, so next time you only need to sign in.
7. Troubleshooting
| What you see | What to do |
|---|---|
| "This QR code is not a WorkHarmony company code" or "No QR code found in this photo" | Use the QR code HR gave you, or tap Enter Code and type the company code |
| The company code is not found | Check the code with HR. Codes use letters, numbers and dashes only |
| "We could not find an employee with that code" | Check your employee code on your badge or payslip, or ask HR |
| "That mobile number does not match our records" | Use the number HR has on your record, or ask HR to update it |
| "An account already exists for this employee" | You have registered before. Tap Sign in instead. If you have forgotten your password, use Forgot password? |
| "Text messages aren't set up yet" | Your company has not switched on SMS for the app. Contact HR |
| The SMS code does not arrive | Wait for the countdown and tap Resend. Check that the phone has signal |
| The clock button is greyed out | You may be too far from your workplace. The card says how far and in which direction |
| Check again instead of a clock button | Today's information could not be loaded. Check your connection and tap Check again |
| No clock button at all | You may be on leave, your shift may be complete, or your company records attendance only on its devices |
| A request type is missing | Your company may not use it, or it may not apply to you. Ask HR |
| You want the other layout | More › Settings › Interface mode |
Signed in to WorkHarmony? The same guide is in your workspace under Help.